
User manual


6
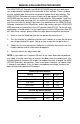
How to Connect the HDMI CAT5 4X Extender
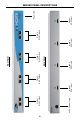
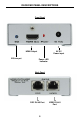
Connect your sources (up to four) to the HDMI CAT5 4X Extender unit’s 1.
HDMI inputs using the supplied HDMI cables.
Connect your displays (up to four) to the HDMI CAT5 MSR receiver unit’s 2.
HDMI outputs using user supplied HDMI cables.
Connect both CAT-5, CAT-5e or CAT-6 cables (DDC and Video) between 3.
the HDMI CAT5 4X Extender and each HDMI CAT5 MSR receiver.
NOTE: If fi eld terminating network cable, please adhere to the TIA/EIA-568-B
standard. Please see page 9 for more information.
Plug the 24V power supply into the HDMI CAT5 4X Extender sender.4.
NOTE: In most scenarios, the 5V DC external power supply for the receiving
units will not be required. Operational power is supplied by the sending unit via
the connected DDC CAT-5, CAT-5e or CAT6 cable. If the power LED indicator on
the receiving units are not on, please check to make sure that the RJ-45 cables
are not crossed (DDC to video and video to DDC) or the cable run exceeds 180
feet.
Power on the displays.5.
Power on the sources.6.
NOTE: If an image is not being shown on the display, please check all cabling for
proper connections and follow the steps outlined below and in the next section.
HDMI CAT5 4X EXTENDER CONFIGURATION
The HDMI CAT5 4X Extender and HDMI CAT5 MSR receivers have built-in auto
equalization that will automatically tune out any unwanted video noise. This
feature is reliable with premium cable runs up to a maximum of 130 feet. It may
be necessary to disable this feature if there is either no video being displayed on
initial start-up, there is video noise in the image, or the cable run exceeds 130
feet. First, verify that all the proper connections have been made and that all
devices are powered on before attempting to disable auto equalization. Please
follow the section on the next page to manually equalize the video signal.
CONNECTING AND OPERATING THE HDMI CAT5 4X EXTENDER