Digital Audio Switcher USER MANUAL www.gefen.
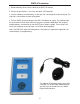
ASKING FOR ASSISTANCE Technical Support: Telephone (818) 884-6294 (800) 545-6900 Fax (818) 884-3108 Technical Support Hours: 9:00 AM to 5:00 PM Monday thru Friday. Write To: Gefen Inc. C/O Customer Service 6265 Variel Ave. Woodland Hills, CA 91367-9897 Notice Gefen Inc. reserves the right to make changes in the hardware, packaging and any accompanying documentation without prior written notice. 2x1 Digital Audio Switcher is a trademark of Gefen Inc. © 2005 Gefen Inc.
TABLE OF CONTENTS 1 Introduction 2 Features 3 Panel Descriptions 4 Connecting and Operating the 2x1 Digital Audio Switcher 5 RMT2-IR Installation 6 IR Extender Installation 7 Specifications 8 Warranty
INTRODUCTION Congratulations on your purchase of the ex•tend•it 2x1 Digital Audio Switcher. Your complete satisfaction is very important to us. Gefen’s line of HDTV switches, extenders, and splitters are designed to make your A/V equipment use more comfortable, more productive and less expensive. The 2x1 Digital Audio Switcher allows access to multiple Digital Audio devices, using a single Digital Audio reciever.
FEATURES Features • Switches easily between any two Digital Audio sources • Optional RMT-2 remote control • TOSLINK cables are used to connect the TOSLINK inputs and 2x1 TOSLINK Digital Audio Switcher output • SPDIF cables are used to connect the SPDIF inputs and 2x1 SPDIF Digital Audio Switcher output • Installs in seconds Includes: 2x 6’ TOSlink cables 5VDC Power Supply RMT2-IR The 2x1 Digital Audio Switcher 2
PANEL DESCRIPTIONS Indicates if port 1 or port 2 is selected Connects to IR extender Selects port 1 or port 2 IR eye SPDIF 1 Connects to 5VDC power supply SPDIF 2 OPT 1 SPDIF Out 3 OPT 2 Optical Out
Connecting and Operating the 2x1 Digital Audio Switcher How to Connect the 2x1 Digital Audio Switcher to your devices 1 Connect the digital audio cables from your devices into the 2x1 Digital Audio Switcher inputs. 2 Connect your digital audio receiver to the 2x1 Digital Audio Switcher output. 3 Input 1 and 2 can either be S/PDIF or TOSlink, not both. 4 Regardless of the input type the output can be both S/PDIF and TOSlink. 5 Plug the 5VDC power supply into the 2x1 Digital Audio Switcher.
RMT2-IR Installation 1. Remove battery cover from the back of the RMT2-IR remote. 2. Verify that dip switches 1 & 2 are in the down (OFF) position. 3. Insert the battery, hold the battery so that you can see the positive side facing up. The side that is not marked must be facing down. 4. Test the RMT2-IR remote by pressing ONLY one button at a time. The indicator light on the remote will flash once each time you press a button.
IR Extender Instructions How to Connect the IR Extender to the 2x1 Digital Audio Switcher 1 Open the unit so the circuit board below is accessible.
SPECIFICATIONS Input/Output Connector Type .............................................................S/PDIF and TOSlink S/PDIF (Digital coax) performance .........................................................................96 kHz Power Consumption ................................................................................ 15 Watts (max.) Power Supply .......................................................................................................... 5VDC Dimensions .......................
WARRANTY Gefen Inc. warrants the equipment it manufactures to be free from defects in material and workmanship. If equipment fails because of such defects and Gefen Inc. is notified within one (1) year from the date of shipment, Gefen Inc. will, at its option, repair or replace the equipment, provided that the equipment has not been subjected to mechanical, electrical, or other abuse or modifications.
*ma-dviaud-241* 6265 Variel Avenue Woodland Hills, CA 91367 1-800-545-6900 818-884-6294 fax: 818-884-3108 www.gefen.com gsinfo@gefen.