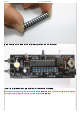
2020/12/17 Voice clock installation tutorial Voice clock installation tutorial-installation step 2 Installation Step 1 Installation Step 2 Operation Instructions and Schematic Diagram Install the chip. The chips have directions, and each chip has a notch mark. pay attention 8-pin voice IC (NY3P03) is the same as 8-pin clock IC (DS1302) Don't install it in the wrong position, you can burn DS1302 if you install it wrong. www.diyleyuan.com/JC/HJ10-0-1.
020/12/17 Voice clock installation tutorial Bend the chip on the table a little bit for easy insertion into the IC socket. Install the integrated circuit, pay attention to the direction of the gap. As shown in the picture above, the left side is the voice IC (NY3P03), which is close to the LED light; the middle is the single-chip microcomputer, and the right side is the clock IC (DS1302). www.diyleyuan.com/JC/HJ10-0-1.
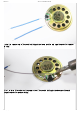
2020/12/17 Voice clock installation tutorial Install the speaker cable. [No need to distinguish between positive and negative poles for speaker wiring] First, solder a little solder on the copper sheet. [No need to distinguish between positive and negative poles for speaker wiring] www.diyleyuan.com/JC/HJ10-0-1.
2020/12/17 Voice clock installation tutorial Solder the wires. [No need to distinguish between positive and negative poles for speaker wiring] Solder a little solder on the position of www.diyleyuan.com/JC/HJ10-0-1.
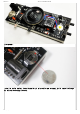
2020/12/17 Voice clock installation tutorial the speaker. Install the button battery, the button battery is not used for power supply, just to make the time go on without reclocking the clock. www.diyleyuan.com/JC/HJ10-0-1.
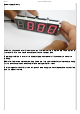
2020/12/17 Voice clock installation tutorial Installed battery After checking that all components and integrated circuits are correct, use the USB cable to supply power. Note that the power supply is 5V. The power supply cannot be greater than 5V. If it is too large, burn the chip and it cannot be powered by the router. Just use a mobile phone charger to supply power. If you use a power bank for power supply, you cannot use a power bank with automatic power-off protection.
2020/12/17 power supply directly. Voice clock installation tutorial Power on, you need to reset it to work normally. The reset method is to press and hold 3 buttons at the same time for more than 5 seconds, and then it will display 12.00. Regarding the failure to reset, or the display of garbled characters, it is necessary to check the welding. 99% of all failures are caused by welding. Please don't say mine is definitely not caused by welding.
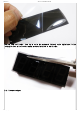
2020/12/17 Voice clock installation tutorial To reset the clock successfully, the next step is to install the shell and set the time. Install the film, the function of the film is to make the color of the digital tube softer. www.diyleyuan.com/JC/HJ10-0-1.
2020/12/17 Voice clock installation tutorial Tear off the film of the film, there is glue on the film, and paste it directly on the digital tube. It's like looking for the mouth of scotch tape, please don't ask how to tear this film. Trim the excess edges. www.diyleyuan.com/JC/HJ10-0-1.
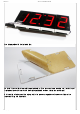
2020/12/17 Voice clock installation tutorial The display effect of the installed film. To install the shell, first tear off the protective film. (The boss sent me a wooden shell, which is not transparent, does not match the description, and bad reviews. Haha, I am also drunk) DIY is a kind of enjoyment, the enjoyment is the process, regardless of success or failure, the important thing is a kind spirit. www.diyleyuan.com/JC/HJ10-0-1.
2020/12/17 Voice clock installation tutorial Prepare the shell material. Note that it is made of acrylic material, which is relatively brittle and cannot be used as hard as it is. www.diyleyuan.com/JC/HJ10-0-1.
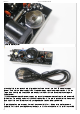
2020/12/17 Voice clock installation tutorial Put some foam or soft paper between the speakers. www.diyleyuan.com/JC/HJ10-0-1.
2020/12/17 Voice clock installation tutorial Install the screws. The www.diyleyuan.com/JC/HJ10-0-1.
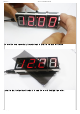
2020/12/17 Voice clock installation tutorial installation is complete. Did your production succeed? Display time www.diyleyuan.com/JC/HJ10-0-1.
2020/12/17 Voice clock installation tutorial Display temperature Display date www.diyleyuan.com/JC/HJ10-0-1.
2020/12/17 Voice clock installation tutorial Display day of the week Long press the voice button to turn on the night light. Press again to turn off the night light. Installation Step 1 Installation Step 2 Operation Instructions and Schematic Diagram www.diyleyuan.com/JC/HJ10-0-1.
2020/12/17 www.diyleyuan.com/JC/HJ10-0-1.