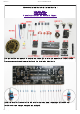
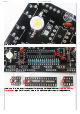
2020/12/17 Voice clock installation tutorial Voice clock installation tutorial-installation step 1 Installation Step 1 Installation Step 2 Operation Instructions and Schematic Diagram The name of the components to be installed, triode, LED, electrolytic capacitor, IC holder, triode. These components need to pay attention to the installation direction to install the resistor. The color of the 10K resistor is brown, black, red, and gold. The 330 ohm resistor colors are orange, orange, black, and gold.
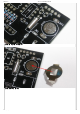
020/12/17 Voice clock installation tutorial Installed resistors. Install the crystal oscillator, the crystal oscillator is installed downside down, there is no polarity, the welding temperature should not be too high , it is easy to damage the crystal oscillator. www.diyleyuan.com/JC/HJ11.
2020/12/17 Voice clock installation tutorial Installed crystal oscillator Install battery button www.diyleyuan.com/JC/HJ11.
2020/12/17 Voice clock installation tutorial Installed battery button Install 22P ceramic capacitor, the ceramic capacitor has no polarity. www.diyleyuan.com/JC/HJ11.
2020/12/17 Voice clock installation tutorial Installed 22p ceramic capacitor Install 104P ceramic capacitor. 104P is the www.diyleyuan.com/JC/HJ11.
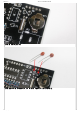
2020/12/17 Voice clock installation tutorial 104 ceramic capacitor installed with 0.1uF. Install the LED. The LED is marked with positive and negative. There is a "-" mark on the LED pin. This direction is the negative. www.diyleyuan.com/JC/HJ11.
2020/12/17 Voice clock installation tutorial The installed LED installs the IC holder, which is convenient for removing the integrated circuit. There is a notch on the IC socket, align it with the notch mark on the circuit board, as shown in the figure above. www.diyleyuan.com/JC/HJ11.
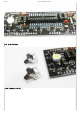
2020/12/17 Voice clock installation tutorial Installed IC holder. Pay attention to the gap sign. Install 8550 triode, the triode has direction. The installation height and direction are shown in the figure below. www.diyleyuan.com/JC/HJ11.
2020/12/17 Voice clock installation tutorial Install the triode. The installed triode. www.diyleyuan.com/JC/HJ11.
2020/12/17 Voice clock installation tutorial The installed triode. Install side push switch www.diyleyuan.com/JC/HJ11.
2020/12/17 Voice clock installation tutorial Installed side push switch, these two are set time. Install the side switch. This is the switch for playing voice and turning on the night light. www.diyleyuan.com/JC/HJ11.
2020/12/17 Voice clock installation tutorial The installed side push switch. Install 5V power supply base, DC005 www.diyleyuan.com/JC/HJ11.
2020/12/17 Voice clock installation tutorial installed base . Install the photoresistor, the photoresistor has no positive and negative poles. www.diyleyuan.com/JC/HJ11.
2020/12/17 Voice clock installation tutorial The welding temperature of the photoresistor should not be too high, which may damage the photoresistor. The height shown above. After soldering, bend the photoresistor 90 degrees to facilitate the detection of light. www.diyleyuan.com/JC/HJ11.
2020/12/17 Voice clock installation tutorial Install the thermistor, the thermal point has no positive and negative poles. Installed thermistor. The thermistor can easily reach out of the case to measure the ambient temperature. www.diyleyuan.com/JC/HJ11.
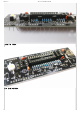
2020/12/17 Voice clock installation tutorial Install the electrolytic capacitor, the long leg is positive, the short leg is negative, and the short leg is facing the position with shadow on the circuit board. As marked above. After installing the basic components of the installed electrolytic capacitor , check whether there is any installation error or missing installation! ! ! ! www.diyleyuan.com/JC/HJ11.
2020/12/17 Voice clock installation tutorial All solder joints must be qualified, and there must be no dirt (including rosin residue, especially next to the crystal oscillator, solder paste cannot be used, and the clock time for solder paste soldering does not run or is not allowed). Check for short circuits, open circuits, If there is no false welding, make sure there is no problem before installing the digital tube. www.diyleyuan.com/JC/HJ11.
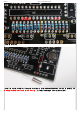
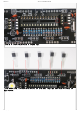
2020/12/17 Voice clock installation tutorial Install the nixie tube, the third nixie tube needs to be installed upside down, don't install it wrong, it's easy to install it, and it will be troublesome to get it down. The effect of the installed digital tube. www.diyleyuan.com/JC/HJ11.
2020/12/17 Voice clock installation tutorial After confirming that there is no error, solder the pins of the digital tube. Installation Step 1 Installation Step 2 Operation Instructions and Schematic Diagram www.diyleyuan.com/JC/HJ11.