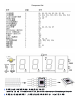
Voice clock installation tutorial-operating instructions and schematics ⚠特别注意:语⾳芯⽚(NY3P035)与时钟芯⽚(DS1302)不能装错位置,否则烧坏DS1302! Special attention: The voice chip (NY3P035) and the clock chip (DS1302) cannot be installed in the wrong position, otherwise the DS1302 will be burned out!
1. 先安装10k 和 330欧姆的电阻器,电阻器没有正负极之分 Install the 10k and 330 ohm resistors first, the resistors have no positive and negative poles 2. 安装晶振(晶振要卧倒安装);再安装2个22P 瓷⽚电容和3个104(0.
Install the crystal oscillator (the crystal oscillator should be installed lying down); then install two 22P ceramic capacitors and three 104 (0.1uF) ceramic capacitors 3. 安装纽扣电池扣:电池扣的开⼝朝外,⽅便安装电池。然后安装发光⼆级管,发光⼆极管的引脚上 ⾯标有 — 标志的为负极 Install the button battery button: The opening of the battery button faces outwards for easy installation of the battery. Then install the light-emitting diode, the pin of the light-emitting diode is marked — the negative pole 4.
Finally, plug in the IC and install the button battery (the button battery is only for memory time when the power is turned off, not for clock power supply). Power the clock with a power bank or mobile phone charger (5v) 12. 复位:同时按住3个按键5秒,这时显⽰12:00,复位成功。(默认是关闭了语⾳和闹钟功能) Reset: Press and hold 3 buttons at the same time for 5 seconds, then 12:00 is displayed, and the reset is successful. (The default is to turn off the voice and alarm functions) 13.
g. 设置整点报时是否打开:再按⼀下功能键(所有的数字显⽰不动),按加按键,“点3”亮(整 点报时打开),“点3”灭(则关闭) Set whether the hourly timekeeping is on or not: press the function key again (all digits are not displayed), press the plus button, "point 3" is on (the hourly timekeeping is on), and "point 3" is off (to close) h. 按功能键退出,设定完成 Press the function key to exit, the setting is complete 14.
Light control function: when the light is dark at night, the digital tube will automatically dim; when the light is strong, the digital tube will become brighter. If the photoresistor is shortcircuited, the digital tube can keep on 17. 数码管贴膜,贴膜⾃带⼀层胶,将贴膜撕开,贴在4个数码管上,将多余的边剪掉,贴膜后的显⽰ 效果会更好⼀些 Digital tube film, the film comes with a layer of glue, tear off the film, stick it on the 4 digital tubes, cut off the excess edges, the display effect after the film will be better 18.