
Installation guide


Installation
Buill-I_ Speedcook Ove_,_
Step
Relllo_Je
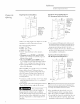
Packagng
and Parts
• Open tile door and remove packing material
with ceramic tray.
• Locate owners kit in carton. Remove and
save.
• Locate box with metal trays in carton.
Remove and save.
• Locate parts package containing 5 motmting
screws. (4 required, 1 extra)
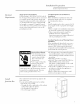
IMPORTANT: To protect tile bottom trim, do
not remo_e tile stvrotoam shipping base tmtil
tile oxen is slipped into tile opening.
Route
Conduit
Through
Cutout
2 people are required
to lift tile oven into tile opening. Grasp tile
l)()ttom at fl'ont and rear. Discard stvrofoan_
base, DO NOT USE HANDLE TO LIbW
THE OVEN, DAMAGE WILL OCCUR!
With oven in fl'ont of the cabinet opening:
• Insert conduit into cabinet opening.
• Lift tile oven into tile opening while
continuing to teecl tile conduit in tile
direction of the installecljtmction box.
Be sm'e the conduit does not get pinched
between tile back of tile oven and tile
cabinet wall.
ShippingBase
_'eculg
Oz)en
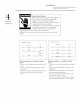
to Cabinet
• Slide oven into tile cabinet opening.
• Drill 3/32" pilot holes into tile cabinet fl'ame
through tile 4 motmting holes in tile oven
fl'ont fi'ame.
• Secm'e oven to cabinet with screws supplied.
Sectlrelv f_lsten ()veil to
cabinet using tile screws provided. Failure
to do so could catlse tile oven to iilove oi"
tip dm'ing use and result in personal ii_.jur>
/
[
ttachment
SecureOvenToCabinet
With ScrewsProvided