Installation I struct" n Advantium Built-ln Ovens PSB1200 PSB1201 ZSC1201 ZSC1202 For a Spanish version of this manual, visit our Website at ge.com. Para cons@tar una version en espaflol de este manual de instrucciones, visite nuestro sitiode internet ge.com.
Safety Information BEFORE YOU BEGIN Read these instructions completely CONTENTS and carefully. IN PORTANT- Save these instructions for local inspector's use. IM PORTANT-Observe ollgoverning codes ond ordinonces. • Note to InstallerBe sure to leave these instructions with the Consumer. • Note to ConsumerKeep these instructions with gour Owner's Honuol for future reference. • Skill LevelInstollotion of this opplionce requires bosic mechonical and electrical skills. • Completion Time - 1 Hour.
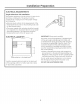
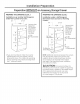
Design Information PRODUCT DIMENSIONS AND CLEARANCES NOTE: Appearance _21-1/2" will vary by model. 29-3/4" 1-1/8" LJ __ / m 1 19" \ 13/16" _ 5/8" TOOLS AND PARTS REQUIRED (NOT SUPPLIED} • #2 Phillips screwdriver • Hand-held drill • • • High speed drill bit, 3/32" diameter 3/8" slot-head screwdriver Level I Saw • 2 x 4 or 2 x 2 lumber for installing runners or 3/8" plgwood for floor (if required) Wood screws or other hardware for installing runner or shelf to support oven (if required) Sa
Installation Preparation ELECTRICAL REQUIREMENTS Single Advantium 120 Installation: This product requires a 120-volt, 60 Hz, 1S-amp circuit and draws 1.8 kilowatts. This product must be connected to a supply circuit of the proper voltage and frequency. • Wire size must conform to the requirements of the National Electrical Code or the prevailing local code for this kilowatt rating. • The power supply cord and plug should be brought to a separate 15 or 20 ampere branch circuit single grounded receptacle.
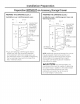
Installation Preparation PreparationWITHOUTan AccessoryStorage Drawer PREPARE THE OPENING PREPARE THE OPENING {cont.) The Advantium Installation over a GE/Monogram Warming Drawer: 120V can be installed in combination with other GE/Monogrom oppliances. AlwoLIs follow eoch product's Installotion Instructions to complete the installation. Single Advantium 23-1/2" 120V Installation: Order a 30" wide single oven cobinet or cut the opening in a wall to the dimensions shown.
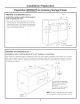
Installation Preparation PreparationWITHOUTan AccessorgStorageDrawer PREPARE THE OPENING {cont.) PREPARE THE OPENING Installationover a GE/Monogram Installation over a GE/Monogram Warming Drawer: oven: {cont.) Oven and 23-1/2" Construct Solid Bottom Min. 3/8" Plywood Supported by x4or2x2 Runners all Four Sides 17-1/2" ConstructSolid Bottom Min. 3/8" Plywood Supportedby _2x4or2x2 Runnersall FourSides 2" Min. (3" Recommended) 2" Min. (3" Recommended) Per Oven Requirement Per Oven Requirement Min.
Installation Preparation PreparationWITHOUTan AccessorgStorageDrawer PREPARE THE OPENING {cont.) PREPARE THE OPENING Installationover another GE/Monogram Under-the-Counter (UTC) oven: Installation Microwave Drawer: 30" {cont.) under a GE/Monogram Oven and over a Warming ........... _-- 23-1/2" Construct Solid Bottom Min. 3/8" Plywood _Supported by 2x4or2x2 Runners all Four Sides 17-1/2" Min. Recommended) 30" ..................... _,,._,i_3-1/2" Per Oven Requirement ConstructSolid Bottom Min.
Installation Preparation PreparationWITHOUTan AccessorgStorageDrawer 23-1/2" PREPARE THE OPENING {cont.) Installation beside another Built-in Speedcook Oven: / GE/Monogram • If you are mounting one Under-the-Counter GE/IVlonogram oven beside the other, use the dimensions shown. The middle rail separating the two openings may need to be larger than the a-1/2" minimum shown. 17-1/2" Min. (5-1/2" Recommended) PREPARE THE OPENING Installation {cont.
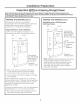
Installation Preparation PreparationWITH an AccessoryStorageDrawer NOTE:MODELZSC1201CAN ONLYBEINSTALLEDWITH AN ACCESSORY STORAGEDRAWERIF INSTALLEDABOVE36-3/4". MODELZSC1202CANNOTBE INSTALLEDWITH AN ACCESSORY STORAGEDRAWER.SEEINSTALLATIONPREPARATION WITHOUT AN ACCESSORY STORAGEDRAWERFORTHIS MODEL. PREPARE THE OPENING {cont.) PREPARE THE OPENING The Advantium Installation over a GE/Monogram 12OV can be installed in combination with other GE/Monogram appliances.
Installation Preparation PreparationWITH an AccessoryStorageDrawer NOTE:MODELZSC1201CAN ONLYBEINSTALLEDWITH AN ACCESSORY STORAGEDRAWERIF INSTALLEDABOVE36-3/4". MODELZSC1202CANNOTBE INSTALLEDWITH AN ACCESSORY STORAGEDRAWER.SEEINSTALLATIONPREPARATION WITHOUT AN ACCESSORY STORAGEDRAWERFORTHIS MODEL. PREPARE THE OPENING {cont.) PREPARE THE OPENING Installationover a GE/Nonogram Installation over a GE/Monogram Warming Drawer: 30" .......................... _ Oven: 23-1/2" b _----- {cont.
Installation Preparation PreparationWITH an AccessoryStorageDrawer NOTE:MODELZSC1201CAN ONLYBEINSTALLEDWITH AN ACCESSORY STORAGEDRAWERIF INSTALLEDABOVE36-3/4". MODELZSC1202CANNOTBE INSTALLEDWITH AN ACCESSORY STORAGEDRAWER.SEEINSTALLATIONPREPARATION WITHOUT AN ACCESSORY STORAGEDRAWERFORTHIS MODEL. PREPARE THE OPENING {cont.) PREPARE Installationover another GE/Monogram Under-the-Counter (UTC) oven: Installation Microwave THE OPENING {cont.
Installation Preparation PreparationWITH an AccessoryStorageDrawer NOTE:MODELZSC1201CAN ONLYBEINSTALLEDWITH AN ACCESSORY STORAGEDRAWERIF INSTALLEDABOVE36-3/4". MODELZSC1202CANNOTBE INSTALLEDWITH AN ACCESSORY STORAGEDRAWER.SEEINSTALLATIONPREPARATION WITHOUT AN ACCESSORY STORAGEDRAWERFORTHIS MODEL. 23-1/2" PREPARE THE OPENING {cont.) Installation beside another Built-in Speedcook Oven: / GE/Monogram • If you are mounting one Under4he-Counter GE/Monogrom oven beside the other, use the dimensions shown.
Installation | Instructions REMOVE THE PACKAGING AND PARTS • Remove all packing material and tape. • Locate parts package containing mounting screws. • Remove the oven from the carton. Do not lift unit bg handle or conduit. this oven. Two people are required to lift • Open the door and remove ang packaging Owner's Hanual Rack _4,CAUTION: if installing theAdvantium Installation Instructions Owner'sManual Cook in oven.
Installation Instructions [_] DOOR TRIM REMOVAL FOR ABOVE 36" INSTALLATION ONLY SLIDE THE OVEN INTO THE CUTOUT CAUTION: Two people are required to If installing the Advantium 120V Oven above 36" from the floor, you mag remove the plastic trim from the bottom of the door for esthetic purposes if desired. lift the oven into the opening. Grasp the bottom at front and rear. DO NOT USE THE HANDLE TO LIFT THE OVEN. DAMAGE WILL OCCUR.
Installation Instructions [-4-I INSTALL BOTTOM TRIM [_] INSTALL MOUNTING CAUTION: if installing the Advantium SCREWS _o 120V Oven below 36",you must use the plastic bottom trimdue to burn riskto children. The plastic trimactsas insulation and willhelp preventburns to childrenfrom hot surfaces. CZZZZ3CZZ:] CZZC] CIK13 [ZZZZD CZIZ3 NOTE: If installing the Advantium 120V Oven with an accessory storage drawer, the bottom trim is not required. Proceed to Step 5.
GE Consumer & Industrial Appliances As e bl Instructions Advantium ®Built-in Accessory Storage Drawer J×2200, J×2201, Z×2201 MODELS AVAILABLE BEFORE YOU BEGIN Profile Models: Read these instructions completely and carefully. Read the Installation Instructions for the Advantium 120V or JX2200BB-BIock JX2201SS-Stoinless Steel 240V oven completely and carefully for cutout dimensions and step-by-step instructions.
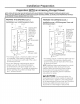
ASSEMBLY TO ADVANTIUM BUILT-IN SPEEDCOOK OVEN ASSEMBLING THE OVEN TO DRAWER REMOVE PACKAGING AND PARTS [] • Remove the drawer from the carton. • Remove all packing material and tape. Open the drawer and remove anLl parts inside. Locate parts. Place storage drawer on a surface with the front of drawer hanging over the edge of the surface. Not placing the front edge of drawer over the edge of the surface mall result in damage to the drawer since the front edge of drawer hangs below the bottom of drawer.
ASSEMBLY TO ADVANTIUM BUILT-IN SPEEDCOOK OVEN ASSEMBLING THE OVEN TO DRAWER {cont.) [_ Remove the front two bottom screws on each side of the oven and the top center screw on each side of the storage drawer. F6] Place the side supports into the tabs on the drawer and secure using the screws supplied and the screws removed in Step C. Side Support 120v only f F£1The oven and storage drawer assemblg is now readg to be installed.
Notes 19
NOTE: While performing installations described in this book, safety glasses or goggles should be worn. NOTE: Product improvement is o continuing endeavor at General Electric. Therefore, materials, appearance and specifications ore subject to change without notice. Printed in Korea GE Consumer & Industrial Appliances General Electric Company Louisville, KV/40225 ge.