
Installation guide


Before you begin - Read these instructions coinpletely and careflllly:
IMPORTANT - Save these instIuctions for local inspector's use.
IMPORTANT - OBSERVE AI,I, GOVERNING CODES AND ORDINANCES.
Note to Installer - Be sure to leave these instiuctions with the Consunler.
Note to Consumer - Keep these instructions with vour Owner's Manual fi)i" fliture reference.
¥!,,,,r..l:_,_llL't_This appliance must be properly grounded. See "Electrical Supply", page 4. [
r!,w,._=l_,_llt.],_mCet appaxeil dolt 8tre correctement mis h la terre. Consulter page 4. [
If wm received a dainaged warining drawei;
w)u should inunediatelv contact w)ur dealer
or builder.
Proper installation is the responsibility of the
installer. Product taihu'e due to inlproper
installation is not covered under the GE
Appliance Warranty. See the Lrse 8.: Care
Guide fl)i" warranty inforination.
• Use this appliance only fi)r its intended
purpose.
Check with local utilities fi)i" electrical codes
that apply in your area. i,ocal codes vary.
Installation electrical connections and
grounding n/ust ctnnply with applical)le codes.
In the absence (if local codes, the drawer
should be installed in accordance with
National Electrical Code ANSI/NFPA 70-1990
or latest edition,
WARNING:
ANTI-TIP PRECAUTIONS
An anti-tip brace must be installed to
prevent the drawer from tipping forward
when opened and loaded. Failure to do so
could result in personal injury.
PRECAUTIONS :
CONTRE LE BASCULEMENT
Pour 6viter les blessures, il faut installer
mae patte de retenue pour empScher le
tiroir de basculer quand il est ouvert et
plein.
For Monogram local service in your area,
1.800.444.1845.
For Monogram service in Canada, call
1.888.880.3030.
For Monogram Parts mid Accessories, call
1.800.626.2002.
Con n
Design Information
Models Available .................................................................................................................................. 3
Product Diinensions ............................................................................................................................ 3
Accessories ........................................................................................................................................... 3
Tools and Materials Required ............................................................................................................ 3
Installation Preparation
Adwmce Planning ............................................................................................................................... 4
Grounding the Appliance ................................................................................................................... 4
ReInove the Packaging and Parts ....................................................................................................... 5
hlstallation Below a Countertop ........................................................................................................ 5
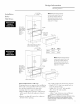
hlstallation Below Wall (-)veils ............................................................................................................ 6
Installation
Step 1: Provide Cabinet Support and Anti-Tip Bracket ................................................................... 7
Step 2: hlstall _4'arining Drawer . ........................................................................................................ 7