
Installation guide


Installation Preparation
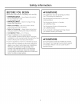
INSTALLATION BELOW A COUNTERTOP
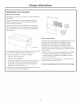
Electrical
Outlet &B"
Max, From
Left Side
Install 2×4 or 2×2 Anti-Tip Block
Against Rear Cabinet Wall 9"
From Floor to Bottom of Block
23-1/2" Hin.
Electrical Outlet
Flush With Side of
Cabinet 7" Max. 7"
'\
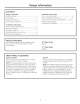
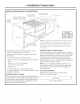
Solid Barrier
Air
Gap
Install a Solid Barrier
and a 1/4"Air Gap
Above Warming Drawer
• When installed, the front face of the drawer will be
nearly flush with adjacent cabinetry doors.
• Drawer overlaps will conceal cut edges on all sides of
the opening.
The rough opening for the drawer must be:
- Depth: 23-1/2" rain. from inside back to front of cabinet
frame.
- Width: 25-1/2" for 27" wide models,
28-1/2" for 30" wide models.
- Height: 9-1/4".
• S" rain. above floor or 1" above toekick. 23-1/4"
from floor to bottom of cutout is recommended for under
countertop installation.
Installation below a cooktop:
Warming drawers are approved for installation below only
certain specified cooktop models. Seethe label attached
to the top of the warming drawer for approved models. A
solid barrier and air gap between cooktop and warming
drawer is required. See Note above.
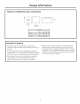
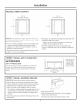
Electrical Outlet 42"
Max. From Right Side
1-1/2" Cabinet Top
25"
o o_.-o:
Install a Solid Barrier
Below a Cooktop
See Note
r' Hin.*
36"
Countertop
9-i/4" Height
Dimensions
A
ZTD910 28-1/2"
ZKD910 25-1/2"
*NOTE:When installing the warming drawer below a cooktop, a solid barrier
must be installed at least r' from the lowest point of the bottom of cooktop
burner box to the top of cutout. Use any solid material such as 1/4" thick
plywood. Allow at least 1/4" air gap between the barrier and the top of the
warming drawer. Seelabel on top of the warming drawer for approved
eooktop models.
Installation below a cabinet drawer:
Thewarming drawer may be installedbeneatha cabinet
drawer. In this installation,a solidbarrier shouldbe installed
abovethe warming drawer to blockaccess.Useany solid
materialsuch as 1/4"thick plywood.Allowat least 1/4"
air gap betweenthe barrier andthe top ofthe warming
drawer.Observethe 5" rain.abovethe floor or 1" abovethe
toekickminimum installationheight.
NOTE:Ifyou are installingin framelesscabinets,it may
be necessaryto install1/2" widecleatsto acceptdrawer
mounting screws.Seedrawerto find exact locationsof
mounting screws.
Side to Side Installation:
Install two warming drawers in separate cutouts.
Allow 2" min. between cutouts.
Side to Side Installation