
Installation guide


Installation
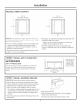
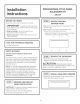
[ STEP 4 I SECURE CUSTOM PANEL
TO METAL MOUNTING PANEL
. Lay the custom panel, appearance side down on a
clean surface
. Place the flat side of the metal panel onto the back
side of the custom panel, with the mounting flanges
facing up
. Align the lamp hole in the panel with the mounting
panel
. Check top, bottom and side overlap dimensions from
the metal panel to wood panel edge as shown
:__j1 i4" _ Top
°V- .... _Y°
..... Handle.......
] . AttachmentHoles
Align Holes Bottom 7/32"
3/16"
__4"
Back side of Appearance Panel with Support Panel
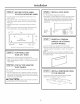
[ STEP5 FOR PANELS LESS
THAN 314" THICK
. Separate the custom panel and metal panel
. Apply a few horizontal beads of adhesive to the metal
panel Avoid adhesive within 1" of lamp hole area and
outer edges
STEP 5A FOR 314" (OR GREATER)
THICK PANELS
3/4" thick panels may be secured to the metal panel
with screws
. Usethe metal panel as a template Position the metal
panel over the back side of the custom panel and drill
pilot holes Drill pilot holes sized to match screws being
used (screws not provided)
A CAUTION: Select screwlength carefully to
avoid penetration of the finished side.
[ STEP 6 I INSTALL LAMP JEWEL
Turn the assembly appearance side up
. Use plastic to wood adhesive to secure the lamp jewel
to the front of the wood panel On the side with the
bulge, (see illustration) apply a small bead of adhesive
around the outside edge Place the jewel into the
drilled hole.
ThisSide fr_Appearanc e
STEP 7
REINSTALL ORIGINAL
HANDLE OR OPTIONAL
CUSTOM HANDLE
A custom handle (not supplied) may be installed.
Drill pilot holes through the front of the custom panel
and through the metal panel to match the chosen
handle.
NOTE: The handle screws should be installed through
the metal panel, the custom panel and into the custom
or original handle.
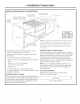
i STEP 8 INSTALL ASSEMBLED PANEL
TO THE DRAWER
. Install the custom panel assembly to the exposed
drawer front using the original 7 screws.
11