
Installation guide


Installation Preparation
Warming Drawer
Packaging
and Parts
Installation
Below a
Countertop
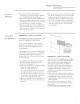
• Place carton on a fiat surfi_ce.
• Open one end of the carton and lift off
the top piece.
• I,ilt the Warlner up and out of the carton.
• Place the drawer on top of the shii)ping
carton to protect the drawer fl'ont and
the finished flooring.
• Remove all packing materials and tape.
• i,ocate package containing 4 wood screws
and set aside.
Parts provided:
• 4 _\'ood Screws
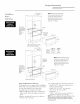
Electrical
Outlet16" Max.
FromLeft Side.
Install
2x4or 2x2
Anti-TipBlock ElectricalOutlet
AgainstRear FlushWith Side
CabinetWall of Cabinet7" Max.
9" FromFloor
to Bottom
of Block
ElectricalOutlet42"Max.
FromRightSide.
>/2 Install a Solid Barrier
-,z' Below a Cooktop
See Note
1-1/2" Cabinet Top
23-1/2"Min.
Solid Barrier
.Air Gap
Installa SolidBarrier
anda 1/4" AirGap
AboveWarmingDrawer
• When installed, the fl'ont fi_ce of the drawer
will be nearly flush with a@_cent cabinetry
dooI'S.
• Drawer overlaps will conceal cut edges on
all sides of the opening,
The rough opening fin" the drawer must be:
- Depth: 23-1/2" rain. fl'om inside back to
front of cabinet fl'ame.
- Width: 25-1/2" fin" 27" wide models,
28-]/2" fin" 30" wide models.
- Height: 9-1/4".
• 5" rain. above floor or l" above toekick.
23-1/4" fi'om floor to bottom of cutout is
recollllllended t0i" tinder coHnterto l)
installation.
Installation below a cooktop:
Warming drawers are approved %r installa-
tion below only certain specified c{}{}kto I)
models, See the label attached to the top of
the warming drawer for api)roved models. A
solid barrier and air gap between cookto I) and
warming drawer is required, See Note above,
1"Min? 36"
Bountertop
9-1/4" ght
Dim. A
ZTDglO 28-1/2"
ZKDglO 25-1/2"
*NOTE: When installing the warming drawer below a
cooktop,a solid barrier must be installed at least 1"from the
lowest point of the bottom of cooktop burner boxto the top of
cutout. Useany solid material such as 1/4" thick plywood.
Allow at least 1/4" air gap between the barrier and the top of
the warming drawer. See labelon top of the warming drawer
for approvedcooktop models.
Installation below a cabh_et drawer:
The warming drawer may be installed beneath
a cabinet drawer. In this installation, a solid
barrier should be installed above the warming
drawer to block access. Use any solid material
such as 1/4" thick i)lDvood. Allow at least 1/4"
air gap between the barrier and the top of the
warming drawer. Observe the 5" rain. above the
floor or ]" above the toekick minimum
installation height,
NOTE: If you are installing in fl'ameless cabinets,
it may be necessary to install 1/2" wide cleats to
accept drawer mounting scre_:s. See drawer to
find exact locations of mounting screws.
Side to Side Installation:
Install two warmii_g drawers in separate cutouts.
Allow 2" rain, between cutouts,
Side to Side Installation