
Installation guide


Installation
Microwave Oven
Under-cabinet
m oun ting
Tools and materials
required:
• Flat-bladescrewdriver
• Phillips screwdriver
• Drill and 1/4" bit
• Nail or center punch
• Penciland ruler
•Scissors
• Hammer
•Tape
•Safetyglasses
• Two brackets (supplied)
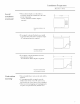
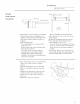
Buttons
Cases%Ri _
Embos ghtSide
_'-._
l-1.
lYFL -,o, t
i _ TEMPtJ_TE 1 '
I
Template1
LeftSide
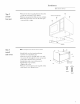
• Carefully remove the four plastic t)lug buttons
from oven top and the two screws at top rear
flange of case.
• Remove the two top case screws on the back
of oven. Retain screws.
• Select correct template and rear brackets for
this model. (See Template/Rear Bracket
Reference Sheet.)
• Secure the two rear brackets to back of the
oven, left and right, using screws removed
earlier.
Make sure brackets are level and flush with
top surface of case.
• Cut Template 1 along dotted lines.
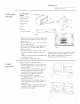
, i _RUCT_OnS i n
II!
Template 2
Mounting holes for the oven should be drilled
fl'om the inside, if cabinet shelves are remov-
able to allow enough space. Holes may be
drilled fi'om bottom, if necessary.
7"0 drill
from inMde
• Place template 2 inside the cabinet:
-If cabinet is less than 12" deep, cut off fi'ont
edge of template to fit, using template cut
lines as a guide.
If cabinet has a recessed shelf, measure the
thickness of the fl'ont rail and cut that
amount off the fl'ont edge of template.
This will allow template 2 to lie flat.
• If you have a partition, you nlust:
Cut Template 2 into 2 pieces to fit each
side of the partition.
Position one piece of Template 2 inside the
cabinet with fl'ont edge even to cabinet
fl'ont edge.
-Position template 1 on fl'ont of the cabinet
so that the arrow is aligned with the hole
center line on template 2.
/
/
12