
Technical Specifications

ValVue Digital Communications Software Ver. 2.80
630
GE Oil & Gas
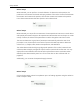
Position Limit
Stops
:
Position Lower Limit /
Position Upper Limit
The SVI2 allows you to establish software limit stops. If enabled, dur-
ing correct operation of the SVI2, the control functions of the SVI will
not allow the valve position to be lower than the lower position limit
or above the upper position limit. Note, however, that this option does
not provide mechanical stops for the valve. In an electrical or air fail-
ure the valve goes to the fail safe position without regard to the soft-
ware limit stops.
The full open and full closed buttons similarly ignores the settings of
the software limit stops.
Some of the diagnostic test cannot be performed with position limit
stops set.
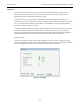
Apply
Clicking
Apply
causes any changes made in the Configure or Cali-
brate tabs to be
witten
immediately to the SVI2.
Change
Mode
Whe
n
selected,
you
can
change
the
SVI
2
mode.The SVI2
can
be
in
any
o
f
thre
e
operatin
g
modes:
Operating- In this mode the SVI2 responds to the input signal
and positions the valve appropriately (indicator green).
Manual- In this mode the valve does not respond to the input
signal Instead it remains stable in one position which is the
position that the valve was when manual mode was entered
or a new position is selected (see Setpoint) (indicator yellow).
Setup- In this mode you can set calibration and configuration
parameters. Additionally you can run response time tests,
step response tests, and positioner signatures. (indicator
yellow).
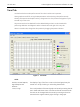
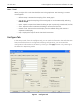
Custom Characterization
A custom characterization defines the relationship between the input signal and the output
position of the valve. It may contain up to 9 XY pairs and the position is linearly interpolated
between the pairs. The first position must be 0,0 and the last position must be 100,100. Both
are in percent and neither count toward the nine points allowed.
Add points to the curve by clicking at the position where you want the point. Delete an existing
point by clicking on it with the right mouse button.
Move points by dragging them to their new position.
The characterization curve must be non-decreasing. The program will not allow a point to be
added or moved to a position that would create a decreasing segment.
To enter exact positions:
1. Enter a value in the edit boxes at the bottom of the tab.
2. Hit the TAB key. The point is entered and the graph updated.