
Technical Specifications


© 2014 General Electric Company. All rights reserved.
78 | =GE Oil & Gas
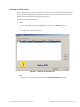
Launching Historical View
To launch this:
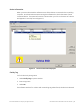
1. Right-click the device name in the Connected Devices tab.
2. Select Historical View and the PST Historical View window appears (Figure 69).
3. Select the Device ID from the drop down list.
4. Select the Start and End Dates for the PST data to view.
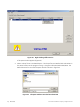
Changing the Historical View Start and End Dates
The Historical View start and end date field is set up as mm/dd/yyyy. There are two methods
for changing the PST schedule date field. You can click on each parameter of the date field;
i.e. mm, or dd, or yyyy, and change each individual parameter or you access the calendar in
the drop down of the date field.
To change the start date schedule for the next PST:
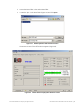
1. Click in each parameter (mm-dd-yy-hh-mm) of the date field and highlight the text.
2. Either:
Type over the old value with the new value for each parameter.
OR
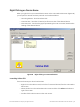
a. Click in the drop down, located at the right of PST schedule date field and access the
date calendar (Figure 69).
b. Using the arrow key on the calendar, change the month, if necessary and drag the
mouse and select the correct date within the month by clicking on it.