
Manual
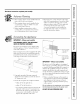


Installationof the warming drawer.
Read these instructions completely and carefully.
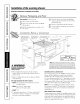
ProvideCabinetSupport
231//'
2% 4" orequivalentrunners
27'c J
231//'
2"x4" orequivalentrunners
30'c J
IMPORTANT'. When installed below a single or
double oven, check to be sure that any oven
SUl)l)orts above the cutout do not obstruct the
23_" required depth of the Walilling drawer
CtltOtlt.
A 2" minimmn clearance between oven
and warming d_'mver CIIR)IILSare required.
Additional clearance may be required if
2 x 4 blocks are used to support framers or
solid floor of the oven above.
The warming drawer may be supported by
( •
either a solid bottom, 2 x 4 w 2 x 2 framers.
The support must be level and rigidly'
motmted, flusll wifll file bottom edge
of die CtltOtlt.
There is no way to level the drawer once #
has been installed. Be sure supports are level
The entire weight of the dKiwer is supported
by the framers or solid floor and inust be
capable of supporting 150 lbs.
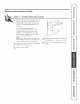
Step I--Install Anti-Tip Brace
WARNING: ANTI- TIP PRECAUTIONS:
The anti-tip brace must be installed to prevent
the drawer from tipping forward when opened
and loaded.
Failure to doso could result in personal injury.
___ nstall2x4or2x2antbtipbrace
againstrearcabinetwail 9"
fromfloorto bottomof brace
23"--
2x4or2x2runners ___
orsolidbottom
14