
Use and Care Manual


6
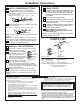
INSTALL TUBING
A
Push the tubing firmly into the collet on
the faucet adapter fitting until the pencil
mark is pushed next to the collet. (If the
tubing is removed, recut the end,
measure, mark and reinsert.)
Tubing must be fully inserted to avoid leaks.
To remove tubing: Depress and hold the white
collet; pull the tubing out to remove.
B
Pull out slightly on the tubing to ensure a good
seal.
C
Press the other end of the tubing into the
outlet side of the filter.
3
Installation Instructions
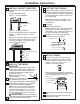
5
CUTTING THE TUBING
A
Determine the length of tubing necessary from
the filter head/bracket to the faucet and from
the water supply line to the filter head/bracket
by holding the tubing in place to ensure it is
the correct length.
NOTE: 6 feet of tubing is supplied. Cut the
tubing into two sections according to your
requirements.
B
Cut tubing.
NOTE: Do not kink tubing.
NOTE: Check the end of the tubing to make
sure there are no cuts, nicks, flat spots or
sharp edges. If any of these are present, cut
the end of the tube with a utility knife.
C
Measure 3/4” from the end of the tubing
provided and mark with a pencil.
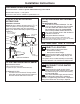
4
INSTALL THE HEAD/
BRACKET
A
Using the filter head/bracket as a guide, mark
hole locations so that there is 1” between the
center of each screw. Fasten the filter head/
bracket to the wall with the Phillips screws
provided with the unit.
NOTE: Predrill 1/8” holes for
easier installation.
B
Make sure to leave at least 2-1/2”
from the bottom of the system to
allow for easy replacement of the filter cartridge.
C
Install screws only halfway so you can slip the
bracket onto the wall during installation.
NOTE: There are three installation configurations.
Select the appropriate screws for installation: For
Cabinet Side Wall Installations, use 1” screws; For
Drywall into Stud Installations, use 1-1/4” screws;
For Drywall with No Stud Installations, use lag bolts.
CAUTION: Be sure screw point does
not protrude through the wall into adjacent cabinet.
D
Tighten screws to secure the bracket.
2-1/2”
3/4”
INCORRECT CUT
CORRECT CUT
3
4
"
Engagement
3/4” (1/4” tubing)
White Collet
(DO NOT REMOVE)
Pencil mark line
Insert tubing
3/4”
3
INSTALL FAUCET ADAPTER
Install the 3/8” x 1/2” faucet adapter to the faucet
threads.
DO NOT OVERTIGHTEN.
Option A – Typical Installation
Option B – Optional Installation
If you have copper tubing with a compression
adapter, you will NOT use the 1/2” faucet
adapter.
Use a section of tubing, slide the compression
hex nut and 3/8
”
ferrule (tapered end away
from the compression nut) onto the tubing,
and put in the tubing insert.
3/8”
Compression adapter
Copper tubing
Insert
Ferrule
Hex nut
Tubing
Adapter
Faucet Threads