
Use and Care Manual


STEP-BY-STEP
I
NSTAL
LATION
I
N
ST
RU
CTIONS
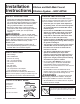
Installation Overview
NOTE: Be sure to allow a minimum space of 1
1
/2”–2”
under the system for removing the filter cartridge.
If you have copper tubing with 3/8” compression
fittings, you’ll need to follow Step 3 Option B (Optional
Installation).
CARTRIDGE SPECIFICATIONS
Performance Data – Filtration System GXK140TNN Using Filter FQK1R
Rated/certified capacity = 1,500 gallons
Performance data sheet is available at gewaterfilters.com
HOT COLD
IN
OUT
Optional installation
2
Installation Instructions
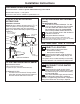
FILTER CARTRIDGE REPLACEMENT
Replacement Filter Canister
FQK1R—Replacement filter caniste
For replacement parts, call toll-free 800.952.5039 (US)
TO REMOVE FILTER:
•
Turn filter 1/4 turn to the left. The top surface
of the filter will move away from the bottom of
the head. Pull the filter down to remove.
HOT COLD
IN
OUT
Filter
Cartridge
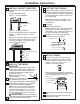
INSTALLING THE SYSTEM
1
SELECT A LOCATION
A
Select a location for the system that is:
• Protected from freezing.
• Not exposed to direct sunlight.
B
Select and mark a location under the sink that
allows access for a filter cartridge change. See
Section 4.
The system can be mounted vertically or
horizontally.
DO NOT MOUNT THE SYSTEM UPSIDE DOWN.
2
DISCONNECT COLD WATER
SUPPLY
A
Remove items from under the sink. Place a
bucket and some towels under the sink to collect
any water that may run out when disconnecting
the water supply lines.
B
Turn off the cold water supply valve and remove
the existing water supply tubing and fittings.
NOTE: For copper tubing, leave the 3/8” compression
fitting on the faucet stem. Go to Step 3, Option B.
3/8” x 1/2” Push to
Connect Adapter
Filter Head/
Bracket
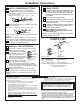
FILTER CARTRIDGE REPLACEMENT
(cont.)
TO REPLACE FILTER:
A
Push filter into the filter head/bracket. Turn filter
1/4 turn to the right until it stops. The top surface
of the filter will be flush with the bottom of the
filter head/bracket when fully installed. NOTE:
When correctly installed, the label will face out.
B
Turn on the cold water faucet to flush the filter for
5 minutes to remove air.
C
Change the batteries in the timer.
NOTE: Remove the water in the line to minimize the water
released during filter cartridge replacement. Turn off the cold water
supply valve and turn on the faucet for 5 seconds.
Shut-Off Valve
Ferrule
Hex nut
Tubing
insert