
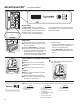
Use and Care Manual / Installation Instructions


6
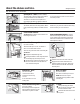
Empty the pan. Place the Chill tray in the
pan. Place the items on the tray and close
the pan completely.
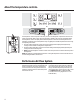
Select the ExpressChill™ pad. On some
models, you can then select the chill time
(use chart to determine best setting). Other
models will only have one option (45
minutes). On models with multiple settings,
tap the pad until the light appears next to
the desired setting.
To stop a feature before it is finished, tap
that feature’s pad until no options are
selected and the display is off.
During ExpressChill™, the display on the
controls will count down the time in the
cycle.
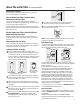
About ExpressChill™. (on some models)
The ExpressChill™ feature is a system of
dampers, a fan and a temperature thermistor.
The pan is tightly sealed to prevent the pan’s
temperature from causing temperature
fluctuations in the rest of the refrigerator.
The controls for this pan are located in the top
of the refrigerator or on the dispenser with the
temperature controls.
How to Use
How it Works
ExpressChill™
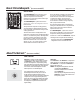
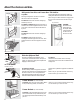
To remove:
Pull the drawer out to the stop position.
Rotate all four swing locks to the unlock
position.
Lift the front of the drawer up and out.
To replace:
Make sure all four swing locks are in the
unlock position.
Place the sides of the drawer into the
drawer supports, making sure the swing
locks fit on the drawer slots.
Lock all four swing locks by rotating them
to the lock position.
How to Remove and Replace the Drawer
ExpressChill™ Chart (on some models)
NOTE: Results may vary depending on packaging, starting temperature and other food traits.
15 Minutes
1 Beverage Can (12 oz)
2 Small Juice Boxes
(6–8 oz each)
30 Minutes
2 to 6 Beverage Cans
(12 oz each)
2 Plastic 20 oz Bottles
of Beverage
4 to 6 Small Juice Boxes
(6–8 oz each)
3 Foil Juice Packets
Wine (750 ml bottle)
45 Minutes
2 Liters of Beverage
1/2 Gallon of Juice
*HODWLQ³SDFNDJH