
Technical Specifications
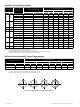
Masoneilan 21000 Series Top Guided Globe Valve | 15
© 2014 General Electric Company. All rights reserved.
• Replacing existing plug and stem-bellows S/A
• Replacing stem-bellows S/A only
If the plug needs replacing, the stem-bellows sub-
assembly should be replaced at the same time.
The original pin hole in a stem which is being reused
sometimes prevents a satisfactory result being obtained and
can also weaken the plug-stem assembly.
If the stem-bellows sub-assembly is being replaced, the
new assembly can be fitted on an existing plug as long as
it is in good condition and the removal of the pin has not
deformed the hole or damaged it in any other way.
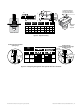
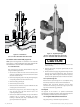
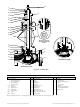
Note: Always use soft metal vise jaws to hold the plug
guide surface. Failure to take this precaution could result
in damage to the plug guide surface during pinning (see
Figure 18).
Be careful not to damage the plug seating surface during
pin removal and assembly operations.
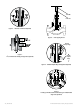
10.2.1.1 Unpinning the Plug Stem
• Pull and hold the plug (16) out of the bonnet
extension (29) to allow access to the plug pin (17).
Place the plug guide on a V-block.
Note: A lower mechanical stop has been provided to
prevent damage of the bellows during this step.
• Using a drift punch, drive out the existing pin (17).
Note: If it is necessary to drill out the pin, use a drill
bit slightly smaller than the pin diameter. Be careful
not to damage the hole of the plug guide.
• Lock two nuts against each other on the end of
the plug stem, and use a flat spanner on the lower
nut to prevent rotation while unscrewing the plug
from the stem. The plug is removed by turning it
counter-clockwise.
• Remove the two nuts from the plug stem. Complete
step 10.1.1.
• Inspect the parts and carry out any necessary
repairs, then reassemble the stem-bellows sub-
assembly (30) through the upper hole in the bonnet
extension (29) (see section 10.2.1.2).
10.2.1.2 Mounting of the Plug-Stem/Bellows S/A into
the Bonnet Extension
• Clean all contact surfaces of the bonnet extension
(29) and the plug-stem/bellows S/A.
• Assemble a new gasket (28) on the upper flange of
the bonnet extension.
• Insert the new stem-bellows S/A through the top
hole into the bonnet extension (29).
• Pin the plug on the stem (See section 10.2.1.3).
10.2.1.3 Plug Stem Pinning
Replacing Plug and Stem/Bellows S/A
A. Screw Stem into Plug
– Lock two nuts against each other on the end of the
plug stem and use a flat spanner on the upper nut
to prevent rotation of the stem-bellows S/A. Screw
the plug onto the lower part of the stem while
inserting the plug shank into the guide bushing (12) in
the bonnet extension (29).
– Pull and hold the plug (16) out of the bonnet extension
(29) to allow access to the plug pin (17).
B. Drilling the New Parts
• Iftheplugisalreadyfullydrilled,
(typical for 440C hardened stainless steel material or
solid Stellite or Equivalent), then drill the stem to the
same diameter (Diameter C in Figure18) as the Plug
Shank Hole.
• Iftheplugguideareahasacentermark,
Place the plug guide on a V-block and use a suitable
size drill to either:
– Match the hole size in the plug, or
– Match Diameter C (see Figure 18),
– Drill through the plug-stem assembly.
• Iftheplugguideareahasnoholeoranycenter
mark,
– Measure Dimension D based on the plug guide
diameter and stem diameter (see Figure 18).
– Place the plug guide on a V-block, and make a
center mark on the plug guide area using a center
punch.
– Drill through the plug-stem assembly using a
suitable size drill bit.
In all cases after drilling: Remove any burrs from
the plug guide hole by making a slight chamfer.
C. Pinning the Plug-Stem Assembly
– Select the correct size pin based on the plug guide
diameter and stem diameter (see Figure 18). Apply
a small amount of grease on the pin and hand-
assemble it into the hole in the plug.
– Press fit the pin into the hole using a hammer.
Complete the pinning operation by ensuring that
the pin is recessed by the same amount from both
sides (see Figure 18).
Replacing Stem/Bellows S/A Only
A. Screw Stem into Plug
– Refer to paragraph A of the previous section
“REPLACING PLUG AND STEM/BELLOWS S/A”.
B. Drilling the New Stem
– Place the plug guide on a V-block and use a
suitable size drill bit to drill the stem (use the hole
in the plug as a guide).
Note: If the hole in the plug guide has been slightly
damaged while removing of the old pin, choose a drill
bit and a pin with a slightly larger diameter than the
normal pin.
C. Pinning
– Select the correct size pin based on plug guide
diameter and pin hole diameter. Proceed as
described in Paragraph C above, taking care not to
damage the plug guide area.