
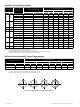
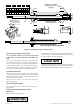
Technical Specifications

8 | GE Oil & Gas © 2014 General Electric Company. All rights reserved.
F. Carefully place the plug sub-assembly into a soft jaw vise,
holding the plug by the flats provided on the upper end of
the shank.
CAUTION
CAUTION
WARNING
DANGER
When using a vise to hold the plug, extreme care must be
taken not to damage the plug shank.
G. Using the appropriate tool used during disassembly, firmly
tighten the plug tip.
CAUTION
CAUTION
WARNING
DANGER
The plug tip must be tightened, allowed to set for
approximately 4 hours, re-tightened, allowed to set another
4 hours, then tightened one more time. The purpose of this
tightening sequence is to allow the insert material to “cold
flow” into place on the plug sub-assembly.
H. Following the above tightening sequence, securely
tighten the set screw down into the plug. Plug is ready for
assembly into the valve.
8. Valve Body Reassembly
After completion of the required maintenance, the valve should
be reassembled using the following procedures:
Note: If any of the following steps were completed during
maintenance, then proceed to the next step.
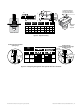
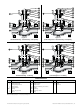
8.1 Threaded Trim (Figure 12 or 14)
A. CIean all gasket mating surfaces.
B. Apply a small amount of sealant to the seat ring threads
and sealing shoulder. Install seat ring into valve body.
Note: A sealant compatible with the process should be
applied sparingly.
C. lnstall and tighten seat ring using wrench used for removal.
CAUTION
CAUTION
WARNING
DANGER
Do not over-tighten. Do not strike seat ring lugs directly.
This could distort the seat ring resulting in unwarranted
seat leakage.
D. Carefully install plug and stem assembly.
Note: Valve should be lapped before final assembly. See
Section 7.3.
E. Install body gasket (11).
Note: Spiral wound body gaskets (11) are standard in the
21000 Series design. It is imperative that a new gasket be
installed each time the valve is disassembled.
F. Assemble bonnet (8) and body stud nuts (10). Bonnet must
be positioned so the packing flange studs are at 90° to the
flow center line.
cycled approximately 500 times. Adjust if necessary.
No further adjustment should be required for the life
of the packing.
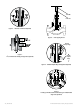
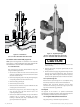
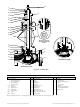
7.7 Soft Seat Plug (Figure 3)
The soft seat plug used in the 21000 Series valve has a
replaceable insert. To remove and replace the insert, proceed
as follows.
CAUTION
CAUTION
WARNING
DANGER
The shank OD is the plug guide. Extreme care must be taken to
prevent scoring or marring this surface. Failure to do so could
result in damage to the guide bushing and destruction of the
plug. Two flats are provided for holding.
A. Loosen set screw until the head of the set screw is flush
with the OD of the shank.
Note: On 3/4"‑ 2" size valves, the plug tip has a machined
slot into which a bar can be inserted for removal. On 3"‑ 6"
size valves, the plug tip has two machined holes into
which a tool (fabricated with appropriate size pins) can be
inserted for removal.
B. Carefully place plug sub-assembly into a soft jaw vise,
holding the plug by the flats provided on the upper end of
the shank.
CAUTION
CAUTION
WARNING
DANGER
When using a vise to hold the plug, extreme care must be
taken not to damage the plug shank.
C. Using the appropriate tool, unscrew plug tip (counter-
clockwise) from the shank sub - assembly.
D. Remove insert O-ring (for valve sizes 3"- 8" only) and insert
retainer. Discard existing insert and O-ring.
E. Thoroughly clean all remaining metallic components
and install new insert and O-ring as follows (according to
valve size):
For 3/4"- 2" valves :
a. Place new insert on shank and insert retainer as
shown in Figure 3.
b. lnstall plug tip into shank sub-assembly. Hand tighten
and ensure plug tip seats evenly against insert.
For 3" - 8" valves:
a. Apply a light coat of lubricant to the O-ring and install on
insert retainer.
CAUTION
CAUTION
WARNING
DANGER
Ensure any lubricant used is compatible with service
conditions.
b. Install new insert on insert retainer and assemble as
shown in Figure 3.
c. Install plug tip into insert retainer sub-assembly
insuring the plug tip seats evenly on the insert.