
Dimensions Guide

CSB923P4NW2 / CSB923P2NS1 / CSB923P3ND1
Café™ 30" Five in One Oven
with 240V Advantium® Technology
© 2019 GE Appliances PC92454 03/19
For answers to your Café™ product questions, visit our website at cafeappliances.com.
ADDITIONAL ACCESSORIES
CXWS0H0PMBZ
Brushed Bronze
1 handle
(standard on Matte White)
CXWS0H0PMSS
Brushed Stainless
1 handle
(standard on Matte Black)
CXWS0H0PMBT
Brushed Black
1 handle
CXWS0H0PMCU
Brushed Copper
1 handle
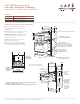
DIMENSIONS AND INSTALLATION INFORMATION
Preparation with an Accessory Drawer
Prepare the opening: The Advantium 240V can be installed in combination
with other GE/Monogram appliances. Always follow each product's Installation
Instructions to compete the installation.
Single oven installation: Order a 30" wide single oven cabinet or cut the
opening in a wall to the dimensions shown.
* For existing cutouts, a maximum width of 28-1/2" is acceptable. If the
opening is slightly wider, secure a furring strip on each side of the
cutout for securing the oven.
- Always maintain 36-3/4" minimum height from the floor to the cutout in
any single or combined installation.
- Allow 3/4" to 2-1/8" case trim overlap on the sides and 1" overlap on the
bottom of the opening for all models. The amount of overlap on the sides
depends on the actual cutout width. Allow 2-1/4" case trim overlap on the top.
- Oven overlaps will conceal cut edges on all sides of the opening.
When installed over a single oven or a warming drawer, allow at least
2" between the two openings. This separation will provide clearance for
bottom overlap of the Advantium 240V and the other appliance overlaps.
Construct a solid oven floor of 3/8" min. thick plywood supported by 2 x 4
or 2 x 2 runners on all sides.
- the support must be level and rigidly mounted, flush with the bottom edge
of the cutout.
* For existing cutouts, a maximum width of 28-1/2" is acceptable. If the opening
is slightly wider, secure a furring strip on each side of the cutout for securing
the oven.
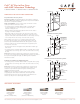
Note: Additional clearances between the cutouts may be required. Check to
be sure the oven supports above the Warming Drawer location do not obstruct
the required interior depth and height. See Warming Drawer installation
instructions for details.
Installation Over a Wall Oven and Warming Drawer:
* For existing cutouts, a maximum width of 28-1/2" is acceptable. If the opening
is slightly wider, secure a furring strip on each side of the cutout for securing
the oven.
Note: Additional clearances between the cutouts may be required. Check
to be sure the oven supports above the Warming Drawer location do not
obstruct the required interior depth and height. See Warming Drawer
installation instructions for details.
Caution: For personal safety, the mounting surface must be capable
of supporting the cabinet load, in addition to the added weight of this
approximate 80-pound oven and 30-pound drawer, plus additional oven
loads of up to 50 pounds or a total weight of 160 pounds.
25-1/4"
23-1/2"
Construct base -
Min. 3/8" plywood
supported by 2x4
or 2x2 runners all
four sides.
17-1/2"
27" or 30"
36-3/4"
Min.
25-1/4"
23-1/2"
Construct base -
Min. 3/8" plywood
supported by 2x4
or 2x2 runners all
four sides.
17-1/2"
27" or 30"
36-3/4"
Min.
Installation over Warming Drawer:
2" Min.
(3" recommended)
Per warming
drawer
requirement
23-1/2"
Construct solid
bottom - Min. 3/8"
plywood supported
by 2x4 or 2x2
runners all four
sides
17-1/2"
27" or 30"
45-1/4"
Min.
Installation over a Wall Oven and Warming Drawer:
2" Min.
(3" recommended)
2" Min.
Per oven
requirement
25-1/4"
Per warming drawer requirement