Gas Slide-In Ranges GEAppliances.com Safety Instructions . . . . . . . . . . . . .2–7 Owner’s Manual Operating Instructions Baking or Roasting . . . . . . . . . . . . . . . . . . .11 Broiling, Broiling Guide . . . . . . . . . . . . . . .14 Clock and Timer . . . . . . . . . . . . . . . . . . . . . .15 Control Lockout . . . . . . . . . . . . . . . . . . . . . .15 Convection . . . . . . . . . . . . . . . . . . . . . . .18–22 Cookware . . . . . . . . . . . . . . . . . . . . . . . . . . . . .9 Oven . . . .
IMPORTANT SAFETY INFORMATION. READ ALL INSTRUCTIONS BEFORE USING. WARNING: If the information in this manual is not followed exactly, a fire or explosion may result causing property damage, personal injury or death. — Do not store or use gasoline or other flammable vapors and liquids in the vicinity of this or any other appliance. — WHAT TO DO IF YOU SMELL GAS n Do not try to light any appliance. n Do not touch any electrical switch; do not use any phone in your building.
GEAppliances.com WARNING! For your safety, the information in this manual must be followed to minimize the risk of fire or explosion, electric shock, or to prevent property damage, personal injury, or loss of life. ANTI-TIP DEVICE To reduce the risk of tipping the range, the range must be secured by a properly installed anti-tip bracket. See installation instructions shipped with the bracket for complete details before attempting to install.
IMPORTANT SAFETY INFORMATION. READ ALL INSTRUCTIONS BEFORE USING. WARNING! SAFETY PRECAUTIONS When using electrical appliances, basic safety precautions should be followed, including the following: n Do not attempt to repair or replace any part n Use this appliance only for its intended of your range unless it is specifically purpose as described in this Owner’s recommended in this manual. All other Manual. service should be referred to a qualified n Be sure your appliance is properly installed technician.
GEAppliances.com SAFETY PRECAUTIONS n Always keep wooden and plastic utensils and canned food a safe distance from your range. n Always keep combustible wall coverings, curtains or drapes a safe distance from your range. n Do not clean the range with flammable or volatile cleaning fluids. n After prolonged use of a range, high floor temperatures may result and many floor coverings will not withstand this kind of use.
IMPORTANT SAFETY INFORMATION. READ ALL INSTRUCTIONS BEFORE USING. WARNING! SURFACE BURNERS Use proper pan size—avoid pans that are unstable or easily tipped. Select cookware having flat bottoms large enough to cover burner grates. To avoid spillovers, make sure cookware is large enough to contain the food properly. This will both save cleaning time and prevent hazardous accumulations of food, since heavy spattering or spillovers left on range can ignite.
GEAppliances.com COOK MEAT AND POULTRY THOROUGHLY… (Cook meat and poultry thoroughly—meat to at least an INTERNAL temperature of 160°F (71°C) and poultry to at least an INTERNAL temperature of 180°F (82°C). Cooking to these temperatures usually protects against foodborne illness. WARNING! OVEN Stand away from the range when opening the oven door. Hot air or steam which escapes can cause burns to hands, face and/or eyes. n Do not heat unopened food containers.
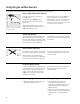
Using the gas surface burners. Throughout this manual, features and appearance may vary from your model. How to Light a Gas Surface Burner Push the control knob in and turn it to the LITE position. You will hear a little clicking noise— the sound of the electric spark igniting the burner. Push the control knob in and turn it to the LITE position. When one burner is turned to LITE, all the burners spark. Do not attempt to disassemble or clean around any burner while another burner is on.
GEAppliances.com Top-of-Range Cookware Aluminum: Medium-weight cookware is recommended because it heats quickly and evenly. Most foods brown evenly in an aluminum skillet. Use saucepans with tightfitting lids when cooking with minimum amounts of water. Cast-Iron: If heated slowly, most skillets will give satisfactory results. Enamelware: Under some conditions, the enamel of some cookware may melt. Follow cookware manufacturer’s recommendations for cooking methods.
Using the oven controls. (Throughout this manual, features and appearance may vary from your model.) Features and appearance may vary. Oven Control, Clock and Timer Features and Settings BAKE Pad OVEN LIGHT ON/OFF Pad Touch to select the bake function. Touch to turn the oven light on or off. BROIL HI/LO Pad DELAY START Pad Touch to select the broil function. Use along with COOKING TIME or SELF CLEAN STD/LOW pads to set the oven to start and stop automatically at a time you set.
GEAppliances.com To avoid possible burns, place the racks in the desired position before you turn the oven on. Before you begin… The racks have stops, so that when placed correctly on the supports, they will stop before coming completely out, and will not tilt. When placing and removing cookware, pull the rack out until it stops. The bake burner is under the oven floor. Do not place foods on the oven bottom for cooking. The oven has 7 rack positions.
Using the oven. Preheating and Pan Placement Preheat the oven if the recipe calls for it. Preheating is necessary for good results when baking cakes, cookies, pastry and breads. Do not place foods or pizza stone directly on the oven floor. To preheat, set the oven at the correct temperature. The control will beep when the oven is preheated and the display will show your set temperature. The preheat time will vary depending on the temperature setting.
GEAppliances.com Oven Vent Your oven is vented through one vent located toward the rear of the range. Do not block this vent when cooking in the oven—it is important that the flow of hot air from the oven and fresh air to the oven burner be uninterrupted. Avoid touching the vent openings or nearby surfaces during oven or broiler operation—they may become hot. n Handles of pots and pans on the cooktop may become hot if left too close to the vent.
Using the oven. How to Set the Oven for Broiling IMPORTANT: To avoid possible burns, place the racks in the desired position before you turn the oven on. Place the meat or fish on a broiler grid in a broiler pan designed for broiling. Follow suggested rack positions in the Broiling Guide. Use LO Broil to cook foods such as poultry or thick cuts of meat thoroughly without over-browning them. Touch the START pad. When broiling is finished, touch the CLEAR/OFF pad.
Using the clock, timer and control lockout. GEAppliances.com To Set the Clock Make sure the clock is set to the correct time of day. The clock must be set to the correct time of day for the automatic oven timing functions to work properly. The time of day cannot be changed during a timed baking or self-cleaning cycle. Touch the CLOCK pad. Touch the number pads. Touch the START pad. To Set the Timer Touch the KITCHEN TIMER ON/OFF pad. The timer is a minute timer only.
Using the timed baking and roasting features. (on some models) NOTE: Foods that spoil easily—such as milk, eggs, fish, stuffings, poultry and pork—should not be allowed to sit for more than 1 hour before or after cooking. Room temperature promotes the growth of harmful bacteria. Be sure that the oven light is off because heat from the bulb will speed harmful bacteria growth. How to Set an Immediate Start and Automatic Stop The oven will turn on immediately and cook for a selected length of time.
Using the probe. GEAppliances.com For many foods, especially roasts and poultry, internal food temperature is the best test for doneness. The temperature probe takes the guesswork out of roasting by cooking foods to the exact doneness you want. Use of probes other than the one provided with this product may result in damage to the probe or oven control. Use the handles of the probe and plug when inserting and removing them from the food and outlet.
Using the convection oven. Convection Fan In a convection oven, a fan circulates hot air over, under and around the food. This circulating hot air is evenly distributed throughout the oven cavity. As a result, foods are evenly cooked and browned—often in less time with convection heat. NOTE: The convection fan will cycle on and off while cooking to best distribute hot air in the oven. The convection oven fan shuts off when the oven door is opened.
GEAppliances.com Convection Roast n Good for large tender cuts of meat, uncovered. The convection fan circulates the heated air evenly over and around the food. Meat and poultry are browned on all sides as if they were cooked on a rotisserie. The heated air seals in juices quickly for a moist and tender product while, at the same time, creating a rich golden brown exterior.
Using the timed features for convection cooking. You will hear a fan while cooking with these features. The fan will stop when the door is opened, but the heat will not turn off. NOTE: Foods that spoil easily—such as milk, eggs, fish, stuffings, poultry and pork—should not be allowed to sit for more than 1 hour before or after cooking. Room temperature promotes the growth of harmful bacteria. Be sure that the oven light is off because heat from the bulb will speed harmful bacteria growth.
GEAppliances.com How to Set a Delayed Start and Automatic Stop You can set the oven control to delay-start the oven, cook for a specific length of time and then turn off automatically. Make sure the clock shows the correct time of day. Touch the CONVECTION BAKE MULTI/1 RACK or CONVECTION ROAST pad. Touch the number pads to set the desired oven temperature. Touch the COOKING TIME pad. NOTE: If your recipe requires preheating, you may need to add additional time to the length of the cooking time.
Using the convection oven. How to Set the Oven for Convection Roasting when Using the Probe For best results when roasting large turkeys and roasts, we recommend using the probe included in the convection oven. The display will flash PROBE and the oven control will signal if the probe is inserted into the outlet, and you have not set a probe temperature and pressed the START pad. Place the oven rack in the position that centers the food between the top and bottom of the oven.
Using the proofing and warming features. GEAppliances.com The proofing feature maintains a warm environment useful for rising yeast-leavened products. How to Set the Oven For Proofing Place the covered dough in a dish in the oven on rack B or C. NOTE: For best results, cover the dough with a cloth or with greased plastic wrap (the plastic may need to be anchored underneath the container so the oven fan will not blow it off). Touch the PROOF pad and then the START pad. The display will read PrF (proof).
Adjust the oven thermostat—Do it yourself! You may find that your new oven cooks differently than the one it replaced. Use your new oven for a few weeks to become more familiar with it. If you still think your new oven is too hot or too cold, you can adjust the thermostat yourself. Do not use thermometers, such as those found in grocery stores, to check the temperature setting of your oven. These thermometers may vary 20–40 degrees F (11–22 degrees C).
Using the self-cleaning oven. GEAppliances.com The oven door must be closed and all controls set correctly for the cycle to work properly. Before a Clean Cycle We recommend venting your kitchen with an open window or using a ventilation fan or hood during the first self-clean cycle. Remove racks, broiler pan, broiler grid, probe, all cookware and any aluminum foil from the oven. Wipe up heavy soil on the oven bottom.
Using the self-cleaning oven. The oven door must be closed and all controls must be set correctly for the cycle to work properly. How to Delay the Start of Cleaning Touch the SELF CLEAN STD/LOW pad once for a 4-hour clean time or twice for a 3-hour clean time. A 3-hour self-clean time is recommended for use when cleaning small, contained spills. A self-clean time of 4 hours or longer is recommended for a dirtier oven.
Special features of your oven control. GEAppliances.com Your new touch pad control has additional features that you may choose to use. The following are the features and how you may activate them. The special feature modes can only be activated while the display is showing the time of day. They remain in the control’s memory until the steps are repeated. When the display shows your choice, touch the START pad.
Special features of your oven control. 12-Hour, 24-Hour or Clock Blackout Your control is set to use a 12-hour clock. If you would prefer to have a 24-hour military time clock or black out the clock display, follow the steps below. 28 Touch the CLOCK pad again to change to the 24-hour military time clock. The display will show 24 hr. If this is the choice you want, touch the START pad. Touch the BROIL HI/LO and BAKE pads at the same time for 3 seconds until the display shows SF.
GEAppliances.com Using Auto Recipe™ Conversion When using convection bake, the Auto Recipe™ Conversion feature will automatically convert entered regular baking temperatures to convection baking temperatures. The display will show the actual converted (reduced) temperature. For example, if you enter a regular recipe temperature of 350°F (177°C) and touch the START pad, the display will show CON and the converted temperature of 325°F (163°C).
Using the Sabbath Feature. (Designed for use on the Jewish Sabbath and Holidays.) (on some models) The Sabbath feature can be used for baking/roasting only. It cannot be used for convection, broiling, self-cleaning or Delay Start cooking. NOTE: The oven light comes on automatically when the door is opened and goes off when the door is closed. The bulb may be removed. See the Oven Light Replacement section. On models with a light switch on the control panel, the oven light may be turned on and left on.
Care and cleaning of the range. GEAppliances.com Be sure all controls are off and all surfaces are cool before cleaning any part of the range. WARNING: If your range is removed for cleaning, servicing or any reason, be sure the anti-tip device is reengaged properly when the range is replaced. Failure to take this precaution could result in tipping of the range and cause injury.
Care and cleaning of the range. Burner Grates and Vent Grille Porcelain enamel burner grates and the vent grille should be washed regularly and, of course, after spillovers. The grates may be washed either in the dishwasher or you may wash them in hot soapy water and rinse with clean water. You may also use abrasive cleaners and scouring pads to clean burner grates and the vent grille. Dry the grates and grille with a cloth—don’t put them back on the cooktop wet.
GEAppliances.com Receptacle Socket Oven Light Replacement (on some models) WARNING: SHOCK OR BURN HAzARD: Before replacing oven light bulb, disconnect the electrical power to the range at the main fuse or circuit breaker panel. Failure to do so may result in electric shock or burn. G6.35 Bulb Tab CAUTION: BURN HAzARD: The glass cover and bulb should be removed when cool. Touching hot glass with bare hands or a damp cloth can cause burns.
Care and cleaning of the range. Cleaning the Oven Door To clean the inside of the door: n Because the area inside the gasket is cleaned during the self-clean cycle, you do not need to clean this by hand. Do not rub or clean the door gasket— it has an extremely low resistance to abrasion. If you notice the gasket becoming worn, frayed or damaged in any way or if it has become displaced on the door, you should have it replaced.
GEAppliances.com Stainless Steel Surfaces (on some models) Do not use a steel wool pad; it will scratch the surface. To clean the stainless steel surface, use warm sudsy water or a stainless steel cleaner or polish. Always wipe the surface in the direction of the grain. Follow the cleaner instructions for cleaning the stainless steel surface.
Cleaning the glass cooktop. Control Lockout Begin by locking the cooktop; see the Control Lockout section. Normal Daily Use Cleaning ONLY use CERAMA BRYTE® Ceramic Cooktop Cleaner* on the glass cooktop. Other creams may not be as effective. To maintain and protect the surface of your glass cooktop, follow these steps: Clean your cooktop after each spill. Use CERAMA BRYTE® Ceramic Cooktop Cleaner.* Before using the cooktop for the first time, clean it with CERAMA BRYTE® Ceramic Cooktop Cleaner.
Glass surface—potential for permanent damage. Sugary spillovers (such as jellies, fudge, candy, syrups) or melted plastics can cause pitting of the surface of your cooktop (not covered by the warranty) unless the spill is removed while still hot. Special care should be taken when removing hot substances. Be sure to use a new, sharp razor scraper. GEAppliances.com Damage from Sugary Spills and Melted Plastic Turn off all surface units and, with an oven mitt, remove hot pans and grates.
Before you call for service… Troubleshooting Tips Save time and money! Review the charts on the following pages first and you may not need to call for service. Problem Possible Causes What To Do Burners have yellow or yellow-tipped flames The combustion quality of burner flames needs to be determined visually. • Use the illustrations below to determine if your burner flames are normal. If burner flames look like A, call for service.
GEAppliances.com Problem Possible Causes What To Do Food does not bake or roast properly Oven controls improperly set. • See the Using the oven section. Rack position is incorrect or the rack is not level. • See the Using the oven section. Incorrect cookware or cookware of improper size being used. • See the Using the oven section. Oven thermostat needs adjustment. • See the Adjust the oven thermostat – Do it yourself! section. Oven controls improperly set.
Before you call for service… Troubleshooting Tips Problem Possible Causes What To Do Clock and timer do not work Plug on range is not completely inserted in the electrical outlet. • Make sure electrical plug is plugged into a live, properly grounded outlet. A fuse in your home may be blown or the circuit breaker tripped. • Replace the fuse or reset the circuit breaker. Oven controls improperly set. • See the Using the clock and timer section.
GEAppliances.com Problem Possible Causes What To Do Control signals after entering cooking time or start time You forgot to enter a bake temperature or cleaning time. • Touch the BAKE pad and desired temperature or the SELF CLEAN STD/LOW pad and desired clean time. Display goes blank A fuse in your home may be blown or the circuit breaker tripped. • Replace the fuse or reset the circuit breaker. The clock is in the black-out mode. • See the Special features of your oven control section.
Before you call for service… Troubleshooting Tips Problem Possible Causes What To Do Scratches (may appear as cracks) on cooktop glass surface Incorrect cleaning methods being used. • Scratches are not removable. Tiny scratches will become less visible in time as a result of cleaning. Cookware with rough bottoms being used or coarse particles (salt or sand) were between the cookware and the surface of the cooktop. • To avoid scratches, use the recommended cleaning procedures.
Please place in envelope and mail to: Veuillez mettre dans une enveloppe et envoyez à : OWNERSHIP REGISTRATION P.O.
Accessories. GEAppliances.com Looking For Something More?(Not all accessories are available for all models.) You can find these accessories and many more at GEAppliances.com (U.S.) or www.GEAppliances.ca (Canada), or call 800.626.2002 (U.S.) or 800.661.1616 (Canada) (during normal business hours). Have your model number ready.
GE Gas Range Warranty. (For customers in the United States) All warranty service provided by our Factory Service Centers, or an authorized Customer Care® technician. To schedule service, visit us on-line at GEAppliances.com, or call 800.GE.CARES (800.432.2737). Please have serial number and model number available when calling for service. Staple your receipt here. Proof of the original purchase date is needed to obtain service under the warranty.
GE Gas Range Warranty. (For customers in Canada) All warranty service provided by our Factory Service Centres or an authorized Customer Care® technician. To schedule service, visit us on-line at www.GEAppliances.ca or call 1.800.561.3344. Please have serial number and model number available when calling for service. Staple your receipt here. Proof of the original purchase date is needed to obtain service under the warranty.
Consumer Support. GE Appliances Website In the U.S.: GEAppliances.com Have a question or need assistance with your appliance? Try the GE Appliances Website 24 hours a day, any day of the year! For greater convenience and faster service, you can now download Owner’s Manuals, order parts or even schedule service on-line. In Canada: www.GEAppliances.ca Schedule Service In the U.S.: GEAppliances.com Expert GE repair service is only one step away from your door.
Au gaz, coulissantes Cuisinières www.electromenagersge.ca Imprimé aux États-Unis Instructions de sécurité . . . . . . .2–7 Mode d’emploi Auto-nettoyage . . . . . . . . . . . . . . . . . .25, 26 Batterie de cuisine . . . . . . . . . . . . . . . . . . . .9 Brûleurs de surface . . . . . . . . . . . . . . . 8, 9 Convexion . . . . . . . . . . . . . . . . . . . . . . .18–22 Cuisiner et rôtir avec la minuterie . . . . . . . . . . . . . . . . . . . .16 Cuisiner ou rôtir . . . . . . . . . . . . . . . . . . . .
INFORMATION DE SÉCURITÉ IMPORTANTE LISEZ TOUTES LES INSTRUCTIONS AVANT L’UTILISATION. AVERTISSEMENT : Si l’information contenue dans ces instructions n’est pas suivie exactement, il pourrait y avoir un incendie ou une explosion causant des dommages à la propriété, des blessures personnelles ou la mort. — Ne rangez pas et n’utilisez pas d’essence ou d’autres vapeurs et liquides inflammables près de cet appareil électroménager ou autre.
www.electromenagersge.ca AVERTISSEMENT ! Pour votre sécurité, vous devez suivre l’information contenue dans ce manuel pour réduire les risques d’incendie et d’explosion, de choc électrique ou pour éviter tout dommage matériel, des blessures ou la mort. DISPOSITIF ANTIBASCULEMENT Pour réduire le risque de basculement, la cuisinière doit être arrimée à un dispositif antibasculement correctement installé.
INFORMATION DE SÉCURITÉ IMPORTANTE LISEZ TOUTES LES INSTRUCTIONS AVANT L’UTILISATION. AVERTISSEMENT ! PRÉCAUTIONS DE SÉCURITÉ Lorsque vous utilisez un appareil électrique, vous devez toujours suivre des précautions de base, y compris ce qui suit : n Utilisez cet appareil seulement pour l’usage n N’essayez pas de réparer ou de remplacer auquel il est destiné selon ce manuel du une quelconque pièce de votre cuisinière propriétaire. à moins que cela ne soit recommandé spécifiquement dans ce manuel.
www.electromenagersge.ca PRÉCAUTIONS DE SÉCURITÉ n Gardez toujours les ustensiles de bois et de plastique et les aliments en boîte à distance de votre cuisinière. n Gardez toujours les revêtements muraux combustibles, les rideaux ou les tentures à distance de votre cuisinière. n Ne nettoyez pas la cuisinière avec des liquides de nettoyage inflammables ou volatiles.
INFORMATION DE SÉCURITÉ IMPORTANTE LISEZ TOUTES LES INSTRUCTIONS AVANT L’UTILISATION. AVERTISSEMENT ! BRÛLEURS DE SURFACE Utilisez la bonne taille de casserole—évitez les casseroles instables ou qui basculent facilement. Choisissez une batterie de cuisine à fond plat assez large pour couvrir les grilles du brûleur. Pour éviter les déversements, assurez-vous que la casserole soit assez grande pour bien contenir les aliments.
www.electromenagersge.ca FAITES BIEN CUIRE LA VIANDE ET LA VOLAILLE… Faites bien cuire la viande et la volaille—la viande doit avoir une température INTERNE de 71 °C (160 °F), et la volaille une température INTERNE de 82 °C (180 °F). Préparer la nourriture à ces températures protège normalement contre les maladies alimentaires. AVERTISSEMENT ! FOUR Lorsque vous ouvrez la porte du four, restez à l’écart de la cuisinière.
Utilisation des brûleurs de surface au gaz. Dans ce manuel, les fonctions et l’apparence pourraient différer de votre modèle. Comment allumer un brûleur de surface au gaz Enfoncez le bouton de commande et tournez-le en position LITE. Vous entendrez un petit déclic—le son de l’étincelle électrique qui allume le brûleur. Enfoncez le bouton de contrôle et tournez-le à la position « LITE ». Une fois la flamme allumée, tournez le bouton pour ajuster la taille de la flamme.
www.electromenagersge.ca Batterie de cuisine sur la cuisinière Aluminium : une batterie de cuisine de poids moyen est recommandée car elle chauffe rapidement et uniformément. La plupart des aliments brunissent uniformément dans une poêle à frire d’aluminium. Utilisez des poêlons à couvercles hermétiques en cuisinant avec de petites quantités d’eau. Céramique de verre résistante à la chaleur : sert à la cuisson de surface ou au four. Elle conduit la chaleur très lentement et se refroidit très lentement.
Utilisez les contrôles du four. (Dans ce manuel, les fonctions et l’apparence pourraient différer de votre modèle.) Les fonctions et l’apparence pourraient varier. Fonctions et réglages des contrôles du four, de l’horloge et de la minuterie Touche BAKE (cuisson) Enfoncez pour choisir la fonction de cuisson. Touche BROIL HI/LO (griller à haute/basse température) Enfoncez pour choisir la fonction ‘griller’.
Utiliser le four. www.electromenagersge.ca Pour éviter toute brûlure possible, placez les grilles à la position voulue avant de mettre le four en marche. Avant de commencer… Le four possède 7 positions de grille. Les grilles ont des butées donc lorsqu’elles sont placées correctement, elles bloquent avant de sortir complètement et ne se pencheront pas. En plaçant et retirant les casseroles, sortez la grille jusqu’à ce qu’elle bloque. L’élément chauffant se trouve sous le plancher du four.
Utiliser le four. Préchauffage et placement des moules Ne placez pas d’aliments directement dans le fond du four. Préchauffez le four si la recette l’indique. Il est nécessaire de préchauffer pour de meilleurs résultats lors de la préparation de gâteaux, de biscuits secs, de pâtisseries et de pain. Pour préchauffer, réglez le four à la bonne température. Le contrôle fera entendre un bip lorsque le four est préchauffé et l’affichage indiquera la température choisie.
www.electromenagersge.ca Évent de four Votre four est ventilé à travers un évent qui se trouve vers l’arrière de la cuisinière. Ne bloquez pas cet évent en cuisinant dans le four. Il est important que le courant d’air chaud du four et l’air frais du brûleur du four circule sans interruption. Évitez de toucher les ouvertures d’évent ou les surfaces avoisinantes tandis que le four ou le gril est allumé, car ils pourraient être chauds.
Utilisation du four. Comment régler le four à griller IMPORTANT : pour éviter les brûlures possibles, placez les tablettes à la position voulue avant d’allumer le four. Déposez la viande ou le poisson sur une grille d’une lèchefrite conçue pour la grillade. Suivez les positions de grilles suggérées dans le Guide pour griller. La porte du four doit être fermée pendant que les aliments grillent.
Utiliser l’horloge, la minuterie et le verrouillage des contrôles. www.electromenagersge.ca Pour régler l’horloge Assurez-vous que l’horloge soit réglée à la bonne heure. L’horloge doit être réglée à la bonne heure pour que les fonctions de minuterie automatique du four fonctionnent correctement. L’heure ne peut pas être changée durant une cuisson à minuterie ou un cycle d’autonettoyage. Enfoncez la touche CLOCK (horloge). Enfoncez les touches numériques. Enfoncez la touche START (démarrer).
Utilisation des fonctions pour cuisiner et rôtir avec la minuterie.(sur certaines modèles) REMARQUE : les aliments qui se gâtent facilement—comme le lait, les oeufs, le poisson, la farce, la volaille et le porc—ne devraient pas rester sortis pendant plus d’une heure avant ou après la cuisson. La température ambiante favorise la croissance de bactéries dangereuses. Assurez-vous que la lumière du four soit éteinte car la chaleur de l’ampoule favorisera la croissance de bactéries dangereuses.
Utiliser la sonde. www.electromenagersge.ca Pour de nombreux aliments, tout particulièrement les rôtis et la volaille, la température interne des aliments est le meilleur moyen de savoir s’ils sont prêts. La sonde de température permet de ne plus tenter de deviner si les aliments rôtis sont bien cuits. La sonde de température possède un capteur ressemblant à une brochette à une extrémité et une fiche à l’autre, c’est ce qui pénètre dans la prise du four.
Utiliser le four à convexion. Ventilateur de convexion Dans un four à convexion, il y a un ventilateur qui fait circuler l’air chaud au-dessus, sous et autour des aliments. Cet air chaud est réparti uniformément dans l’ensemble de la cavité du four. Ainsi, les aliments cuisent et brunissent uniformément—souvent en moins de temps avec la chaleur de convexion. REMARQUE : un ventilateur de convexion s’allume et s’éteint pendant la cuisson pour mieux répartir l’air chaud dans le four.
www.electromenagersge.ca Rôtir par convexion n Convient pour les larges coupes tendres de viande, découvertes. Le ventilateur de convexion fait circuler uniformément l’air réchauffé au-dessus et autour des aliments. La viande et la volaille sont brunies de tous les côtés comme si elles étaient préparées dans une rôtissoire. L’air réchauffé enferme les jus rapidement pour un produit tendre et humide tout en créant un extérieur d’un brun doré.
Utiliser les fonctions à minuterie pour la cuisson à convexion. Vous entendrez un ventilateur en cuisinant avec ces fonctions. Le ventilateur s’arrête si la porte est ouverte, mais la chaleur continuera. REMARQUE : les aliments qui se gâtent facilement—comme le lait, les oeufs, le poisson, la farce, la volaille et le porc—ne devraient pas rester sortis pendant plus d’une heure avant ou après la cuisson. La température ambiante favorise la croissance de bactéries dangereuses.
www.electromenagersge.ca Comment régler un démarrage retardé et un arrêt automatique OU Vous pouvez régler le contrôle du four pour retarder le démarrage du four, cuire pendant un temps précis, puis s’éteindre automatiquement. Assurez-vous que l’horloge montre la bonne heure. Enfoncez la touche CONVECTION BAKE MULTI/1 RACK (cuisson convexion multi/1 grille) ou CONVECTION ROAST (rôtir convexion). Enfoncez les touches numériques pour régler la température voulue du four.
Utiliser le four à convexion. Comment régler le four pour rôtir à convexion en utilisant la sonde Pour de meilleurs résultats en préparant de grosses dindes et rôtis, nous recommandons d’utiliser la sonde incluse dans le four à convexion. Pour changer la température du four durant le cycle Rôtir, enfoncez la touche CONVECTION ROAST (rôtir convexion) et ensuite les touches numériques pour régler la nouvelle température.
Utiliser les fonctions de fermentation et de réchauffement. www.electromenagersge.ca La fonction de fermentation conserve un environnement chaud utile pour que les produits à levure lèvent. Comment régler le four pour la fermentation Placez la pâte couverte dans un plat dans le four sur la tablette B ou C.
Ajustez le thermostat du four—Faites-le vous-même ! Vous pouvez découvrir que votre nouveau four prépare les aliments différemment de celui qu’il remplace. Utilisez votre nouveau four pendant quelques semaines pour vous familiarisez avec lui. Si vous croyez que votre nouveau four est trop chaud ou trop froid, vous pouvez ajuster vous-même le thermostat. N’utilisez pas de thermomètres, comme ceux qu’on trouve dans les épiceries pour vérifier le réglage de température de votre four.
Utiliser le four autonettoyant. www.electromenagersge.ca La porte du four doit être fermée et tous les contrôles réglés correctement pour que les cycles fonctionnent correctement. Avant un cycle de nettoyage AVERTISSEMENT : Nous recommandons d’aérer votre cuisine avec une fenêtre ouverte ou en utilisant un ventilateur ou la hotte durant le premier cycle d’autonettoyage. Essuyez toute accumulation de saleté sur le fond du four.
Utiliser le four autonettoyant. La porte du four doit être fermée et tous les contrôles réglés correctement pour que le cycle fonctionne correctement. Comment retarder le début du nettoyage Enfoncez la touche SELF CLEAN STD/LOW (autonettoyage std/bas) une fois pour une durée de nettoyage de 4 heures ou deux fois pour une durée de 3 heures. Une durée d’autonettoyage de 3 heures est recommandée lorsque les déversements sont petits et contenus.
Fonctions spéciales de votre contrôle de four. www.electromenagersge.ca Votre nouveau contrôle tactile a d’autres fonctions. Voici les fonctions et comment les activer. Les modes de fonctions spéciales peuvent être activées seulement lorsque l’affichage présente l’heure. Elles restent en mémoire jusqu’à ce que les étapes soient répétées. Lorsque l’affichage montre votre choix, enfoncez la touche START (démarrer).
Fonctions spéciales de votre contrôle de four. 12 heures, 24 heures ou effacer l’horloge Votre contrôle est réglé pour utiliser une horloge de 12 heures. Si vous préférez une horloge de 24 heures ou un arrêt d’affichage, suivez ces étapes : Enfoncez les touches BROIL HI/LO (griller à haute/basse température) et BAKE (cuisson) en même temps pendant 3 secondes jusqu’à ce que l’affichage indique SF. Enfoncez la touche CLOCK (horloge) une fois. L’affichage indiquera 12 hr (12 heures).
www.electromenagersge.ca Utiliser la conversion Auto Recipe™ Pour la cuisson à convexion, la fonction de conversion Auto Recipe™ convertira automatiquement les températures de cuisson régulières par la température de cuisson à convexion. L’affichage indiquera la température convertie (réduite) actuelle.
Utiliser la fonction Sabbath (Conçue pour le Sabbath et les Grandes Fêtes juives.) (sur certaines modèles) La fonction Sabbath peut servir seulement sous cuire/rôtir. Elle ne peut servir pour la convexion, gril, autonettoyage ou démarrage retardé. REMARQUE : la lumière du four s’allume automatiquement lorsque la porte s’ouvre et s’éteint lorsqu’elle se ferme. L’ampoule peut être retirée. Reportez-vous à la section Remplacer la lumière du four.
www.electromenagersge.ca Comment quitter la fonction Sabbath Enfoncez la touche CLEAR/OFF (annulation/arrêt). Si le four fonctionne, attendez pendant une période de délai aléatoire d’environ 30 secondes à 1 minute, jusqu’à ce que seulement s’affiche. Enfoncez et tenez enfoncées les touches BROIL HI/LO (griller à haute/basse température) et BAKE (cuisson) en même temps jusqu’à ce que l’affichage indique SF.
Entretien et nettoyage de la cuisinière. Assurez-vous que tous les contrôles sont éteints et que toutes les surfaces sont fraîches avant de nettoyer toute partie de la cuisinière. AVERTISSEMENT : si votre cuisinière est retirée pour le nettoyage, l’entretien ou pour toute autre raison, assurez-vous que le dispositif antibasculement est réengagé correctement lorsque la cuisinière est replacée. Sinon, la cuisinière pourrait basculer et il pourrait y avoir des blessures.
www.electromenagersge.ca Grilles du brûleur et grille centrale Les grilles du brûleur en émail de porcelaine et la grille d’évent doivent être lavées régulièrement et, bien sûr, après tout déversement. Les grilles se lavent soit dans le lave-vaisselle soit dans de l’eau savonneuse puis rincées à l’eau propre. Vous pouvez aussi utiliser des nettoyants abrasifs et des tampons à récurer pour nettoyer les grilles du brûleur et la grille d’évent.
Entretien et nettoyage de la cuisinière. Réceptacle Douille Remplacer les ampoules de four (sur certains modèles) AVERTISSEMENT : Ampoule G6.
www.electromenagersge.ca Nettoyage de la porte du four Pour nettoyer l’intérieur de la porte : n Puisque la section à l’intérieur du joint se nettoie durant le cycle d’autonettoyage, aucun besoin de le nettoyer à la main. Ne frottez pas et ne nettoyez pas le joint de porte car il a une résistance extrêmement faible à l’abrasion. Si vous remarquez qu’il devient usé, s’effiloche, est endommagé de quelque façon ou a été déplacé sur la porte, vous devriez le remplacer.
Entretien et nettoyage de la cuisinière. Surfaces d’acier inoxydable (sur certaines modèles) N’utilisez pas de tampons de laine d’acier; ils pourraient rayer la surface. Pour nettoyer la surface en acier inoxydable, utilisez de l’eau chaude savonneux ou un produit nettoyant ou cire à acier inoxydable. Essuyez toujours la surface dans le sens du grain. Suivez les instructions du produit nettoyant pour nettoyer la surface en acier inoxydable.
Nettoyage de la surface de cuisson vitrée. www.electromenagersge.ca Lockout (verrouillage) des contrôles Commencez par verrouiller la surface de cuisson et consultez la section Verrouillage des contrôles. Nettoyage quotidien normal Utilisez SEULEMENT le nettoyant de surface de cuisson de céramique CERAMA BRYTE®* sur la surface de cuisson de verre. D’autres crèmes pourraient ne pas être efficaces.
Surface de verre—possibilité de dommages permanents. Les déversements sucrés (tels que gelées, fudge, bonbons, sirops) ou les plastiques fondus peuvent piquer la surface de cuisson (non couverte pas la garantie) à moins que vous ne puissiez les retirer tandis qu’ils sont encore chauds. Attention en retirant les substances chaudes. Assurez-vous d’utiliser un grattoir à lame de rasoir neuf et tranchant. N’utilisez pas de lame émoussée ou ébréchée.
Avant d’appeler le service... www.electromenagersge.ca Conseils de dépannage Gagner du temps et de l’argent ! Révisez les tableaux des pages suivantes d’abord et vous n’aurez peut-être pas besoin d’appeler le service. Problème Causes possibles Action Les flammes des brûleurs sont jaunes ou leurs extrémités sont jaunes La qualité de combustion des flammes du brûleur doit être déterminée visuellement. • Utilisez les illustrations plus bas pour déterminer si les flammes de vos brûleurs sont normales.
Avant d’appeler le service... Conseils de dépannage Problème Causes possibles Action Les aliments ne cuisent ou ne rôtissent pas Les contrôles du four sont mal réglés. • Reportez-vous à la section Utiliser le four. La position de la clayette est incorrecte ou la clayette n’est pas à niveau. • Reportez-vous à la section Utiliser le four. On utilise la mauvaise taille de casserole. • Reportez-vous à la section Utiliser le four. Le thermostat du four doit être ajusté.
www.electromenagersge.ca Problème Causes possibles Action L’horloge et la minuterie ne fonctionnent pas La fiche n’est pas insérée entièrement dans la prise de courant. • Assurez-vous de la fiche soit branchée dans une prise sous tension, bien mise à la terre. Un fusible pourrait être grillé ou le disjoncteur a été déclenché. • Remplacez le fusible ou réinitialisez le disjoncteur. Les contrôles du four sont mal réglés. • Reportez-vous à la section Utiliser l’horloge et la minuterie.
Avant d’appeler le service... Conseils de dépannage Problème Causes possibles Action Le contrôle signale après avoir entré la durée de cuisson ou l’heure de démarrage Vous avez oublié d’entrer une température de cuisson ou de durée de nettoyage. • Enfoncez la touche BAKE (cuisson) et la température désirée sur la touche SELF CLEAN STD/LOW (autonettoyage std/bas) et la durée de nettoyage voulue. L’afficheur s'éteint Un fusible pourrait être grillé ou le disjoncteur pourrait avoir été déclenché.
www.electromenagersge.ca Problème Causes possibles Action Des égratignures (peuvent être des fissures) sur la surface de cuisson vitrée Mauvaises méthodes • Les égratignures ne s’éliminent pas. Les petites égratignures de nettoyage utilisées. seront moins visibles avec le temps et suite au nettoyage. Vous utilisez peut-être une batterie • Pour éviter ce problème, utilisez les procédures de nettoyage de cuisine aux fonds rugueux ou recommandées.
Accessoires. Vous cherchez quelque chose de plus? (Tous les accessoires ne sont pas offerts sur tous les modèles) Vous pouvez trouver ces accessoires et bien d’autres sur le site electromenagersge.ca, ou en composant le 800.661.1616 (durant les heures ouvrables). Tenez votre numéro de modèle à portée de la main.
Notes. www.electromenagersge.
Notes.
Garantie de la cuisinière au gaz GE. Agrafez votre reçu ici. La Le service sous garantie est assuré par nos centres de service preuve de date d’achat original de l’usine ou par un technicien agréé Customer Care®. Pour est nécessaire pour obtenir obtenir le service, visitez notre site Web à l’entretien et les réparations www.electromenagersge.ca ou contactez 1.800.561.3344. Veuillez sous la garantie. fournir le numéro de série et le numéro de modèle lorsque vous appelez pour obtenir le service.
Soutien au consommateur. Site Web appareils électroménagers GE www.electromenagersge.ca Vous avez une question ou vous avez besoin d’aide pour votre appareil électroménager? Contactez-nous par Internet au site www.electromenagersge.ca 24 heures par jour, tous les jours de l’année. Service de réparations 1.800.561.3344 Service de réparations GE est tout près de vous. Pour faire réparer votre électroménager GE, il suffit de nous téléphoner.