REFRIGERATORS Bottom Freezer SAFETY INFORMATION .....3 OPERATING INSTRUCTIONS Features . . . . . . . . . . . . . . . . . . . . . . . . . . 6 Controls . . . . . . . . . . . . . . . . . . . . . . . . . . 9 Dispenser* . . . . . . . . . . . . . . . . . . . . . . . 13 Autofill* . . . . . . . . . . . . . . . . . . . . . . . . . 14 Single Serve Brewer* . . . . . . . . . . . . . . 15 About Appliance Communication . . . 16 Water Filter . . . . . . . . . . . . . . . . . . . . . . 17 Refrigerator Storage Options.
THANK YOU FOR MAKING GE APPLIANCES A PART OF YOUR HOME. Whether you grew up with GE Appliances, or this is your first, we’re happy to have you in the family. We take pride in the craftsmanship, innovation and design that goes into every GE Appliances product, and we think you will too. Among other things, registration of your appliance ensures that we can deliver important product information and warranty details when you need them. Register your GE appliance now online.
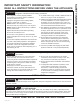
READ ALL INSTRUCTIONS BEFORE USING THE APPLIANCE WARNING To reduce the risk of fire, explosion, electric shock, or injury when using your refrigerator, follow these basic safety precautions: Ŷ 7 KLV UHIULJHUDWRU PXVW EH SURSHUO\ LQVWDOOHG DQG ORFDWHG LQ DFFRUGDQFH ZLWK WKH ,QVWDOODWLRQ ,QVWUXFWLRQV EHIRUH LW LV XVHG Ŷ 8QSOXJ WKH UHIULJHUDWRU EHIRUH PDNLQJ UHSDLUV replacing a light bulb, or cleaning. NOTE: Power to the refrigerator cannot be disconnected by any setting on the cont rol panel.
SAFETY INFORMATION IMPORTANT SAFETY INFORMATION READ ALL INSTRUCTIONS BEFORE USING THE APPLIANCE CONNECTING ELECTRICITY WARNING ELECTRICAL SHOCK HAZARD Plug into a grounded 3-prong outlet 'R QRW UHPRYH WKH JURXQG SURQJ 'R QRW XVH DQ DGDSWHU 'R QRW XVH DQ H[WHQVLRQ FRUG )DLOXUH WR IROORZ WKHVH LQVWUXFWLRQV FDQ UHVXOW LQ GHDWK ILUH RU HOHFWULFDO VKRFN Do not, under any circumstances, cut or remove the third (ground) prong from the power cord.
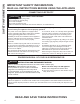
READ ALL INSTRUCTIONS BEFORE USING THE APPLIANCE HOT WATER DISPENSER WARNING Scalding Hazard. The hot water dispenser is capable of heating water to a temperature of approximately 185°) °& :DWHU temperatures above 125°) °& FDQ FDXVH VHYHUH EXUQV RU GHDWK IURP VFDOGLQJ &KLOGUHQ WKH GLVDEOHG DQG WKH elderly are at highest risk of being scalded. Use this appliance only for its intended purpose as described in this Owner’s Manual.
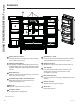
USING THE REFRIGERATOR: )HDWXUHV Features Space-saving ice maker* ,FH PDNHU DQG ELQ DUH ORFDWHG RQ WKH GRRU FUHDWLQJ more usable storage space. QuickSpace™ shelf* )XQFWLRQV DV D QRUPDO IXOO VL]HG VKHOI ZKHQ QHHGHG and easily slides back to store tall items below. Showcase LED lighting /(' OLJKWLQJ LV SRVLWLRQHG WKURXJKRXW WKH LQWHULRU WR VSRWOLJKW DUHDV LQ WKH UHIULJHUDWRU /('V DUH ORFDWHG XQGHU WKH UHIULJHUDWRU GRRU WR OLJKW WKH IUHH]HU ZKHQ opened. Spillproof shelves 'HVLJQHG WR FDSWXUH \RXU VS
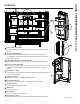
USING THE REFRIGERATOR: )HDWXUHV Features Space-saving ice maker* ,FH PDNHU DQG ELQ DUH ORFDWHG RQ WKH GRRU FUHDWLQJ PRUH XVDEOH VWRUDJH space. Showcase LED lighting /(' OLJKWLQJ LV SRVLWLRQHG WKURXJKRXW WKH LQWHULRU WR VSRWOLJKW DUHDV LQ WKH UHIULJHUDWRU /('V DUH ORFDWHG XQGHU WKH UHIULJHUDWRU GRRU WR OLJKW WKH IUHH]HU ZKHQ RSHQHG Full-width temperature controlled drawer Adjustable temperature control bin that can accommodate larger items.
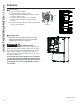
USING THE REFRIGERATOR: )HDWXUHV Features Door ice bin* 1. Open left refrigerator door. 2. Pull down latch to release bin door. 8VLQJ KDQGKROG OLIW LFH EXFNHW XS DQG RXW WR FOHDU locators in bottom of bin. 4. To replace the ice bucket, set it on the guide brackets and push until the ice bucket seats properly.
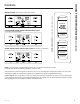
PFH28, PFE28K, DFE28, PFD28, PYE22K, PYD22, DYE22 &RQWURO 6W\OH % $XWR)LOO 0RGHOV Ice GFD28, GFE28, GFE26, GFS26, GYS22, GYE22 Control Style C, GE Models GNE29, GWE23, PWE23 &RQWURO 6W\OH ' 1RQ 'LVSHQVH &RQWURO PFE28P, PYE22P Control Style A, Single Serve Models Refrigerator Recommended: 37 °F Actual Set F Recommended: 0°F Freezer Hold 3 Sec for °F/°C Door Alarm Ice Maker Lock Controls USING THE REFRIGERATOR: Controls Controls Hold 3 Seconds Reset Filter Hold 3 Seconds Error Complete Sensing
USING THE REFRIGERATOR: Controls Controls Changing the Temperature for Control Style A To Change the Refrigerator Temperature: Press the Fridge button and current set temperature will display. Pressing and releasing the button will cycle through the available temperature settings. Press and hold button for Turbo Cool feature. The display will show tC. Cooling system can be turned off by pressing and holding Freezer and Start Heating. OFF will be displayed. To turn on, press Fridge or Freezer.
3)+ 3)( . ')( 3)' Control Style A, External Controls 3)( 3 3<( 3 Control Style B, External Controls 3<( . 3<' '<( Ice Control Style C, External Controls *)' *)( *)( *)6 GYE22, GYS22 Error Complete Sensing Cubed Crushed Hands-free Autofill* Cooling system On/Off Hands-free Autofill uses sensors to monitor container height to automatically dispense filtered water without having to activate the paddle.
USING THE REFRIGERATOR: Controls Controls Controls Style D, Internal Controls GNE29, GWE23, PWE23 Refrigerator Recommended: 37 °F Actual Set F Recommended: 0°F Freezer Hold 3 Sec for °F/°C Door Alarm Ice Maker Lock Controls Hold 3 Seconds Reset Filter Hold 3 Seconds Door Alarm 6RXQGV WR DOHUW ZKHQ WKH IUHH]HU RU UHIULJHUDWRU GRRUV have been left open. Reset Filter Hold for 3 seconds after replacing filter.
Water & Ice Dispenser (See About the controls with temperature settings & About the control IHDWXUHV ,I QR ZDWHU LV GLVSHQVHG ZKHQ WKH UHIULJHUDWRU LV ILUVW installed, there may be air in the water line system. Press the dispenser paddle for at least five minutes to remove trapped air from the water line and to fill the water system. To flush out impurities in the water line, throw away the first six full glasses of water. To remove Dispenser Tray (Type A and B Only) Ŷ 3XOO 'LVSHQVHU 7UD\ RXW XQWLO LW VWR
USING THE REFRIGERATOR: $872),// .HXULJ . &XS %UHZHU AUTOFILL* To Use HANDS FREE AUTOFILL: Ŷ &HQWHU FRQWDLQHU RQ 5HFHVV 'LVSHQVHU 7UD\ DV IDU back as possible without activating paddle and remove hand from container Ŷ Press AUTOFILL To Stop AUTOFILL Ŷ Press AUTOFILL to stop. Important Facts about AUTOFILL Ŷ )RU RSWLPXP UHVXOWV XVH D XQLIRUP FRQWDLQHU EHWZHHQ ´ FP WDOO DQG ´ FP ZLGH Ŷ )LOO OHYHO DQG IXQFWLRQDOLW\ PD\ YDU\ RQ FRQWDLQHUV WDOOHU WKDQ ´ FP RU ZLGHU WKDQ ´
(Cont.) How to use the single serve dispenser 1 Load the K-Cup Brewer ,QVHUW D .HXULJ . &XS SRG LQWR WKH EUHZHU DQG SUHVV GRZQ ILUPO\ \RX ZLOO KHDU D SRSSLQJ VRXQG . &XS Close the brewer. Lid will click when secure. Push to open 2 3 4 CAUTION Cut/Puncture Hazard. • There are two sharp needles located inside the . &XS EUHZHU 7R DYRLG ULVN RI LQMXU\ GR QRW SXW \RXU ILQJHUV LQVLGH WKH EUHZHU 8VH FDXWLRQ when cleaning. • .HHS WKH .
USING THE REFRIGERATOR: Appliance Communication Appliance Communication GE WiFi Connect** (for customers in the United States, its territories, and Canada) GE WiFi Connect Enabled* (PFE28P, PFD28, PYD22, PYE22P, PFH models only) ,I \RXU UHIULJHUDWRU KDV D &RQQHFWHG $SSOLDQFH LQIRUPDWLRQ ODEHO ORFDWHG RQ WKH LQVLGH DV VKRZQ \RXU UHIULJHUDWRU FDQ EH FRQQHFWHG WR \RXU :L)L QHWZRUN DOORZLQJ LW WR FRPPXQLFDWH ZLWK \RXU VPDUW SKRQH IRU UHPRWH PRQLWRULQJ FRQWURO DQG QRWLILFDWLRQV 'HSHQGLQJ RQ WKH UHIULJHUD
Water Filter Cartridge The water filter cartridge is located in the fresh food interior on the left side wall, near the top. 6HOHFW PRGHOV XVH UDGLR IUHTXHQF\ LGHQWLILFDWLRQ 5),' WR GHWHFW OHDNV DQG PRQLWRU ILOWHU VWDWXV 7KH 5),' WHFKQRORJ\ LV FHUWLILHG E\ WKH )&& FCCID: ZKJ-EBX1532P001 ICID: 10229A-EBX1532P001 “This device complies with part 15 of the FCC Rules.
USING THE REFRIGERATOR: Refrigerator Storage Options Refrigerator Storage Options Rearranging the Shelves Shelves in the refrigerator compartment are adjustable. To remove: Remove all items from the shelf. Tilt the shelf up at the front. Lift the shelf up at the back and bring the shelf out. To replace: While tilting the shelf up, insert the top hook at the back of the shelf in a slot on the track. Lower the front of the shelf until the bottom of the shelf locks into place.
Right Door Bins FIXED BINS can easily be carried from refrigerator to work area. To remove: Lift bin straight up, then pull out. ROTATING BIN*: To remove: Rotate bin outward then lift straight up. To remove Place hand under metal base and lift up. To remove Metal Base: Place hand under metal base and lift up. Remove Rotating Bin )L[HG %LQV 5HPRYH )L[HG %LQV Remove Metal Base Left Door Bins DISPENSER MODELS - FIXED BIN To remove: Lift the bin straight up, then pull out.
USING THE REFRIGERATOR: &OLPDWH =RQH 7HPSHUDWXUH &RQWUROOHG 'UDZHU Climate Zone & Temperature Controlled Drawer ClimateZone .HHS IUXLWV DQG YHJHWDEOHV RUJDQL]HG LQ VHSDUDWH compartments for easy access. Excess water that may accumulate in the bottom of the drawers or under the drawers should be wiped dry.
How to Remove and Replace Drawer To remove: Pull the drawer out to the stop position. Lift the front of the drawer up and out. To replace: Pull left and right slides until fully extended. Place drawer back in first and rotate drawer front down to seat on slide. Push the drawer in to closed position. How to Remove and Replace Drawer Divider* To remove: Pull the drawer out to the stop position. Raise the front side of the divider to unhook it from the rear wall of the drawer.
USING THE REFRIGERATOR: %DVNHWV 'UDZHUV DQG %LQV Baskets, Drawers, and Bins Freezer Basket and Drawer Basket. 'UDZHU ,FH %XFNHW $YDLODEOH RQ 1RQ 'LVSHQVH PRGHOV RQO\ $YDLODEOH DV D ,0 .LW RQ VRPH PRGHOV Non-Adjustable Bin in the Freezer* To remove: Push in plastic tab on either left or right side Plastic Tabs To replace: Slide bin into location until it locks into place.
A newly installed refrigerator may take 12 to 24 hours to begin making ice. ,FH Throw away the first maker Connect to potable water supply bin of ice to allow the WARNING only. ZDWHU OLQH WR FOHDU ,W LV A cold water supply is required for automatic icemaker normal for ice to appear operation. The water pressure must be between 40 discolored in the first DQG SVL NLORSDVFDOV 24 hours of production, or after water filter replacement.
CARE AND CLEANING Care and Cleaning Cleaning the Outside FINGERPRINT RESISTANT STAINLESS STEEL*, BLACK STAINLESS, SLATE, DARK SLATE, PAINTED - Outside surfaces, door handles, and trim DO NOT use Stainless Steel cleaners on the door surfaces. IMPORTANT: 7KH XVH RI LQFRUUHFW SURGXFWV PD\ GDPDJH WKH RXWHU ILQLVK RI )LQJHUSULQW 5HVLVWDQW 6WDLQOHVV DQG Black Stainless models. Please follow these instructions and use only the appropriate items below to clean your appliance surfaces.
Behind the Refrigerator Be careful when moving the refrigerator away from the wall. All types of floor coverings can be damaged, particularly cushioned coverings and those with embossed surfaces. Raise the leveling legs located at the bottom front of the refrigerator. Pull the refrigerator straight out and return it to position by pushing it straight in. Moving the refrigerator in a side direction may result in damage to the floor covering or refrigerator.
INSTALLATION INSTRUCTIONS Installation Instructions Refrigerator GE and GE Profile™ models Questions? Call 800.GE.CARES (800.432.2737) or visit our Website at: GEAppliances.com In Canada, call 1.800.561.3344 or visit our Website at: GEAppliances.ca BEFORE YOU BEGIN PREPARATION Read these instructions completely and carefully. MOVING THE REFRIGERATOR INDOORS ,I WKH UHIULJHUDWRU ZLOO QRW ILW WKURXJK D GRRUZD\ WKH UHIULJHUDWRU GRRU DQG IUHH]HU GUDZHU FDQ EH UHPRYHG 7R UHPRYH WKH UHIULJHUDWRU GRRU
DIMENSIONS All measurements are given with leveling leg fully retracted. &RXQWHU 'HSWK &' 0RGHOV 2QO\ 6WDQGDUG 'HSWK 6' 0RGHOV 2QO\ ´ ´ &DVH 'HSWK Z R 'RRUV ´ 6' ´ &' ´ 6' ´ &' ´ ´ ´ Height from floor to hinge cover top ´ ´ ´ ´ $GGLWLRQDO 'LPHQVLRQV SD CD 69 ´ 69 ´ 69´ 69´ Case Depth without Doors 29 ´ 24 ´ Overall Exterior Case Width ´ ´ Overall Exterior Depth Doors/Drawers with Handl
INSTALLATION INSTRUCTIONS Installation Instructions INSTALLING THE REFRIGERATOR REFRIGERATOR LOCATION Ŷ 'R QRW LQVWDOO WKH UHIULJHUDWRU ZKHUH WKH WHPSHUDWXUH ZLOO JR EHORZ ) & EHFDXVH it will not run often enough to maintain proper temperatures. Ŷ 'R QRW LQVWDOO WKH UHIULJHUDWRU ZKHUH WKH WHPSHUDWXUH ZLOO JR DERYH ) & EHFDXVH it will not perform properly.
INSTALLING THE REFRIGERATOR (Cont.) 1 REMOVE THE REFRIGERATOR DOORS (cont) E 8VLQJ D ´ VRFNHW UDWFKHW GULYHU UHPRYH WKH screws securing the top hinge to the cabinet. REMOVE OPPOSITE DOOR )ROORZ WKH VDPH SURFHGXUH RQ WKH RSSRVLWH GRRU There are no water lines on the opposite side. For Door in Door Models: Securely tape the inner and outer doors before installing or removing. 90º door alignment not required during installation or removal for these models.
INSTALLATION INSTRUCTIONS Installation Instructions INSTALLING THE REFRIGERATOR (Cont.) 2 REINSTALLING THE 2 REINSTALLING THE REFRIGERATOR DOORS REFRIGERATOR DOORS (cont.) ' Securely tape the door shut with masking tape Reverse steps 1 through 4 to reinstall refrigerator doors, follow details below for critical alignments. A Reinstall center hinge first and WRUTXH WKH ó´ VFUHZ WR LQ OEV 1 P DQG VPDOO VFUHZ WR LQ OEV 1 P 5RWDWLQJ WKH VFUHZ E\ WXUQ DIWHU LW LV IOXVK with mati
INSTALLATION INSTRUCTIONS Installation Instructions INSTALLING THE REFRIGERATOR (Cont.) 4 REMOVE FREEZER BASKET 5 REMOVE THE FREEZER BASKET SLIDES (Cont.) A Pull the lower basket and slide mechanism to full extension using both hands. B Remove the top IUHH]HU GUDZHU E\ fully extending the drawer then lifting up and out. C Remove the basket resting on the slides. ' Push the bottom basket slides back until the slide mechanism self retracts. ) Hole for clip Reverse the steps to assemble.
INSTALLATION INSTRUCTIONS Installation Instructions INSTALLING THE REFRIGERATOR (Cont.) 7 REPLACE FREEZER DOOR CAUTION Lifting Hazard Freezer door is heavy Use both hands to secure the door before lifting. A Pull the lower basket slide mechanism to full extension with both hands. B /LIW WKH IUHH]HU GRRU DQG DOLJQ WKH WDEV RQ WKH door bracket sides with the square holes in slide mechanisms. Align and insert WDE RQ )UHH]HU 'RRU %UDFNHW ZLWK VORW RQ )UHH]HU Slide Bracket.
INSTALLING THE REFRIGERATOR (Cont.) Instructions for adjusting freezer door gaps: IMPORTANT! The 6 mounting screws (3 on each side) are NOT interchangeable with the center or top hinge screws. Drawer screws have flat washer heads, and other screws have lines/ribs on washer heads. $IWHU LQVWDOODWLRQ RI WKH IUHH]HU GRRU FKHFN IRU XQLIRUP JDSV WRS DQG ERWWRP RI ULJKW DQG OHIW KDQG VLGH ZLWK WKH template provided.
INSTALLATION INSTRUCTIONS Installation Instructions INSTALLING THE REFRIGERATOR (Cont.) 11 LEVEL THE FREEZER DOOR 11 LEVEL THE FREEZER DOOR (cont.) C Lift the door on the side requiring adjustment, rotate the cam to required position. A Locate the height adjuster cam in the IUHH]HU GRRU 6OLJKWO\ ORRVHQ WKH WKUHH GRRU attachment screws on both sides using a ´ KH[ VRFNHW GULYHU B Locate and loosen the cam screw using the T-27 screw driver. ,QLWLDO SRVLWLRQ /LIW E\ ´ FP /RZ
INSTALLING THE REFRIGERATOR (Cont.) Anti-Tip Floor Bracket Installation (Models PYE, GYE, GYS, GWE, DYE, PYD, PWE, and ZWE only) TOOLS YOU WILL NEED WARNING Tip Over Hazard. ´ PP 'ULOO %LW DQG (OHFWULF RU +DQG 'ULOO Built-in style models (model PYE, GYE, GYS, GWE, 3<' 3:( DQG =:( DUH WRS KHDY\ HVSHFLDOO\ ZLWK any doors open. These models must be secured with the anti-tip floor bracket to prevent tipping forward, which could result in death or serious injury.
INSTALLATION INSTRUCTIONS Installation Instructions INSTALLING THE REFRIGERATOR (Cont.) Anti-Tip Floor Bracket Installation (Models PYE, GYE, GYS, GWE, DYE, PYD, PWE, and ZWE only) AT-2 LOCATING THE ANTI-TIP FLOOR BRACKET (cont.
INSTALLING THE REFRIGERATOR (Cont.) 13 CONNECTING THE REFRIGERATOR TO THE HOUSE WATER LINE A cold water supply is required for automatic LFH PDNHU RSHUDWLRQ ,I WKHUH LV QRW D FROG ZDWHU supply, you will need to provide one. See ,QVWDOOLQJ WKH :DWHU /LQH VHFWLRQ NOTES: • Before making the connection to the refrigerator, be sure the refrigerator power cord is not plugged into the wall outlet. ,I \RXU UHIULJHUDWRU GRHV QRW KDYH D ZDWHU filter, we recommend installing one if your water supply has sand or
INSTALLATION INSTRUCTIONS Installation Instructions INSTALLING THE REFRIGERATOR (Cont.) 14 TURN ON THE WATER SUPPLY Turn the water on at the shutoff valve (house ZDWHU VXSSO\ DQG FKHFN IRU DQ\ OHDNV 15 PLUG IN THE REFRIGERATOR See the grounding information attached to the power cord. Once the unit is on, press the dispenser paddle and dispense water for at least 5 minutes to remove air from the water line, and flush the filter.
INSTALLING THE REFRIGERATOR (Cont.) 17 LEVEL THE REFRIGERATOR DOORS Remember a level refrigerator is necessary for JHWWLQJ WKH GRRUV SHUIHFWO\ HYHQ ,I \RX QHHG help, review the previous section on leveling the refrigerator. Adjustment points INSTALLATION INSTRUCTIONS Installation Instructions A ,I \RX RSHQ WKH IUHH]HU GRRU \RX FDQ VHH the center hinge. B ,QVHUW ´ $OOHQ ZUHQFK LQWR WKH VKDIW RI WKH center hinge. C Adjust the height by turning clockwise or counterclockwise.
INSTALLATION INSTRUCTIONS Installation Instructions INSTALLING THE REFRIGERATOR (Cont.) 1RQ 'LVSHQVH Models G H G H J (Select models RQO\ ,FH PDNHU LQ IUHH]HU available on Non'LVSHQVH PRGHOV DQG DYDLODEOH DV ,0 .LW IRU some models. To place bins into doors: Match your bin with the letter shown.Position the bin hooks over the bin locator and push forward until inserted fully. Bin hook rear each side Push bin down until locked into position. Bin locator each side 40 49-60792 Rev.
INSTALLATION INSTRUCTIONS Installation Instructions INSTALLING THE REFRIGERATOR (Cont.) Models PFD, PYD, GFD Rotating bin Adjustable bins To place adjustable bins into door: Position the bins over the bin locators and push down until locked in position. Bin ,QVWDOO metal base To place rotating bin into door: 1. Slide bin base assembly onto the bracket on the door. 2. Slide the bin onto the bin base Bin base Bin Bin locators 49-60792 Rev.
INSTALLATION INSTRUCTIONS Installation Instructions INSTALLING THE WATER LINE BEFORE YOU BEGIN Recommended copper water supply kits are WX8X2, WX8X3 or WX8X4, depending on the amount of tubing you need. Approved plastic water supply lines are SmartConnect™ Refrigerator Tubing :; ; :; ; DQG :; ; When connecting your refrigerator to a GE Appliances Reverse Osmosis Water System, the only DSSURYHG LQVWDOODWLRQ LV ZLWK D *( $SSOLDQFHV 59.LW )RU RWKHU UHYHUVH RVPRVLV ZDWHU V\VWHPV IROORZ
INSTALLING THE WATER LINE (Cont.) WHAT YOU WILL NEED (Cont.) NOTE: The only GE Appliances approved plastic tubing is that supplied in SmartConnect™ 5HIULJHUDWRU 7XELQJ NLWV 'R QRW XVH DQ\ RWKHU plastic water supply line because the line is under pressure at all times. Certain types of plastic will crack or rupture with age and cause water damage to your home.
INSTALLATION INSTRUCTIONS Installation Instructions INSTALLING THE WATER LINE (Cont.) 4 FASTEN THE SHUTOFF VALVE )DVWHQ WKH VKXWRII YDOYH WR WKH FROG ZDWHU SLSH with the pipe clamp. Pipe Clamp 7 CONNECT THE TUBING TO THE VALVE 3ODFH WKH FRPSUHVVLRQ QXW DQG IHUUXOH VOHHYH for copper tubing onto the end of the tubing and connect it to the shutoff valve. Make sure the tubing is fully inserted into the valve. Tighten the compression nut securely.
Newer refrigerators sound different from older refrigerators. Modern refrigerators have more features and use newer technology. Do you hear what I hear? These conditions are normal. HUMMM... WHOOSH... Ŷ T he new high efficiency compressor may run faster and longer than your old refrigerator and you may hear a high-pitched hum or pulsating sound while it is operating. Ŷ
TROUBLESHOOTING TIPS Troubleshooting Tips... Before you call for service Save time and money! Review the charts on the following pages first and you may not need to call for service. Problem Possible Causes What to Do Water filter indicated as installed incorrectly or a leak is present on cap control panel. Water filter installed backward or is leaking. &KHFN IRU OHDN ,I QR OHDN LV SUHVHQW UHPRYH ILOWHU E\SDVV SOXJ URWDWH 180° and reinstall.
Problem Possible Causes What to Do Water spurting from dispenser* Newly installed filter cartridge Run water from the dispenser for 5 PLQXWHV DERXW JDOORQV No water or ice cube production* Supply line or shutoff valve is clogged Call a plumber Water filter is clogged Replace filter cartridge or remove filter and install bypass plug** )LOWHU FDUWULGJH QRW SURSHUO\ LQVWDOOHG Remove and reinstall filter cartridge, being certain that it locks in place.
TROUBLESHOOTING TIPS Troubleshooting Tips... Before you call for service Problem Possible Causes What to Do Beverage quality not as expected You may be using non-standard or RXW GDWHG . &XSV 5HFRPPHQG XVLQJ RIILFLDO .HXULJ .
SERVICE Before you call for service, review the detailed troubleshooting tips in the Owner’s manual. ,I QHHGHG VHUYLFH FDQ EH VFKHGXOHG E\ YLVLWLQJ XV RQOLQH GEAppliances.com or calling 800.GE.CARES 800.432.2737. ,Q &DQDGD YLVLW GEAppliances.ca or call 800.561.3344.
TROUBLESHOOTING TIPS/TRUTH OR MYTH 50 Truth or Myth SERVICE Before you call for service, review the detailed troubleshooting tips in the Owner’s manual. ,I QHHGHG VHUYLFH FDQ EH VFKHGXOHG E\ YLVLWLQJ XV RQOLQH GEAppliances.com or calling 800.GE.CARES 800.432.2737. ,Q &DQDGD YLVLW GEAppliances.ca or call 800.561.3344. Truth or Myth Truth or Myth? Answer Explanation 'RRU UHPRYDO LV DOZD\V UHTXLUHG IRU installation.
GEAppliances.com For US Customers, DOO ZDUUDQW\ VHUYLFH LV SURYLGHG E\ RXU )DFWRU\ 6HUYLFH &HQWHUV RU DQ DXWKRUL]HG &XVWRPHU Care® technician. To schedule service online, visit us at geappliances.com, or call GE Appliances at 800.GE.CARES 3OHDVH KDYH \RXU VHULDO QXPEHU DQG \RXU PRGHO QXPEHU DYDLODEOH ZKHQ FDOOLQJ IRU VHUYLFH In Canada, call 800.661.1616. Servicing your refrigerator may require the use of the onboard data port for diagnostics.
RPWFE Water Filter Cartridge Limited Warranty Contact us at geapplianceparts.com, or call 800.GE.CARES. For the period of GE Appliances will replace Thirty Days )URP WKH GDWH of the original purchase Any part of the water filter cartridge which fails due to a defect in materials or workmanship during this limited thirty-day warranty.* What GE Appliances will not cover: Ŷ Service trips to your home to teach you how to use Ŷ Replacement of the water filter cartridge due to water the product.
Performance Data Sheet Model: GE Appliances RPWFE Ŷ 6\VWHP FHUWLILHG E\ ,$302 5 7 DJDLQVW 16) $16, 6WDQGDUGV DQG 3 IRU WKH UHGXFWLRQ RI FODLPV VSHFLILHG RQ WKH SHUIRUPDQFH data sheet and at iapmort.org. Ŷ $FWXDO SHUIRUPDQFH PD\ YDU\ ZLWK ORFDO ZDWHU FRQGLWLRQV Substance Tested for Reduction Chlorine Taste and Odor Chloramine Taste and Odor 3DUWLFXODWH &ODVV , Cysts Lead Mercury Asbestos Toxaphene 92& &KORURIRUP VXUURJDWH FKHPLFDO Alachlor $WUD]LQH %HQ]HQH Carbofuran carbon tetrachloride
CONSUMER SUPPORT Consumer Support GE Appliances Website Have a question or need assistance with your appliance? Try the GE Appliances Website 24 hours a day, any day of the year! You can also shop for more great GE Appliances products and take advantage of all our on-line support services designed for \RXU FRQYHQLHQFH ,Q WKH 86 GEAppliances.com ,Q &DQDGD GEAppliances.