
User Manual
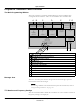

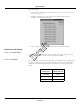

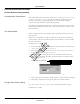
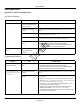
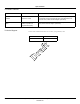
Table Of Contents
- Contents
- 1 Introduction
- 2 Apex Transmitter
- 3 ApexPro CH Transmitter
- Program the Transmitter’s Basic Functions
- View Transmitter Diagnostics
- Update Transmitter Firmware
- ApexPro CH Appendices
- 4 ApexPro Transmitter

Revision A - Draft 7 APEX, ApexPro, and ApexPro CH Transmitter Programming Instructions 29
2001989-135
Apex Transmitter
Apex Appendices
Appendix 1: Apex Troubleshooting
LED Status Problems
Programming Problems
Condition Possible Cause Possible Actions
No lights are blinking. Normal status when hardware
is properly connected and the
software is running.
No action needed.
Hardware is not connected
properly.
Check the hardware connections as described in “Connect the Hardware” on
page 11.
Software is not installed. Install the Apex & ApexPro Tx Config software as described in “Install
the Programming Device” on page 9.
Software is not running. Start the Apex & ApexPro Tx Config software as described in “Run
the Apex & ApexPro Programming Box Software” on page 13.
Batteries do not have enough
power.
Replace the batteries:
1. Disconnect the transmitter from the programming device.
2. Replace the transmitter batteries with two new AA alkaline batteries.
3. Reconnect the transmitter to the programming device.
All lights blink once and then
turn off.
Normal status when hardware
has just been properly
connected.
No action needed.
Condition Cause Possible Actions
Unable to display or program
the transmitter settings
Batteries do not have enough
power.
Replace the batteries:
1. Disconnect the transmitter from the programming device.
2. Replace the transmitter batteries with two new AA alkaline batteries.
3. Reconnect the transmitter to the programming device.
Message indicates No
communication from the
transmitter:
Hardware is not connected
properly.
Check the hardware connections as described in “Connect the Hardware” on
page 11.
Incorrect COM port was
selected.
1. Exit this window. (Reference G in “Program Apex Transmitter Window”
on page 23.)
2. Restart Apex & ApexPro Tx Config: In your PC’s Start menu,
select Programs > GE Medical Systems > Apex & ApexPro
Tx Config > Apex & ApexPro Tx Config.
3. In the Select Transmitter window, choose a different COM Port
from what you selected before. Select OK.
4. Repeat steps 1 through 3 until a connection is established and the
message area indicates Connected to the transmitter.
5. If the transmitter still is not working after trying all of the COM ports, refer
to other sections of this appendix.
Draft