
User Manual
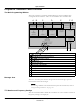

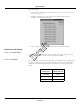

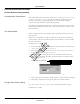
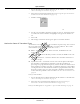
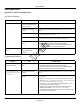
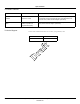
Table Of Contents
- Contents
- 1 Introduction
- 2 Apex Transmitter
- 3 ApexPro CH Transmitter
- Program the Transmitter’s Basic Functions
- View Transmitter Diagnostics
- Update Transmitter Firmware
- ApexPro CH Appendices
- 4 ApexPro Transmitter

Revision A - Draft 7 APEX, ApexPro, and ApexPro CH Transmitter Programming Instructions 27
2001989-135
Apex Transmitter
Perform Advanced Functions
Perform Advanced Programming
Communication Status Button
The Communication status button (reference C in “Appendix 2: Access Apex
Technical Functions” on page 31) revolves clockwise to indicate that the
hardware (transmitter, programming device, and the PC) is properly
connected and the software is processing normally.
In addition, by clicking on this button, authorized personnel can access the
advanced functions described in this section. A password is needed to access
these functions.
Set Serial Number
This is a display of the serial number of the specific transmitter that uses
this software.
Whenever a transmitter is replaced, you must enter the new transmitter’s
serial number. You must also identify the level of software to be used with
the new transmitter.
To change the settings:
1. Access the high-level technical functions of the software as described in
“Access the Super User Mode” on page 31.
2. Select the Set S/N button, reference A in “Program Apex Transmitter
Technical Functions Window” on page 31.
3. A window appears asking for the new serial number. Enter the new
serial number, found on the label on the back of the transmitter. (You
must use upper-case.)
4. Select OK to proceed with the change. (Select Cancel to make no change.)
5. The change is shown on the Program Apex Transmitter window.
Change Alarm Pause Setting
. See “Alarm Pause Setting” on page 26 for a description of this setting.
To change the setting:
510A
E5JD0091GP MILWAUKEE, WI USA
Serial number on transmitter
Draft