
Owners manual


9
Installation Instructions
ICEMAKER INSTALLATION INSTRUCTIONS U V OR W
BEFORE YOU BEGIN
Read each step thoroughly before proceeding.
•
WARNING
To eliminate the
risk of electric shock or injury during
installation, you must first unplug the
refrigerator before proceeding. Failure
to follow these instructions can result in
electrical shock.
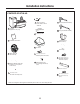
Flat blade and Phillips
screwdrivers
Pliers
TOOLS YOU WILL NEED
Sharp knife
REPOSITION FREEZER SHELF
• Make sure the freezer shelf is in the lowest position.
2
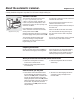
SELECT FILL TUBE FOR YOUR
REFRIGERATOR
Which fill tube should you use?
There is a label on the back of the refrigerator that will
tell you which to use: U V or W
The fill tube you use will depend on the model and size
of your refrigerator.
For letter U :
Use long fill tube assembly #12 and cut off 1/2” of
length from the tip of the fill tube. This will ensure the
correct length fill tube for your model. This will provide
proper water flow into your fill cup and icemaker. It will
prevent the fill tube from freezing up with water and
ice.
For letter W :
Use short fill tube assembly #11 and cut off 1” of length
from the tip of the fill tube. This will ensure the correct
length fill tube for your model. This will provide proper
water flow into your fill cup and icemaker. It will prevent
the fill tube from freezing up with water and ice.
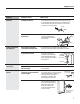
For letter V :
It is important to use the correct fill tube assembly
because the length is critical to the performance of
your icemaker. It is also critical to prevent any leaking
from the fill tube into the freezer itself.
• Open the fresh food door and locate the label in the
upper left corner of the compartment.
• Find the model number in bold listed under
MODEL NO.
• Match the two digit number in the model number
to the fill tube number in the table below. NOTE: The
desired number starts at the fourth character.
1
GENERAL ELECTRIC COMPANY
APPLIANCE PARK LOUISVILLE, KY 40225
www.GEAppliances.com
LISTED HOSEHOLD REFRIGERATOR/FREEZER
SERIAL NO.
182A
MODEL NO.
FZ743041GTH18GBDCRWW
IIIIIIIIIIIIIIIIIIIIIIIIIIIIIIIIIIIIIIIIIIIIIIIIIIIIIIIIIIIIIIIIIIIIII
IIIIIIIIIIIIIIIIIIIIIIIIIIIIIIIIIIIIIIIIIIIIIIIIIIIIIIIIIIIIIIIIIIIIIIIIIIIIII
IIIIIIIIIIIIIIIIIIIIIIIIIIIIIIIIIIIIIIIIIIIIIIIIIIIIIIIIIIIIIIIIIIIIIIII
IIIIIIIIIIIIIIIIIIIIIIIIIIIIIIIIIIIIIIIIIIIIIIIIIIIIIIIIIIIIIIIIIIIIIIII
IIIIIIIIIIIIIIIIIIIIIIIIIIIIIIIIIIIIIIIIIIIIIIIIIIIIIIIIIIIIIII
IIIIIIIIIII
IIIIIIII
IIIIII
Model
Number
Fill
Tube
12 #
15 #
16 #
18 #
21 #
Model Number
11
11
12
12
12
Cut 1/2”Cut 1/2”
Cut 1”
Are these the right instructions for your model? Follow the Installation Instructions indicated by the
ODEHORQWKHEDFNRIWKHUHIULJHUDWRU³89RU:)RUOHWWHU7JRWRSDJHIRULQVWUXFWLRQV