
Owners manual

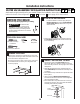


BEFORE YOU BEGIN
Read each step thoroughly before proceeding.
•
WARNING
To eliminate the
risk of electric shock or injury during
installation, you must first unplug the
refrigerator before proceeding. Failure
to follow these instructions can result in
electrical shock.
Installation Instructions
WATER VALVE ASSEMBLY INSTALLATION INSTRUCTIONS U V OR W
Flat blade and Phillips
screwdrivers
Pliers
TOOLS YOU WILL NEED
Sharp knife
1/4"and 5/16" Nutdrivers
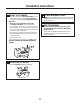
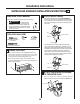
ATTACH THE WATER VALVE
• Locate the female connector plug. Plug the
female connector (C) onto the male terminals
on the water valve (3). Either wire can go on
either terminal.
2
9
• Fasten the water valve to the cabinet by driving
the hex-head screw (9) from the kit into the hole
in the cabinet leg.
C
3
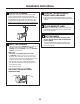
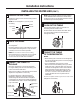
REMOVE THE COVER
Remove the compressor compartment access cover.
This requires removing screws which attach the cover
to the back of the refrigerator case.
Be sure to save the screws as the access cover must
be reinstalled later to ensure your refrigerator will
function properly.
1
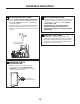
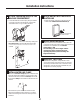
CONNECT WATER TUBE TO INLET
• Squeeze the ends of the hose clamp (14) from
the kit with pliers and slide the clamp over the fill
tube assembly, located in the top right corner of the
refrigerator.
• While still squeezing the clamp, insert the free end
of the water tube (3) into the fill tube assembly as far
as it will go.
• Then slide the clamp downward to capture the water
tube in place.
• Using one of the adhesive-backed fasteners (4),
secure the water tube to the back of the refrigerator
about 1/2" below the inlet.
• If the water tube is not pushed in as far as it can go
and the hose clamp is not in place over the fill tube
assembly, then leaks are possible.
3
14
4
Fill tube
assembly
Water tube
Clamp
3
Are these the right instructions for your model? Follow the Installation Instructions indicated by the
ODEHORQWKHEDFNRIWKHUHIULJHUDWRU³89RU:)RUOHWWHU7JRWRSDJHIRULQVWUXFWLRQV
14