O2 / O2Plus/ O2 X User Manual V1.
Contents Features...................................................................................................................................... 4 Slide Arm technology............................................................................................................. 4 Stabilized Video and Photo Camera System.......................................................................... 4 HD Video Transmission........................................................................................
Gimbal Camera..................................................................................................................... 25 Aircraft Control.....................................................................................................................26 Frequency Matching............................................................................................................. 27 Flight Mode Selection..........................................................................................
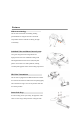
Features Slide Arm technology The aircraft’s slided arms and folding landing pad and blade are designed to form a functional and portable structure without sacrificing strength or flexibility. Stabilized Video and Photo Camera System Using new integrated control algorithms and high-precision three-axis stabilization design, 4K ultra-high-definition videos and 13,000,000-pixel photos can be taken on a stable platform, offering excellent photographic effects and recording experiences.
2 small set screws and a second proprietary locking mechanism, the props on the O2 will ensure they stay secured during flight. Vision position System Our advanced forward and downward is onboard the GDU 02 series, thus achieving intelligent obstacle avoidance, follow me, vision circle, and gesture shot. With the powerful vision system, the aircraft is made more intelligent. User Instructions Warning Thank you for using this GDU product.
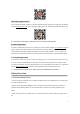
GDU Mini App Download For an optimal operating experience, please download the GDU Mini App by logging on the official website www.gdu-tech.com or by scanning the QR code below, and then install the GDU Mini App. ※ Please either use the IOS8.0 or Android5.0 or above to install the GDU Mini APP. Product Registration To ensure complete after-sales services, please log on to the official website www.gdu-tech.com and register your product.
• Do not use the product in proximity to high-voltage communications towers, in order to prevent interference with remote controller signals. • Be careful when using the product at altitudes of 4000m, or as performance is greatly reduced and aircraft could be dangerous to operate. • Please only use the product in legally permitted areas. 2. Operating Instructions • Do not call or answer the phone while product is in flight. Pay close attention to the GDU Mini App interface to ensure a safe flight.
※ The cover is used for protecting the equipped gimbal camera. Confirm that the holder cover has been removed before using the aircraft. ※ It is recommended to install the holder cover to protect the gimbal camera whenever the aircraft is not in use. 2. Pull out each of the aircraft arms to the limit mark, and fully unfold the propellers and landing feet to completely. ※ While extending the arm, Be sure to pull firmly and carefully and do not extend past limit marks.
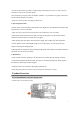
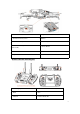
1. 3 axis Stabilized Camera 7. Propellers 2. Downward vision system 8. Battery 3. Forward vision system 9. LED Battery Level Indicator 4. Parameter/data adjustment interface (MicroUSB) 10. Power Button 5. Motors 11. Aircraft Status indicator (and orientation) lights 6. Tripods Remote controller Part Diagram 1. Status display 9. Power button 2. Stick 10. NA 3. Antenna 11.
4. Flight mode switch 12. Camera button 5. One-button Take-off 13. Video button 6. RTH (Return to Home) Button 14. Custom function button C1 7. USB update, debugging, and charging interface 15. Custom function button C2 8. Micro USB slot Aircraft Aircraft Status Indicator The flight status of GDU O2 series aircraft is shown according to the tail indicator.
Flight Mode The GDU O2 series product supports two flight modes: 1. Standard mode (maximum flight speed: 5m/s) Accurate hovering and smart flight can be achieved through the use of the GPS module and vision position system.
higher than 5m, the aircraft will return at the current height. If the aircraft is over 20m away from the return point, the aircraft will rise to the preset height (if the current height is above the set height, the aircraft will fly at the current height), fly directly above the return point, and then slowly land. ※ Please set the return height in the flight setting interface of the GDU Mini App. 1.
If the remaining power is 30% or less of total power, the low power alert will be triggered, the red indicator will flash slowly, and the GDU Mini App will remind the user of the low power levels. Low power return If the remaining power is 20% or less of total power, the red indicator will flash quickly,and the aircraft will be forced to return automatically. During the return process, the aircraft can be controlled by remote controller (assuming standard signal levels).
Downward Vision System Application Scenario The downward vision system is effective with height less than 8m, in poor GPS signal conditions. It is particularly applicable to indoor flight. Operating Steps 1. Use the remote controller to switch the flight mode into standard mode. 2. Turn on the aircraft’s power supply. Wait until the flight status indicator is a steady green ON. 3. Engage the sticks to start the aircraft.
The accuracy of the vision position system is likely to be influenced by light intensity and surface of obstacles, and ultrasonic positioning may be inaccurate if the drone flies close to sound-absorbing materials. Therefore, be careful not to rely on the vision position system in the following conditions: Light intensity: less than 10lux or more than 10,000lux. Operating temperature: below -10℃ or above 55℃. Flight altitude: more than 4,000m. Excessively flight speed.
requirements. 5. The aircraft should fly more than 3m above the ground after the Follow/Around function is enabled. 6. Always pay attention to surrounding objects along the aircraft’s Follow/Around route, and be ready to switch to manual control or click “STOP” on the GDU Mini APP to avoid collision in case of emergency. 7. Pedestrians should be kept more than 5m away from aircraft in Follow/Around mode. 8.
1. Click the smart function button “ ”, and select “Follow Me” in the pop-up interface to enter Follow me mode. A target selection prompt will appear. 2. Select the target by one of two means: A. Double-click: double-click the face or pedestrian icon on the screen to detect the target. After the target is selected, a green cursor prompt will appear on the screen. B. Box selection: press your finger on the screen and drag a box until the selected area fully covers the target outline.
1. Click the smart function button “ ” in the GDU Mini App flight interface. Select “Gesture Shot” in the pop-up interface to enter Gesture shot mode. This mode supports two functions: photo and video. 1) Photo Make a V ( ) gesture in front of the gimbal camera. After this gesture is recognized successfully, the GDU Mini APP will commence a 3 second countdown. The user should pose during this time. The photo will be taken at the end of the countdown.
3. If “EXIT” is clicked, the aircraft will exit the Dronie mode and hover in its current position. Rocket Operating steps: 1. Click the smart function button “ ” in the GDU Mini App flight interface. Select “Rocket” in the pop-up interface to enter the Rocket mode. 2. The user should set the flight distance, select video or photo mode along with the control mode, and then click “Start flight”. The aircraft will rise vertically, and the target will be shot vertically.
Finally, tighten the screws. Screw Clamp Blade ④ Motor shaft slot The process of propeller disassembly is as follows. First, remove the screws. Then rotate the clamp of the Type A propeller rightwards or the clamp of Type B propeller leftwards 45 degrees, then remove the clamp. Finally, remove the propeller. Anti-Shooting Propellers The anti-shooting propellers provide a safety guarantee in addition to screw locking.
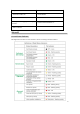
Power Indicator LED1 LED2 LED3 LED4 Current Power Flashing fast None None None 0-5% Flashing None None None 6%-25% ON Flashing None None 26%-50% ON ON Flashing None 51%-75% ON ON ON Flashing 76%-100% ON ON ON ON 100% Charging Power off the aircraft. Remove the battery and charge with a designated charger. The charging time is within 2 hours.
Input voltage: 100-240V Charging time: less than 2 hours If the battery and remote controller are charged at the same time, the charging time is within 2.5 hours. Input voltage: 100-240V Charging time: less than 2.5 hours (A+B) During the charging process, if the indicators on red, it means that the battery is being charged. If the indicators is green on, it means that the battery has been fully charged.If the A and B charging at the same time,when A or B not a full charge,the indicators is red on.
Align the battery with the locking slot of the body, and insert the battery by pushing forwards. ※ Insert or remove the battery with the aircraft powered OFF. After flight, remove the battery. ※ The battery contains hazardous chemicals. Prior to use, please carefully read the Battery Safety Guide and the warnings written on the battery. Remote controller The remote controller of GDU O2 product is equipped with the advanced automatic frequency-switching wireless communication system.
Description of Remote controller Screen Connection of Remote controller and Aircraft Disconnection of Remote controller and Aircraft Charging of Remote controller Only charge the remote controller in its OFF state. Check whether the remote controller is fully charged according to the charger’s indicator light color. If the power indicator flashes in red, it means that the remote controller is being charged.
2. Adjust the length of remote controller, clamp the mobile phone into the appropriate position, and connect the other end to the mobile phone’s charging interface. 3. After flying, remove the mobile phone and fix the data cable back into the slot. The remote comes equipped with a Lightning cable by default. If requires, please replace it with the Micro USB cable.
in real-time. ※ The Back-to-center button can be customized. ※ The gimbal camera can also be controlled by the GDU Mini App. See details in APP. Aircraft Control The remote controller supports three modes: American (Mode 1), Japanese (Mode 3) and Chinese (Mode 2). The control sticks are defined as follows. 1. American (Mode 1): throttle and rotation on left stick, and left/right and forward/backward on right stick. 2.
The default mode is American (Mode 1). You can change the operating mode of the remote controller in the Control settings interface of the GDU Mini App. Frequency Matching Frequency matching of the remote controller and built-in receiver has been performed before delivery, so the user can directly access the remote controller. If the aircraft or remote controller is replaced, frequency matching should be redone.
Upgrading the Remote controller Upgrading the remote controller includes upgrading of both the operation system and the video transmission system. Download the upgrade tool and firmware of the O2 controller from GDU official website www.gdu-tech.com, install it by connecting the controller to the PC with USB cable, open the upgrade software and click connect, once it is normally connected, click to upgrade the firmware, wait till the upgrading is completed.
Gimbal Overview The three-axis stabilized gimbal provides a stable platform for the camera, so as to shoot high quality images during high-speed flight. With this high-precision three-axis anti-shake gimbal, the variations in accuracy will be 0.02° or less. Even in case of heavy maneuvering, photography will remain accurate to within 0.05° or less, thus preventing shaking and enabling HD video recording and image acquisition.
GDU Mini App The GDU Mini APP is application software designed by GDU for O2 series products. The user can use the software to control the aircraft, the gimbal camera and its gimbal, thus enabling the functions of flight control, shooting/recording, course planning, parameter settings, media sharing, etc. The GDU Mini APP is composed of four parts: Drone, Media, Explore and Me. ※ The interfaces and functions of the app will be regularly upgraded. Please refer to the latest APP version.
Classic Shot Mode ①Home : click to return to the Home page of APP. ②GPS status : shows the number of GPS.
: shows the remaining power of the aircraft. ④ Aircraft connection status : shows the connection status of the aircraft. ⑤ Altitude : shows the current flight altitude. ⑥ Flight distance : shows the current flight distance. ⑦ Settings : click to enter the system setting interface of the aircraft, including control settings, flight settings, video transmission settings, camera settings and general settings. ⑧ Remote controller power : show the remaining power of the remote controller.
: click to open the camera function parameters, which can be adjusted. ⑭ RTH : click to return and land. ⑮ Switch to map : click to switch to the map interface. ⑯ Compass : shows the current orientation and heading. ⑰ Auto take-off/Vertical landing button / : shows the take off button before take off ; shows vertical landing button after takeoff.
⑲ Map switching : click to change the map display among 2D map, satellite map and hybrid map. ⑳Waypoint : click to activate the waypoint function, where you can set and upload flying mark points that the aircraft will follow. ㉑ Positioning : click to locate the aircraft’s current position. ㉒ Electronic fence : the aircraft will fly safely within the set electronic fence. ㉓ Clear : click to clear any non-uploaded waypoints or electronic fences in the map interface.
㉕ Control settings Switch the control mode, customize C1\C2 buttons and match RC with drone. ㉖ Flight settings Set altitude/distance limit, return altitude and visual obstacle avoidance. ㉗ Image transmission settings Set channel mode, check the signal strength. ㉘ Camera settings Set preview resolution ratio, video resolution ratio, photo resolution ratio and storage. ㉙ General settings Set the grid, sound, param units, magnetometer, calibrate map coordinates and view drone information.
Photo editing: Retouch and Color Correction 36
Video editing: Single-video editing, multi-video stitching, and adding video themes (filter + music) Explore The Explore interface shows the wonderful aerial artworks uploaded by the user. After uploading is successful, the works will be synchronously shared on social media platforms.
Sharing: ※ The supported third-party platforms will be added continuously as the app is upgraded. Please refer to the latest APP vision. Me In the GDU Personal Center, the user can modify their personal information, view their published works and collected favorites and visit the Official GDU Store.
※ The language of the app interface should be the same as the system language of the mobile device. Change the system language of the mobile device before changing the interface language. ※ At present, the app interface only supports Chinese Simplified and English. The language package will be added later, and please refer to the latest APP version. Flight Preflight Check Check all parts of the aircraft before each flight.
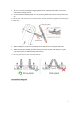
Steps: 1. Power on the remote control and then the aircraft, then connect the mobile phone to the remote controller. At this time, the aircraft will begin its self-check, accompanied by a beeping sound. 2. After the beep stops, click on APP, and select page of “General Settings”; click “Calibrate” on the right; it enters into mode of compass calibration when the yellow light keeps on, the magnetometer calibration mode is enabled. 3. Start magnetometer calibration.
4. Hold the aircraft carefully. With the nose facing downward, rotate the aircraft clockwise vertically and observe the aircraft’s indicators. If the tail indicator is solid green, vertical magnetometer calibration is successful. Otherwise, magnetometer calibration failed, please return to Step 2. ※ Do not move the aircraft while it is inself-check. ※ Calibrate the magnetometer before the aircraft’s first use or after any significant change in flight area.
Take-off:① Press the AUTO Take-off button on the remote controller 3s, the aircraft will hover at 1.5 meters above the ground. Or ② Unlock the aircraft by pushing the sticks down inward ,the motor running, push the throttle up. Landing:① Press the RTH button on the remote controller. Or ② Push the throttle down until the aircraft lands onto the ground and the motor stops running. Automatic Take-off/Landing The aircraft must fly within 80m of the controller if being piloted using the GDU Mini APP.
※ The GDU Mini APP is only applicable to O2 products. ※ Before the flight, please put the head of the aircraft forward and keep over 10 feet away from the aircraft. ※ Do not unlock the aircraft on steep slopes or hillsides.
Lens FOV 79.8°equivalent focal length 25.5 mm F/2.2 Distortion <1.5% ISO range Auto 100 - 1600 Electronic shutter speed Auto Maximum photo resolution 4208*3120 Video resolution 4K: 3840×2160 @ 30fps 1080P: 1920×1080 @ 30fps 720P: 1280×720 @ 30fps Image format JPG Video format MP4 Built-in memory: 16G (O2) or 32G (O2Plus and O2X) ● Remote controller Operating frequency 5.8GHz (O2) or 2.
Certification Information FCC Compliance This equipment has been tested and found to comply with the limits of a Class B digital device, pursuant to Part 15 of the FCC Rules. These limits are designed to provide reasonable protection against harmful interference in a residential installation. This equipment generates uses and can radiate radio frequency energy and, if not installed or used in accordance with the instructions, may cause harmful interference to radio communications.