
Installation Guide


• Protectsunderallstandardslopedroof
coverings– Grace Ice & Water Shield protects
under slate, tile, cedar shakes or metal, as well as
under conventional asphalt shingles.
• Slipresistantsurface– Grace Ice & Water Shield
has a slip resistant embossed surface to maximise
traction and safety for applicators.
• Proventrackrecord– Grace Ice & Water Shield
is the name brand in roong underlayments with
a 30-year track record of protecting roofs from ice
dams and wind-driven rain.
• Reroofable– Unlike some granular surfaced
membranes, Grace Ice & Water Shield will not
adhere to the underside of the exposed roof
covering. Grace Ice & Water Shield can be applied
over the old Grace underlayment (except over
Grace Basik
®
) in retrot applications, making
reroong easier, less costly (since there is no need
for removing the existing underlayment), more
durable and environmentally friendly (as the
structural deck remains intact avoiding the need to
purchase additional wood decking).
• Gracetechnicalsupport– Grace Ice & Water
Shield is backed by a team of local technical
support personnel that help ensure every
application goes smoothly.
Installation Procedure
Surface Preparation
Install Grace Ice & Water Shield directly on a clean,
dry, continuous structural deck. Some suitable deck
materials include plywood, wood composition,
wood plank, metal, concrete, or gypsum sheathing.
Remove dust, dirt, loose nails, and old roong
materials. Protrusions from the deck area must be
removed. Decks shall have no voids, damaged, or
unsupported areas. Wood planks should be closely
butted together. Repair deck areas before installing
the membrane.
Prime concrete, masonry surfaces and DensGlass
Gold
®
with Perm-A-Barrier
®
WB Primer. Prime wood
composition and gypsum sheathing with Perm-A-
Barrier WB Primer if adhesion is found to be marginal
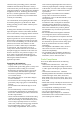
Property Typical Values Test Method
Colour Grey-Black -
Nominal Thickness* 1 mm ASTM D 3767 Method A
Tensile Strength, Membrane 2N/mm
2
ASTM D 412 (Die C Modified)
Elongation Break of Membrane 200% ASTM D 412 (Die C Modified)
Low Temperature Flexibility Unaffected @ -29°C ASTM D 1970
Adhesion to Plywood 525 N/m ASTM D 903
Permeance 2.5 ng/m
2
s Pa (0.08 Perms) ASTM E 96
Physical Properties
(refer to Technical Letter 12, Use on Oriented Strand
Board (OSB) Roof Sheathing). Apply Perm-A-Barrier
WB Primer at a rate of 6–8 m
2
/L. Priming is not
required for other suitable surfaces provided that they
are clean and dry.
Membrane Installation
Apply Grace Ice & Water Shield in fair weather
when the air, roof deck, and membrane are at
temperatures of 5°C or higher. Apply roof covering
material at temperatures of 5°C or higher.
Cut the membrane into 3–5 m lengths and reroll
loosely. Peel back 300–600 mm of release liner,
align the membrane, and continue to peel the release
liner from the membrane. Press the membrane in
place with heavy hand pressure. Side laps must be
a minimum of 90 mm and end laps a minimum of
150 mm. For valley and ridge application, peel the
release liner, center the sheet over the valley or ridge,
drape, and press it in place. Work from the center
of the valley or ridge outward in each direction and
start at the low point and work up the roof.
Alternatively, starting with a full roll of membrane,
unroll a 1–2 m piece of membrane leaving the release
liner in place. Align the membrane and roll in the
intended direction of membrane application. Carefully
cut the release liner on top of the roll in the cross
direction being careful not to cut the membrane. Peel
back about 150 mm of the release liner in the opposite
direction of the intended membrane application
exposing the black adhesive. Hold the release liner
with one hand and pull the roll along the deck with the
release liner, leaving the applied membrane behind.
Use the other hand to apply pressure on the top of
the roll. Stop frequently to press the membrane in
place with heavy hand pressure. When nished with
the roll go back to the beginning, reroll and pull the
remaining release paper from the material, nishing
the installation. For successive membrane courses,
align the edge of the release liner with the dashed line
provided on the surface of the membrane to achieve the
90 mm side lap.
* Nominal thickness refers to the thickness of the membrane without release liner.
Typical test values may represent average values from samples tested. Test methods noted may be modified.
The test is run at a rate of 50 mm per minute.