
Installation Guide

needed. In addition, Grace Ultra
™
underlayment is
the appropriate product for use under certain types of
metal roofs (those employing copper, zinc, or Cor-Ten
®
panels). These metal roofs tend to readily conduct heat
to the underlayment making them more likely to expose
the membrane to high temperatures. It is up to the
contractor and specier to decide what level of perfor-
mance is required based on the guidelines provided.
Wind-Driven Rain
Sloped roofs are not waterproof. They protect struc-
tures by shedding rain water. Storm-driven winds
can cause sloped roof coverings to lift. Rain can be
easily driven under the roof covering directly to the
unprotected deck where it causes leaks and damage to
the interior of the structure. Grace Ultra
™
membrane
applied beneath the sloped roof covering helps prevent
wind-driven rain from entering the structure. For wind-
driven rain protection, full coverage with Grace Ultra
™
underlayment is recommended. Since Grace Ultra
™
underlayment is a vapor barrier, the roof construction
must allow for proper ventilation in full roof coverage
applications.
Ice Dams
For ice dam protection, Grace Ultra
™
membrane
should be adhered at the edge of the roof deck by the
eaves. The membrane should be applied to a point
on the roof deck above the highest expected ice dam.
Several variables inuence the height of ice dams
and the membrane coverage required. Local building
codes should be consulted for specic requirements.
Variables inuencing the height of ice dams include
climate (particularly the annual snowfall), slope, over-
hang, valleys, how well the structure is insulated and
ventilated, and exposure (sun vs. shade). In addition
to placement along the eaves, Grace Ultra
™
membrane
can be used to help prevent roof leaks in a handful of
danger zones like in valleys, at the rake edges, and
around chimneys and skylights.
Installation Procedure
Surface Preparation
Install Grace Ultra
™
membrane directly on a clean, dry,
continuous structural deck. Some suitable deck materi-
als include plywood, wood composition, wood plank,
metal, concrete, or gypsum sheathing. For all other
substrates, contact your local Grace representative.
Remove dust, dirt, loose nails, and old roong materi-
als. Protrusions from the deck area must be removed.
Decks shall have no voids, damaged, or unsupported
areas. Repair deck areas before installing the membrane.
Prime concrete, masonry surfaces and DensGlass
Gold
®
with Perm-A-Barrier
®
WB Primer. Prime wood
composition and gypsum sheathing with Perm-A-
Barrier
®
WB Primer if adhesion is found to be marginal
(refer to Technical Letter 12, Use on Oriented Strand
Board (OSB) Roof Sheathing). Apply Perm-A-Barrier
®
WB Primer at a rate of 250–350 ft
2
/gal (6–8 m
2
/L).
Priming is not required for other suitable surfaces
provided that they are clean and dry.
Membrane Installation
Apply Grace Ultra
™
membrane in fair weather when
the air, roof deck, and membrane are at temperatures of
40°F (5°C) or higher. Apply roof covering material at
temperatures of 40°F (5°C) or higher.
Cut the membrane into 10–15 ft (3–5 m) lengths and
reroll loosely. Tack/secure the end of the roll with a
nail. Peel back 1–2 ft (300–600 mm) of release liner,
align the membrane, and continue to peel the release
liner from the membrane. Press the membrane in
place with heavy hand pressure. Side laps must be a
minimum of 3.5 in. (90 mm) and end laps a minimum
of 6 in. (150 mm). For valley and ridge application,
peel the release liner, center the sheet over the valley or
ridge, drape, and press it in place. Work from the center
of the valley or ridge outward in each direction and
start at the low point and work up the roof.
Alternatively, starting with a full roll of membrane,
unroll a 3–6 ft (1–2 m) piece of membrane leaving the
release liner in place. Align the membrane and roll in
the intended direction of membrane application. Care-
fully cut the release liner on top of the roll in the cross
direction being careful not to cut the membrane. Peel
back about 6 in. (150 mm) of the release liner in the
opposite direction of the intended membrane applica-
tion exposing the black adhesive. Hold the release liner
with one hand and pull the roll along the deck with the
release liner, leaving the applied membrane behind.
Use the other hand to apply pressure on the top of the
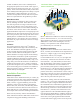
Use Grace Ultra
™
underlayment on all of
these critical areas
Confined
Rake Edge
Rake Edge
Eave
Low Slope Area
Chimney
Skylight
Valley
Eave
Ridge
Hip
Dormer
Corners
Flanged Windows
Sill
Exterior
Doors
Sill Plate
Ledger Board
Deck Joists
Grace Ultra™ Roofing Underlayment
Grace Vycor
®
Plus Flashing
Grace Vycor Deck Protector
®
Flashing