® Voyager 3 OPERATION MANUAL Part Number: 930-032 REV: A REV DATE: 04-02-04 ©2004 GENERAL BINDING CORPORATION ALL RIGHTS RESERVED. Do not duplicate without written permission.
Voyager 3 Operations Manual TABLE OF CONTENTS 1.0 Safety 1.1 Explanation of symbols 1.2 General Rules of safety 1.3 Emergency Stops 1.4 Safety Shields 1.5 Pneumantics 1.6 Heat 1.7 Safety labels 1.8 Know Your laminator 1-1 1-2 1-4 1-4 1-5 1-5 1-6 1-10 2.0 Warranty 2.0 Limited 90-day warranty 2-1 3.0 Specifications 3.1 Machine Specification 3.2 Feeder Specifications 3.3 Feeder Pump and Specifications 3.4 Heater 3-1 3-2 3-3 3-4 4.0 Installation 4.1 Pre-installation 4.1.1 Suggested Floor Layout 4.1.
II 2004 General Binding Corporation
Operations Manual Voyager 3 The information in this publication is provided for reference and is believed to be accurate and complete. GBC is not liable for errors in this publication or for incidental or consequential damage in connection with the furnishing or use of the information in this publication, including, but not limited to, any implied warranty of fitness or merchantability for any particular use.
IV 2004 General Binding Corporation
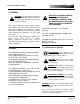
Voyager 3 Operations Manual: Safety 1.0 Safety CAUTION: Do not attempt to operate your Voyager 3 Laminator until you completely read and understand this and all related Operations Manual. Your safety, as well as the safety of others, is important to GBC. This section contains important safety information pertaining to the Voyager 3 Laminator which must be adhered to while operating, cleaning and performing basic maintenance in and around the machine.
Voyager 3 1.2 General rules of safety ELECTRICAL HAZARD: Do not operate the laminator if power cord is damaged or frayed.You can be severely shocked, electrocuted or cause a fire. ELECTRICAL HAZARD: Employ a licensed electrician to provide electrical requirements for the laminator. ELECTRICAL HAZARD: Employ a licensed plumber to provide tap and drain requirements for the laminator. ELECTRICAL HAZARD: Do not use liquid or aerosol cleaners on the laminator.
Operations Manual: Safety CAUTION: Vapor build up or stored flammable liquids can cause a fire. Excessive dust can damage the laminator. CAUTION: Exercise extreme caution when working around or replacing the film cutter blade. This blade is sharp and cut you. CAUTION: Keep feet away from the feeder pile table when lowering to ground level. CAUTION: Avoid contact with the heat roller during webbing, operation, un-webbing, changing film or after heat has been removed from the laminator.
Voyager 3 Operations Manual: Safety Jog/Slow Speed w/Guard Open 1.3 Emergency stops (E-Stop) The Voyager 3 is equipped with three E-Stops. One is located on the feeder next to the feeder pile table controls, the second is located on the laminator control panel and the third is located on the top of the laminator electrical box. The Jog and Reset buttons must be held simultaneously to allow the slow speed jogging with the safety guard open. Speed is monitored by relay for safety purposes. 1.
Voyager 3 Operations Manual: Safety Use care in raising the lower pressure roller and/ or engaging the snap roller. Before engaging either of these rollers, ensure that nothing is in the nip areas. Know how to react quickly in an emergency. If any problem or danger should occur, depress any of the E-Stops, all functions of the machine are stopped and the main pressure roller is lowered. 1.
Voyager 3 Operations Manual: Safety 1.7 Safety labels Posted at various locations on the Voyager 3 Laminator are important safety labels. Pay careful attention to these labels at all times! Figure 1.7.1 illustrates the location of each of these labels. WARNING: DO NOT operate unless you have been fully trained. DO NOT operate until you have read the OPERATING INSTRUCTIONS completely. WARNING READ MANUAL: Read and understand the Operations Manual before attempting to run this machine.
Operations Manual: Safety Voyager 3 CAUTION HOT SURFACE/ PINCH POINT: Surface may be hot. Do not touch. Keep hands and fingers away from pinch point. CAUTION HEAVY OBJECT: Exercise safe lifting practices when handling. CAUTION PINCH POINT: Keep hands and clothing away from pinch point. WARNING ELECTRICAL SHOCK HAZARD: Live voltage present. Do not touch wires. Use proper lock out/ tag out procedures. WARNING: Do not operate without all guards in place. You may be seriously injured.
Voyager 3 Operations Manual: Safety WARNING SHARP EDGE WARNING: Sharp edge. Keeps hands and fingers away. Sharp edge can cut. CAUTION: Max load and height. Do not exceed. WARNING: Keep hands and fingers away. The gate can crush.
2004 General Binding Corporation PROPRIETARY GBC PRO-TECH CLAIMS PROPRIETARY RIGHTS TO THE PERMISSION FROM GBC PRO-TECH C ! ! WARNUNG Hande und kleidung fernhalten. Klemmgefahr zwishen rollen. WARNUNG Hande und kleidung fernhalten. Klemmgefahr zwishen rollen. Mantener manos y prendas a distancia. ! MUCHO CUIDADO Punto de pinchamient o entre los rodillos. Mantener manos y prendas a distancia. ! MUCHO CUIDADO Punto de pinchamient o entre los rodillos. ! ! WARNING clear.
Voyager 3 Operations Manual: Safety 1.8 Know your laminator To help you relate to the components referred to in this manual, take the time to get to know what and where key components are on your new laminator.
Operations Manual: Safety Voyager 3 Laminator Separator 2004 General Binding Corporation Page 1-11
Voyager 3 Page 1-12 Operations Manual: Safety 2004 General Binding Corporation
Operations Manual: Warranty Voyager 3 2.0 Limited 90-Day Warranty GBC warrants to the original purchaser for a period of one year parts and ninety days labor, after installation that this laminator is free from defects in workmanship and material under normal use and service. GBC’s obligation under this limited warranty is limited to replacement or repair, at GBC’s option, of any part found defective by GBC without charge for material or labor.
Voyager 3 Page 2-2 Operations Manual: Warranty 2004 General Binding Corporation
Voyager 3 Operations Manual: Specifications 3.0 Specifications 3.1 MACHINE SPECIFICATION Maximum Speed: 150 ft/min = 10,000, 8.5 x 11 in. sheets/ hr. (45.7 meters/min = 10,000, 21.6 x 28 cm sheets/ hr.) Minimum sheet sizes: 8.5 x 11 in. with the 8.5 side forward (21.6 x 28 cm with the 21.6 side forward) Maximum sheet size: 30 x 40 in. with the 30 side forward (76.2 x 101.6 cm with the 76.2 side forward) Max. Feeder Loading: 30 in.
Voyager 3 Operations Manual: Specifications Ambient Air Temp: 5°-40° C Humidity Rating: 30%-95% (Non-Condensing) Altitude Rating: 1000 Meter Minimum 3.2 Feeder Specifications Minimum sheet sizes: 8.5” x 11” (21.6 x 28 cm) (8.5” side forward) Maximum sheet size: 30” x 40” (76.2 x 101.
Voyager 3 Operations Manual: Specifications Other: Conveyor: Type: Length: Vacuum sections : Belts: Lifting Mechanism: Type: Vacuum and blower adjustments Vacuum style conveyor Min. 40” (101.6 cm) Max. 4” (101.6 mm) from downstream edge of feeder conveyor with possibility to close two external sections 3.2” (80mm) wide “Habasit” belts for vacuum conveyor Lifting mech.
Voyager 3 Operations Manual: Specifications Motor power: 1.85 kW (informative) RPM at 50 Hz: 1420 (informative) Adjustments: Vacuum and pressure adjustments Power Requirement: Power supplied by the laminator Note: Air pump design equal or similar to Becker air pump T 4.40 DSK 3.4 Heater (For heater specifications see heater manual).
Voyager 3 Operations Manual: Installation 4.0 Installation 4.1 Pre-installation CAUTION: The GBC Voyager 3 can only be installed by a trained GBC Service Representative. Before a Voayger 3 Laminator can be installed, there are a few requirements that must be met. Make certain that each of the requirements listed in the following pre-installation checklist are met prior to installation. CAUTION: Failure to follow the pre-installation check list can result in damage to the laminator.
Voyager 3 Operations Manual: Installation CAUTION: Do not locate the laminator where air can blow directly on the machine. The air flow can cool the rollers unevenly and result in poor quality output. Have you contacted a certified electrician to install a receptacle for the laminator ensuring that adequate power and correct circuit breaker is being supplied? The laminator and heater requires 380 Volt AC, 50/ 60 Hz, 50 amps, Delta three phase (four wire) power.
PROPRIETARY GBC PRO-TECH CLAIMS PROPRIETARY RIGHTS TO THE > 2 ft. (61 cm) 3.5 ft. (107 cm) Air supply drop Detail A-A C Align heater with edge of feeder motor PERMISSION FROM GBC PRO-TECH REPRODUCED, COPIED OR DISCLOSED IN WHOLE OR IN PART, OR USED FOR MANUFACTURE OR FOR ANY OTHER PURPOSE WITHOUT WRITTEN MATERIAL DISCLOSED ON THIS DRAWING. IT IS ISSUED IN CONFIDENCE FOR ENGINEERING INFORMATION ONLY AND SHALL NOT BE Electrical drop (Laminator) See Heater Manual For Details.
PROPRIETARY GBC PRO-TECH CLAIMS PROPRIETARY RIGHTS TO THE PERMISSION FROM GBC PRO-TECH MATERIAL DISCLOSED ON THIS DRAWING. IT IS ISSUED IN CONFIDENCE FOR ENGINEERING INFORMATION ONLY AND SHALL NOT BE REPRODUCED, COPIED OR DISCLOSED IN WHOLE OR IN PART, OR USED FOR MANUFACTURE OR FOR ANY OTHER PURPOSE WITHOUT WRITTEN connect air A ground three hot legs NOTE: See Wiring Diagram for connection details C Power In (From Transformer - US) (From Drop - Europe) Elec. / Air conn. Rev.
Voyager 3 Operations Manual: Installation 4.2 Receiving the crates The GBC Voyager 3 is shipped in two crates. Both crates should arrive at the same time on your docks. INFORMATION: ALL SHIPMENTS ARE EXWORKS. At our dock, title passes to the buyer. Please review your insurance coverage prior to shipment, as you are responsible for all subsequent freight charges and risks. 4.3 Uncrating CAUTION: Do not attempt to remove the sides of the crate by yourself.
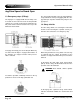
Voyager 3 4.4 Positioning the components All components are positioned by the center line of the laminator. The components should be positioned in the following order; Laminator, stacker table, feeder, conveyor, vacuum/ pump and then the water heater. Refer to Figure 4.4.1 Component Placement. Operations Manual: Installation Laminator Once the laminator has been safely removed from the crate, you can move the laminator into position by using a pallet jack or forklift.
Voyager 3 Operations Manual: Installation Feeder Conveyor Once the feeder has been safely removed from the crate, you can move the feeder into position by using a pallet jack or forklift. The conveyor can be easily carried by two people and set down on the floor between the feeder and the laminator. The belt drive gear end of the conveyor should be on the feeder end. The conveyor will be connected at the time of installation.
Voyager 3 Operations Manual: Installation CAUTION: Position water heater as close as possible to Laminator to prevent tripping hazard. Figure 4.4.
Operations Manual: Installation Voyager 3 4.5 Safety Checklist Once installation is complete, perform the following steps to ensure that all the safety features of the machine are operating properly.
Voyager 3 Page 4-10 Operations Manual: Installation 2004 General Binding Corporation