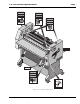
© 1999 GBC Pro-Tech Do not duplicate without written permission CY STOP ARRET D' U CE E N RG E RG E N NOT AUS EM ING RN WA NG HTU E AC GARD E EN MIS G IN RN WA NG HTU E AC GARD S TOP AR RET D' U CE NOT AU S CY R G EN EM R G EN E EN MIS E psi 100 kPa 90 700 80 630 70 560 60 490 50 420 40 350 30 280 20 210 10 140 70 OUT 150 175 125 200 HI 100 225 75 250 PROT 50 ECH 275 °F 300 LO 001-133 OUT 150 175 125 200 HI 100 225 75 250 PROT 50 E
F-36 PRO Laminator Operation Manual The information in this publication is provided for reference and is believed to be accurate and complete. GBC Pro-Tech is not liable for errors in this publication or for incidental or consequential damage in connection with the furnishing or use of the information in this publication, including, but not limited to, any implied warranty of fitness or merchantability for any particular use.
F-36 PRO Laminator Operation Manual Caution/Warning Label Locations .................................................................................... 1-4 ! Preinstallation Checklist....................................................................................
F-36 PRO Laminator Operation Manual Machine Shutdown .......................................................................................................... 3-8 Procedure .................................................................................................................... 3-8 " # $ " Thermocouple Positioning and Cleaning.........................................................................
F-36 PRO Laminator Operation Manual DO NOT ATTEMPT TO OPERATE YOUR F-36 PRO LAMINATOR UNTIL YOU HAVE READ THIS SECTION CAREFULLY! Your safety, as well as the safety of others, is important to GBC Pro-Tech. This section contains important safety information. The following symbols are used throughout this manual to indicate warnings and cautions. DANGER Indicates an imminently hazardous situation which, if not avoided, will result in death or serious injury.
Safety F-36 PRO Laminator Operation Manual EM RG E P STO CY N RG E 1NO / 4 TtuAU r nS EM U D' U CE RG E RG E N ARRET NOT AUS E CE E N Twist and pull up both buttons to resume operation P STO CY N Push either button to stop the laminator CAUTION ALWAYS CHECK THE TEMPERATURE SENSORS PRIOR TO OPERATION! The sensors must be clean and have free view of the roll to maintain proper roll operating temperatures. The rolls can overheat and cause a fire or seriously damage the laminator.
F-36 PRO Laminator Operation Manual WARNING Do not use liquid or aerosol cleaners on the laminator. Do not spill liquid of any kind on the laminator. You can be severely shocked, electrocuted or cause a fire. Use only a damp cloth for cleaning the cabinet. Safety CAUTION If silicone adhesive contacts the upper or lower roll, remove it IMMEDIATELY using 80% isopropyl alcohol. It can harden within an hour and ruin the roll.
Safety F-36 PRO Laminator Operation Manual WARNING Connect the laminator only to the type of power source indicated on the label on the back of the laminator. You can be severely shocked, electrocuted or cause a fire. If you are not sure of the type of power available consult the dealer or local power company. WARNING Do not attempt to plug any device into the vacuum table outlet that does not require 240V. You can be severely shocked, electrocuted or cause a fire.
F-36 PRO Laminator Operation Manual Safety WARNING WARNING ACHTUNG ACHTUNG MISE EN GARDE MISE EN GARDE WARNING ACHTUNG STO P ARRET D' U CE NOT AUS CY R G EN EM R G EN MISE EN GARDE E ING RN WA UNG HT E AC GARD SE MI EN ING RN WA UNG HT E AC GARD STO P ARRET NOT AUS CY D' U R G EN EM R G EN EN CE SE MI E psi 100 kPa 90 700 80 630 70 560 60 490 50 420 40 350 30 280 20 210 10 140 70 240 VOLTS LEM PRODUCTIONS, INC.
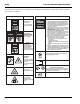
Safety F-36 PRO Laminator Operation Manual The following are typical safety hazard decals used on GBC Pro-Tech machines, with a brief description (“Meaning” column) of each decal. Decal Meaning WARNING ACHTUNG WARNING! Moving parts can crush and cut. MISE EN GARDE Do not operate with guard or door open. Decal Meaning WARNING! SAFETY INSTRUCTIONS SICHERHEITSRICHTLINIEN 1. 2. CONSIGNES DE SÉCURITÉ 3. 4.
F-36 PRO Laminator Operation Manual ! Before an F-36 PRO Laminator can be installed there are a few requirements that must be met. Make certain that each of the requirements listed in the following preinstallation checklist are met before beginning installation.
Installation F-36 PRO Laminator Operation Manual Recommended clearance 73" (~1.8m) Floor Trimmer 10' (~3m) 4'6" (~1.1m) 3' x 6' (~1m x 2m) Table 3' (~1m) 2'2" (~.
F-36 PRO Laminator Operation Manual , Installation + $ ☞ NOTE ALL SHIPMENTS ARE EX- WORKS. At our dock, title passes to the buyer. Please review your insurance coverage prior to shipment, as you are responsible for all subsequent freight charges and risks. Before signing the Bill of Lading, be sure to inspect the crate and/or pallet for signs of damage or missing items; if applicable, make a note of this on the Bill of Lading. The F-36 PRO Laminator is shipped one of two ways.
Installation F-36 PRO Laminator Operation Manual CAUTION Foot Bolt Shipping Pad Figure 2-3: The Foot Bolts 5. Remove the screws holding the foot pads onto the pallet using the Phillips head screwdriver. 6. Have the laminator lifted off the skid and placed on the floor by licensed riggers. The riggers must also unscrew the foot bolts from the laminator frame since it requires lifting the laminator.
F-36 PRO Laminator Operation Manual Installation If the laminator is in a crate: 1. Remove the top of the crate and then the sides in the order shown in Figure 2-4. CAUTION Do not allow the top to fall into the crate. It can damage the laminator. Do not put packing screws on the floor. They can cause problems when trying to roll the machine into position. A second person must support the side labeled 5 in Figure 2-4. It can fall and damage the laminator.
Installation F-36 PRO Laminator Operation Manual WARNING Do not attempt to move the laminator across anything other than a flat, level surface without trained and qualified riggers. You can be crushed or seriously injured. The F-36 PRO Laminator is a large and heavy piece of equipment. It is necessary to employ LICENSED RIGGERS ONLY to move the machine. The laminator is not designed to be tipped up or sideways in any way.
F-36 PRO Laminator Operation Manual WARNING Installation LINE 1 EUROPEAN 3–PHASE Y ALWAYS CHECK THE SENSORS PRIOR TO OPERATION! The sensors must be clean and contact the roll to maintain proper roll operating temperatures. The rolls can overheat and cause a fire or seriously damage the laminator. A N A LINE 3 LINE 2 THE EUROPEAN THREE-PHASE (STAR) LINE–1 7. Plug the laminator into an approved socket or have a certified electrician wire the laminator directly to a power source.
Installation F-36 PRO Laminator Operation Manual The first time the laminator is started and every time it is serviced you should use the following checklist to confirm that the unit is operating properly and that all safety mechanisms are functioning. ❏ Is the footswitch operating? Test the footswitch for both forward and reverse operation. Verify that the footswitch overrides the photoelectric eye by pressing the footswitch and pushing an object as large as your hand into the nip area.
F-36 PRO Laminator Operation Manual EM 1NO / 4 TtuAU r nS EM RG E RG E P STO CY N U CE RG E N U NOT AUS Twist and pull up both buttons to resume operation E ARRET D' In addition, the laminating rolls of the F-36 PRO Laminator can reach temperatures of over 200°F (100°C). At these temperatures there is a danger of a severe burn if the rolls are touched during set-up, operation or servicing.
Operation F-36 PRO Laminator Operation Manual The operator controls for the F-36 PRO Laminator are located on the front of the unit, to the right of the operator position. The names and functions of these controls are as follows: 7. UPPER ROLL HEATER CONTROLLER – Provides a readout of the temperature of the upper roll and the set-point for the desired temperature. 8.
F-36 PRO Laminator Operation Manual - # Operation The footswitch on the F-36 PRO Laminator operates much like the accelerator on an automobile. When the mechanical guard is removed, use the footswitch to feed material into the laminator at the rate you select by pressing the footswitch. The more pressure you apply, the faster the rolls turn. When you remove pressure from the footswitch, the rolls stop.
Operation .. F-36 PRO Laminator Operation Manual The F-36 PRO Laminator is capable of processing a wide range of pressure sensitive and thermal laminates onto an equally wide range of image materials. The primary considerations are: • Laminate adhesives are compatible with image materials. • The materials properly activate below the maximum roll temperature and within the speed and roll nip pressure ranges available on the laminator.
F-36 PRO Laminator Operation Manual $ Operation 1. Set the heater switches to OFF. The process control charts should be kept in this manual or in a book close to the laminator. Use the machine to encapsulate the popular charts so they can withstand food and coffee spills and so they are always available for ready reference. 2. Leave the cooling system ON. ☞ NOTE 3. Lower the upper main roll until the laminating rolls are touching.
Operation 6. Lay the image onto the adhesive side of the Falcon Board. Tacking the image down with a tacking iron at this point is sometimes helpful. 7. Push the Falcon board and image up against the leader board and press the footswitch. Be sure to maintain paper tension throughout this procedure. 8. Once the board is through the nip and it no longer continues to feed, disengage the footswitch and raise the main roll. With a knife, cut the laminate on the infeed side.
F-36 PRO Laminator Operation Manual 1. Adjust the machine settings as shown in process chart 3-4b. 2. Trim the print to size and trim the board to the size of the print. 3. Insert the board into the nip area and lower the main roll until it contacts. Turn the crank another 1/ 4 of a turn and remove the board using the footswitch. 4. Clean the board with a tack cloth or cleaning roller. 5.
Operation 3 F-36 PRO Laminator Operation Manual # # - This is the most commonly performed process. It is very important that the F-36 PRO Laminator is shut down in proper manner. If not, the laminating rolls can be damaged or destroyed. 1. Adjust the machine settings as shown in process chart 3-6 and remove the infeed table. Be sure that, while heating the machine, the rolls are together and turning. 2. Install laminating film on the upper and lower unwinds. 3.
F-36 PRO Laminator Operation Manual Operation 3 4 * /5 MATERIALS Upper Media Image Media Lower Media Mounting Substrate LAMINATOR SETTINGS Top Heater Status Drive Mode Bottom Heater Status Pull Roll Position Speed Output Cooling Drive Direction Main Roll Setting 3 4 * 6!57 5 Identification Diagram Notes __________________________________________________________________________________________ _____________________________________________________________________________
Operation F-36 PRO Laminator Operation Manual 3 4 * /5 One-Pass Mounting and Laminating MATERIALS Upper Media 3 mil gloss Image Media Bond Paper Lower Media N/A Mounting Substrate Falcon Board LAMINATOR SETTINGS Top Heater Status ON @ 240 ºF (115 ºC) Drive Mode Manual (Footswitch) Bottom Heater Status OFF Pull Roll Position UP Speed 1-2 ft/min Output Cooling OFF Drive Direction FWD Main Roll Setting DOWN - 1/4 turn 3 4 * 6!57 5 Leader Board Printed I
F-36 PRO Laminator Operation Manual Operation 3 4 * /5 One-Pass Mounting MATERIALS Upper Media N/A Image Media Bond Paper Lower Media N/A Mounting Substrate Falcon Board LAMINATOR SETTINGS Top Heater Status ON @ 240 ºF (115 ºC) Drive Mode Manual (Footswitch) Bottom Heater Status OFF Pull Roll Position UP Speed 2-3 ft/min Output Cooling OFF Drive Direction FWD Main Roll Setting DOWN - 1/4 turn 3 4 * 6!57 5 Printed Image FALCON Board Notes _________
Operation F-36 PRO Laminator Operation Manual 3 4 * /5 "5 Two Pass Mount and Cold/Pressure Overlaminate, First Pass MATERIALS Upper Media Pro-Gloss Image Media Bond Paper Lower Media Pro-Mount Mounting Substrate N/A LAMINATOR SETTINGS Top Heater Status ON @ 110 ºF (43 ºC) Drive Mode Manual or Auto Bottom Heater Status OFF Pull Roll Position UP or DOWN Speed 4-6 ft/min Output Cooling OFF Drive Direction FWD Main Roll Setting DOWN - 1/2 turn 3 4 * 6!57 5 "
F-36 PRO Laminator Operation Manual Operation 3 4 * /5 "8 Two Pass Mount and Cold/Pressure Overlaminate, Second Pass MATERIALS Upper Media N/A Image Media N/A Lower Media N/A Mounting Substrate Foam Core LAMINATOR SETTINGS Top Heater Status OFF Drive Mode Manual (Footswitch) Bottom Heater Status OFF Pull Roll Position UP Speed 2-6 ft/min Output Cooling OFF Drive Direction FWD Main Roll Setting DOWN - 1/4 turn 3 4 * 6!57 5 "8 Hold Encapsulated Image Image
Operation F-36 PRO Laminator Operation Manual 3 4 * /5 %5 Two Pass Mount and Hot Overlaminate, First Pass MATERIALS Upper Media 3 mil Gloss Image Media Bond Paper Lower Media Pro-Mount Mounting Substrate N/A LAMINATOR SETTINGS Top Heater Status ON @ 230 ºF (110 ºC) Drive Mode Manual or Auto Bottom Heater Status OFF Pull Roll Position DOWN Speed 3-4 ft/min Output Cooling OFF Drive Direction FWD Main Roll Setting DOWN - 1/2 turn 3 4 * 6!57 5 %5 Notes ____
F-36 PRO Laminator Operation Manual Operation 3 4 * /5 %8 Two Pass Mount and Hot Overlaminate, Second Pass MATERIALS Upper Media N/A Image Media N/A Lower Media N/A Mounting Substrate Foam Core LAMINATOR SETTINGS Top Heater Status OFF Drive Mode Manual (Footswitch) Bottom Heater Status OFF Pull Roll Position DOWN Speed 2-3 ft/min Output Cooling OFF Drive Direction REV Main Roll Setting UP 3 4 * 6!57 5 %8 CAUTION: Do not allow foam board to drop below Fan
Operation F-36 PRO Laminator Operation Manual 3 4 * /5 Encapsulation MATERIALS Upper Media 3 mil Gloss Image Media Bond Paper Lower Media 3 mil Gloss Mounting Substrate N/A LAMINATOR SETTINGS Top Heater Status ON @ 230 ºF (110 ºC) Drive Mode Manual or Auto Bottom Heater Status ON @ 230 ºF (110 ºC) Pull Roll Position DOWN Speed 3-6 ft/min Output Cooling OFF Drive Direction FWD Main Roll Setting DOWN - 1/4 turn 3 4 * 6!57 5 Notes _____________________
F-36 PRO Laminator Operation Manual " # $ Performing regular maintenance on the F-36 PRO Laminator is critical to the proper operation of the machine. A maintenance schedule and a section of procedures for disassembling and reassembling the serviceable areas of the laminator are included in this section.
Maintenance and Troubleshooting F-36 PRO Laminator Operation Manual Use Your Other Hand to Gently Bend Provide Support At Rivets Figure 4-1: Adjusting the Thermocouple Once installed, the critical point of the thermocouple MUST make direct contact with the roll as shown in Figure 4-2. Bend Rivets Thermal Junction Roll Figure 4-2: Correct Thermocouple Contact CAUTION Firmly hold the thermocouple where the “guitar pick” sensor is riveted to the aluminum base while bending.
F-36 PRO Laminator Operation Manual Maintenance and Troubleshooting Upper Main Roll Thermocouple Tube to Frame Thermocouple Wire STOP ARRET D' U E CE N RG E RGE CY N NOT AUS EM G IN RN WA NG HTU E AC GARD Wire to Control Side SE MI ING RN WA NG HTU E AC GARD SE MI EN rn ar d bu y cles. h an us Sta ler d Crzard. g rol an e hamovinchine for of p mal be Stose rol . rai aning cle EN R-PT r No.1033 Reorde -0241 800-748 Inc. HCS, ©1994 rn ar d bucle h an ay s. us St ler d Crzard.
Maintenance and Troubleshooting To clean the laminator rolls: 1. Remove the infeed table and infeed pressure plate to gain access to the rolls. WARNING Exercise extreme caution while cleaning the laminator. You can be caught in the turning rolls and crushed or burned. 2. While the laminator is at normal operating temperature, put on the rubber gloves and, using a rubber cement eraser, remove any heat activated adhesive from the rolls.
F-36 PRO Laminator Operation Manual Maintenance and Troubleshooting To clean the cabinet and covers: 5 9 $ # 4 1. Unplug the laminator to clean the exterior. The gap between the two main rolls is called the nip. The purpose of adjusting the nip is to ensure continuous contact between the laminating rolls as the media is drawn through the machine. This procedure must be done regularly. 2. Using a damp cotton terry cloth (water only), clean the exterior of the laminator.
Maintenance and Troubleshooting F-36 PRO Laminator Operation Manual 5. Adjust the nip by turning the adjusting bolt using an ¾" open end wrench (clockwise to lower the roll end and counter clockwise to raise the roll end). Adjust the ends of the upper main roll until there is an even gap between the rolls as shown in Figure 4-5. 1/4" to 1/2" Play Properly Set Nip (Distance Between Rolls is Equal) Figure 4-5: Properly Set Nip 6.
F-36 PRO Laminator Operation Manual * Maintenance and Troubleshooting Tools required: • 1/ " 8 • High temperature grease or lithium grease • Grease gun hex wrench To lubricate the laminator: WA R AC NING HT UN MIS G E EN Grease Fittings GA RD E Mov crusing pa Do h and rts do not cut.can or op op erat en e . with ©199 4 HCS, Inc. 800-7 48-02 41 Reord er No. 1012PT WARNING Do not lubricate the laminator when it is hot. You can be burned.
Maintenance and Troubleshooting F-36 PRO Laminator Operation Manual # $ 7 Problem: Problem: D waves in the image, not in the D waves in the laminate. laminate. Hints: Hints: • Increase clutch tension. • Check paper tension. • Check roll pressures. • Check relative moisture • Check nip settings. content of the paper. Problem: Straight waves in the output. Hints: • Decrease clutch tension. • Check operational settings for materials being used.
F-36 PRO Laminator Operation Manual % & * . & Warranty This warranty specifically does not cover: GBC Pro-Tech Engineering Company, Inc. warrants the equipment sold is free from defects in material and workmanship for a period of ninety days (90) from the date of delivery to the customer. This warranty is the only warranty made by GBC Pro-Tech and cannot be modified or amended.
Warranty F-36 PRO Laminator Operation Manual Blank page.
F-36 PRO Laminator Operation Manual Dimensions (L x D x H) Weight Laminating Rolls Laminating Opening Laminating Material Laminating Speeds Encapsulating Features Safety Features Options Installation Requirement Table 6-2: Replacement Parts Table 6-1: F-36 PRO Laminator Specifications Characteristic Specifications Specifications 56" x 31" x 56" (1.42 x .79 x 1.42m) Uncrated: 300 lbs (136 kg) Crated : 500 lbs (225 kg) 42" (1.
Specifications F-36 PRO Laminator Operation Manual Blank page.
F-36 PRO Laminator Operation Manual Index ! ( * 5 Laminate adhesives 3-4 Laminating material 6-1 Laminating opening 6-1 Laminating rolls 6-1 Laminating speeds 6-1 Lubrication 4-7 Accessory pack 2-3 Adjusting bolt 4-5, 4-6 Chain Lubrication 4-7 Tensioning 4-6 Clutch Common problems 4-8 Controls Front control panel 3-2 3 Main roll Lower 4-5 Main rolls 4-1, 4-5 Temperature 4-1 Maintenance schedule 4-1 Motor 2-8, 4-6 Mounting and laminating (one pass) 3-5 Mounting only 3-6 Emergency stop button
Index F-36 PRO Laminator Operation Manual Safety features 6-1 Safety information 1-1 Safety labels 1-4 Setup 3-3 Setup procedure 2-6 Shutdown 3-8 Specifications Dimensions 6-1 Encapsulating 6-1 Laminating material 6-1 Laminating opening 6-1 Laminating rolls 6-1 Laminating speeds 6-1 Weight 6-1 Technical support Call 1-800-236-8843 4-7 Thermocouple 4-1, 4-2, 4-3 Locations 4-3 thermocouple 4-1 Two-pass mount and laminate 3-6, 3-7 , Unpacking 2-3 Cardboard box 2-3 Crate 2-5 Upper main roll 1-3, 2-6, 4-