
User Manual

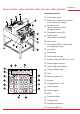
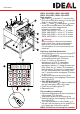
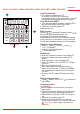
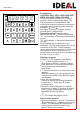


Table Of Contents
- 23 -
cm
inch
cm
inch
•
Operation
•
IDEAL 4810-95EP, IDEAL 4850-95EP,
IDEAL 5221-95EP, IDEAL 6550-95EP
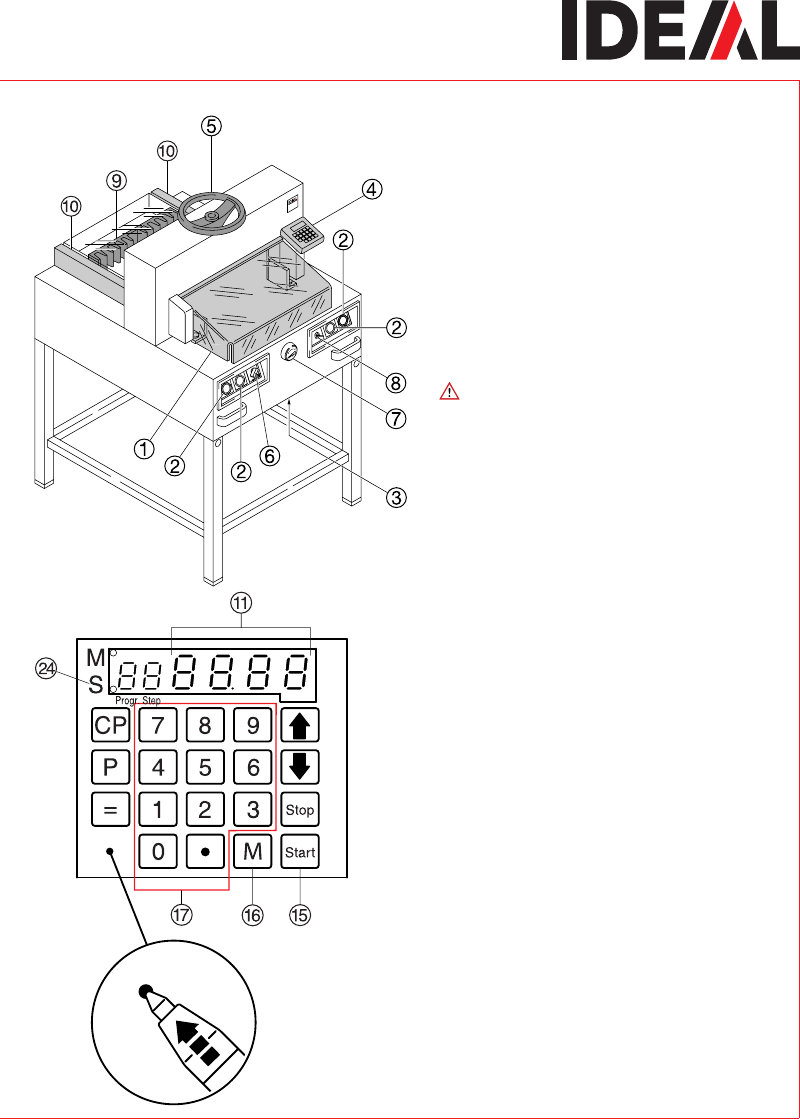
Start machine
•
Main switch
F
to position "I", insert the key
H
for the control panel and turn it to the right.
Open the front safety guard
A
• Press
S
button
O
backgauge
I
moves
to the rear and searches for the reference
position, wait until a measurement
is shown in the display
D.
IDEAL 4810-95/EP = 45 cm, 17,72 inches
IDEAL 4850-95/EP = 45 cm, 17,72 inches
IDEAL 5221-95EP = 52 cm, 20,47 inches
IDEAL 6550-95/EP = 61 cm, 24,02 inches
Warning!
Before storing or cutting a measurement
please check if the correct measurement
scale (cm or inch) see above is stored.
For information on how to store see picture
below left.
Cutting to specified dimensions
•
Enter dimension on the numerical key pad
Q
LED "S"
X
appears.
(If a wrong dimension is entered this can be
corrected by pressing the
s
button).
•
Press
S
button dimension is
approached, LED "S" disappears.
Dimensions below 9 cm can only be
approached with the
S
button pressed and
held. (When the
S
button
O
is released,
the backgauge
I
moves to a measurement
of 9 cm measurement 9 cm blinks, keep
the
S
button pressed, backgauge
I
moves
to e.g. 7 cm.
•
Insert paper and move by means of the
stacking angle to the backgauge
I
and side
lay on the left
J
.
•
Only IDEAL4810-95/EP
Turn the hand-wheel
E
for paper clamping to
the right and tighten with a short twist.
•
Close the front safety guard
A.
•
Release the cut.
Cut according to markings
•
Adjust the backgauge with the hand-wheel or
crank handle
G
to the back.
•
Insert paper and move by means of the
stacking angle to the backgauge
I
and side
lay on the left
J.
•
Turn the hand-wheel or crank handle
G
to
the right until the marking on the paper to be
cut is below the cutting line indicator.
IDEAL 4810-95 has no cutting line indicator.