OPERATION MANUAL MBM 307A / 407A AUTOMATIC FOLDERS 1-800-223-2508 www.mbmcorp.
1
Safety Instructions Definition of Symbols and Notes The following names and signs stand for possible dangers. Danger This symbol stands for immediate danger. Disregarding these instructions may cause severe injury. Caution This symbol stands for a potentially dangerous situation. Disregarding these instructions may lead to injuries or damage to property. Note This symbol stands for notes, operational hints and other useful information.
Introduction Thank you for purchasing the MBM 307A / 407A Automatic Paper Folder. You should receive many years of reliable service from this machine. Compact and easy to use, the 307A / 407A Paper Folder is sure to streamline your paper folding tasks, saving you valuable time. Please read the Operation Manual thoroughly before using this machine. This Operation Manual is good for both 307A/407A . Explanations of functions unique to the 307A are indicated in italics. Contents Safety Instructions ..........
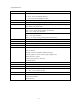
(1) Specifications Model: 307A / 407A Paper sizes: 3.5” x 5.0” to 11” x 17” 3.5” X 5.0” size is for SINGLE fold only. 5” x 7.2” size cannot be folded into GATE. Paper weight: 45 to 105g/m2 (up to 152g/m2 for single fold) 14 to 70 lb Paper quality: Medium and high-quality paper, high-quality paper for stencil printing. Fold types: Single, gate, letter, zigzag, double parallel, and fold-out. Irregular folding and cross folding using double fold. Fold dimensions: Maximum fold dimensions Table 1: 12.
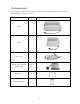
(2) Accessories After un-boxing the 207M, make sure that the following accessories are present. Please contact your local dealer immediately if anything is missing.
(3) Part Names ⑧ ⑪ ④ ① ② ③ ⑨ ⑤ ⑫ ⑬ ⑭ ⑥ ⑩ ⑦ ⑮ ⑯ ⑰ ⑱ ⑲ Number Name Number Name ① Safty cover ⑪ Paper feed table ② Left side cover ⑫ Table 2 ③ Paper feed roller ⑬ Right side cover ④ Paper guide ⑭ Paper feed table lever (307A only) ⑤ Auxiliary feed table ⑮ Table 1 socket ⑥ Paper eject roller ⑯ Table 2 socket ⑦ Paper eject table ⑰ Power switch ⑧ Stopper fine adjustment knob ⑱ Inlet ⑨ Table 1 ⑲ Circuit breaker ⑩ Control panel 6
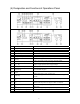
(4) Designation and Functions of Operations Panel 407A 307A ① ② ③ ④ ⑤ ⑥ Designation/Indication Fold type key Test key Start/Stop key Clear/Reset key Store key Memory 1/2/3 key ⑦ Select key ⑧ Perforation mode lamp ⑨ +/― key ⑩ Speed adjustment key ⑪ Numerical key ⑫ Counter ⑬ Check lamp ⑭ Table 1 stopper move mode lamp Table 2 stopper move mode lamp Paper ejection roller move lamp No.
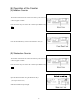
(5) Operation of the Counter (A) Addition Counter The number indicated on the counter increases by one each time a sheet of paper is folded. Press the Select key and select the Counter Input Mode Lamp 123. Press the Clear/Reset key and reset the number to zero (0). (B) Subtraction Counter The number indicated on the counter decreases by one each time a sheet of paper is folded. Press the Select key and select the Counter Input Mode Lamp 123.
(6) Set-Up Install Table 1 and 2. Insert the notched front part of Table 1 into stud ① and drop its rear notched part onto stud ②. Insert the plug into the connector ③. Caution: The connector can only be connected one way. Do not force. Insert the notched front part of Table 2 into stud ④ and drop its notched rear part onto stud ⑤. Insert the plug into the connector ⑥. Caution: The connector can only be connected one way. Do not force.
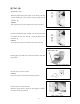
(7) Directions for Use (A) Standard folding of standard-size paper 407A 1. Turn power switch on. 2. Loosen the paper guide set screw and adjust the paper guide to fit the width of the paper. 3. Neatly arrange and place it on the feed table with the printed side up (printed side down in case of fold-out). 4. Adjust paper guide snug with the paper, and tighten the setscrew. <to next page> Paper gui de set scr ew Paper gui de Paper f eed t abl e 307A 1. Turn power switch on. 2.
Selecting a fold type: One of the six folding types (Single, Gate, Letter, Zigzag, Double Parallel, and Fold-out) can be selected. Press the desired fold type key. Example: Single folding using letter size paper. Letter size (11” length) – C1 Legal size (14” length) – C2 Ledger size (17” length) – C3 Test folding: When the TEST key is pressed, two sheets will be folded while not activating the counter. Check to see if the second sheet has been folded correctly.
(B) Standard Folding of Non-standard-size Paper L(mm) Determine the Paper Length Measure the paper length. The arrow indicates the direction of paper feed. Press the SELECT key and select the Paper Length Input Mode.³´ (407A) Input the paper length using the number keys. The unit for input is millimeters. For example, to specify a paper length of 250 mm, enter 2 → 5 → 0. The available input range is 179 to 435 mm.
Set the designated position using the +/- Indication Standard-size paper Non-standard-size paper key. 1 2 3 C1 C2 C3 Setting the designated position Setting the paper ejection roller for( 307A) The exit roller should be moved to the proper position according to the paper size. Refer to the “Roller Position Indication” label. If ejection is not performed properly, try a different position.
(C) Cross Folding Cross folding refers to performing the double parallel, letter, or other types of folds for paper already folded using a single fold. Cross folding can be used when, for example, a sheet of ledger size paper folded using the double parallel fold is still too large to be enclosed in an envelope. Note: The maximum weight of paper that can be used for cross folding is 28lb. bond.
(8) Adjustment (A) Skew Adjustment If the folding position is slanted it can be adjusted using the skew adjustment knob. (B) Fine Adjustment Move the stopper using the stopper fine adjustment knob. Caution: If the fine adjustment knob is moved, when the TEST key is pressed, the machine will continue to fold, when the START / STOP key is pressed, the machine will start to fold after the stopper is returned to the previous position Note: To make large stopper adjustments, use the +/- key.
Fine Adjustment for Table 1 Fold type Single fold Folded (A) Table 1 is not used Long Gate fold Short Long Letter fold Short Long Zigzag fold Short Long Double parallel fold Short Long Fold-out Fold Short 16 Direction to turn the Table 1 fine adjustment knob
Fine Adjustment for Table 2 Fold type Folded (B) Long Single fold Short Long Gate fold Short Long Letter fold Short Long Zigzag fold Short Long Double parallel fold Short Long Fold-out fold Short 17 Direction to turn the Table 2 fine adjustment knob
(9) Memory (A) Storage 407A Storage of Non-standard folds can be input with the Memory 1/2/3 keys and the Fold type keys. The positions of the Table 1 and 2 stoppers, position of the ejection roller, and folding speed are all saved in memory. 307A Storage of Non-standard folds can be input with the Fold type keys. The position of the Table 1 and 2 stoppers, and folding speed is stored in memory. Select the memory key in which the fold will be input.
(B) Cancellation of Memory Cancel the storage input in the memory 1/2/3 keys and the fold type keys Important: The machine will be enabled to perform standard folds set by the manufacturer. Select the key in which the memory is to be cancelled. Important: The lamp of the key in which the fold is stored flashes. Press and hold the CLEAR / RESET key and release immediately when you hear a beep. The lamp of the key in which the storage has been cancelled will light.
(10) Maintenance Two rollers can be removed and installed without using any tool, which facilitates cleaning of the rollers and paper ejection photo sensor. As the other two rollers cannot be removed, they should be cleaned while revolving them little by little. Rollers should be moistened with water and wiped off with a cloth wrung tightly. If only one sheet of paper is fed, use a soft cotton swab to remove paper dust, etc. from the face of the paper ejection photo sensor shown by the arrow.
Sensor position Open the safety cover and wipe the surface (black plastic) of the paper feed photo sensor with the tip of a cotton swap or similar material moistened in water. Caution! When cleaning, make sure that no residue from the cotton swab is left in the unit or the paper feed may stop with an error after feeding a single sheet (Check lamp (1) flashes). → See "(11) Troubleshooting, Check lamp (1)" on page 22.
(11) Troubleshooting If Check lamp (1) is flashing it may indicate: 1) No paper 2) Paper jam at paper feed photo sensor 3) Paper feed photo sensor is dirty If Check lamp (2) is flashing it may indicate: 1) Paper jam at fold tables 2) Plug is disconnected If Check lamp (3) is flashing it may indicate: 1) Paper jam at paper eject photo sensor 2) Paper eject photo sensor is dirty Note: If paper is loaded immediately after printing, problems such as jamming, double feed, slipping, and wrinkling may occur.
(12) Removing the fold tables (1) Set the power switch to OFF. ① (2) Disconnect the plugs. ② ③ (3) Remove the fold tables. Caution! Be sure to always remove plugs prior to removing tables.
MEMO 24
MEMO 25
26
MBM Corporation 27