
Logic HE Balanced Flue Combined Controls Installation User Instructions


7
User Instructions
Adjusting the Flame height
2.25 Increase the flame height and temperature by carefully
moving the slide control up until the next stop point is felt,
see Diagram 8. This denotes the highest setting.
2.26 Carefully move the slide control down to the lower stop
point to return to the lowest setting.
IMPORTANT: YELLOW FLAMES TYPICALLY
APPEAR WHEN THE APPLIANCE HAS REACHED
NORMAL OPERATING TEMPERATURE. THIS CAN
TAKE UP TO 30 MINUTES.
WARNING: IF THE APPLIANCE FAILS TO LIGHT OR
BECOMES EXTINGUISHED IN USE, WAIT 3
MINUTES BEFORE ATTEMPTING TO RELIGHT.
Switching OFF the Appliance
2.27 To turn the appliance off lift the slide control to its highest
stop point, see Diagram 8. The pilot goes out.
3. Changing the Battery
Remote Control
3.1 The battery box is located at the bottom left of the
appliance behind the ash cover.
3.2 Remove the old batteries and replace with a new high
quality (Duracell or similar) 4 AA batteries.
9
It is essential to use high quality batteries (Duracell
or equivalent) when replacing batteries.
Slide Control
3.3 The battery box is located at the bottom left of the
appliance behind the ash cover, see Diagram 10.
10
9V Battery
Ignition
Unit
3.4 Remove the old battery and replace with a new high quality
(Duracell or similar) 9V battery.
It is essential to use high quality batteries (Duracell
or equivalent) when replacing batteries.
4. Cleaning the Appliance
4.1 Make sure the appliance and surrounds are cool before
trying to clean.
4.2 Refer to the separate decorative front instructions to
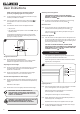
remove the front from the appliance.
4.3 Remove the glass frame by unscrewing the 2 lower outer
pozi head screws, see Diagram 11, Arrow A, by several
turns, there is no need to fully remove these 2 screws.
4.4 Remove the remaining 6 screws, see Diagram 11, Arrow B.
B
B
B B
B
B
A
A
11
4.5 Lift the glass frame clear of the appliance and carefully
place to one side.
4.6 To clean the glass surface, Gazco recommends you use
hot soapy water.
4.7 The glass frame must be refitted to the appliance following
cleaning or servicing.
Ensure that the fibre glass seal on the box is intact, then
lower the glass frame onto the 2 lower fixing screws, see
Diagram 11, Arrow A.