
Logic HE Conventional Flue Combined Controls Installation User Instructions


6
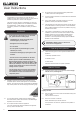
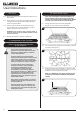
To light the main burner:
2.14 Press buttons A & B simultaneously.
The remote’s LED light flashes to show communication
between the appliance's controls and the remote.
Adjusting the Flame height:
2.15 Press and hold buttons A & B simultaneously to increase the
flame height. A clicking sound indicates that the appliance is
at maximum.
2.16 Press and hold button C to decrease the flame height.
Continue to press C to turn off the main burner.
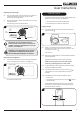
To make small adjustments to flame height:
2.17 Press and hold down button B and press button A once to
make a slight increase. This increases the temperature by
stages.
Repeat to further adjust.
2.18 Press button C once to slightly reduce the flame height.
IMPORTANT: YELLOW FLAMES TYPICALLY
APPEAR WHEN THE APPLIANCE HAS REACHED
NORMAL OPERATING TEMPERATURE. THIS CAN
TAKE UP TO 30 MINUTES.
WARNING: IF THE APPLIANCE FAILS TO LIGHT
OR BECOMES EXTINGUISHED IN USE, WAIT 3
MINUTES BEFORE ATTEMPTING TO RELIGHT.
Switching OFF the Appliance
THE REMOTE CONTROL CAN TURN THE MAIN BURNER
OFF AND LEAVE THE PILOT BURNING AND READY TO
RUN .
2.19 To switch off the appliance completely (no pilot burning)
return both control knobs to the off position ( ).
Remote Control
2.20 To turn the main burner of the appliance off using the
handset press and keep pressing the Off button ( ).
The main burner goes out leaving the pilot burning and ready
to operate .
Controls on Appliance
2.21 Use the controls on the appliance to turn the appliance off by
turning the left-hand control knob until it points to Off ( ).
A click is heard and the main burner goes out leaving the
pilot burning and ready to operate .
CAUTION: IN RARE INSTANCES, NOISES FROM
SOURCES OUTSIDE THE REMOTE CAN OPERATE THE
MAIN BURNER. IF THIS OCCURS, ALWAYS TURN THE
CONTROL TO PILOT ( ) OR OFF.
User Instructions
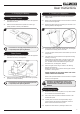
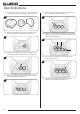
Slide Control
This appliance is operated using the slide control on the top
right hand side of the decorative front.
When the appliance is OFF the slide control will be at the
highest point, see Diagram 6.
6
OFF
Ignition Point
Low Setting
High Setting
Lighting the Pilot
2.22 Push the slide control down as far as possible to its lowest
point, see Diagram 6, this is the ignition point.
Keep the slide control pressed down for 5 seconds to
ensure the pilot is lit. Then release.
The appliance should light on its lowest setting.
2.23 When released the slide control automatically raises to a
natural stop point, see Diagram 6.
Repeat the above steps if the appliance does not light.
2.24 If, after repeating the above steps the pilot does not light,
contact your Retailer or Installer.
Adjusting the Flame height
2.25 Increase the flame height and temperature by carefully
moving the slide control up until the next stop point is felt,
see Diagram 6. This denotes the highest setting.
2.26 Carefully move the slide control down to the lower stop point
to return to the lowest setting.
IMPORTANT: YELLOW FLAMES TYPICALLY
APPEAR WHEN THE APPLIANCE HAS REACHED
NORMAL OPERATING TEMPERATURE. THIS CAN
TAKE UP TO 30 MINUTES.
WARNING: IF THE APPLIANCE FAILS TO LIGHT
OR BECOMES EXTINGUISHED IN USE, WAIT 3
MINUTES BEFORE ATTEMPTING TO RELIGHT.
Switching OFF the Appliance
2.27 To turn the appliance off lift the slide control to its highest
stop point, see Diagram 6. The pilot goes out.