
Logic HE Conventional Flue Combined Controls Installation User Instructions

8
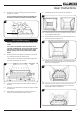
Coal Effect
4.12 Remove the ceramic coals and fuel bed and place on a dry
clean surface.
4.13 Check the burner cover gasket for damage. Replace any
damaged parts with genuine Gazco replacement parts,
contact your Gazco retailer.
4.14 Carefully clean the burner and tray assembly using a
vacuum cleaner with soft brush attachment, ensure all
debris is removed from the burner ports.
WARNING: Take care when using a vacuum cleaner on
the burner gasket as this is extremely delicate and may
deteriorate after use.
4.15 Replace the ceramics by referring to section 5B.
5. Arrangement of the Fuel Bed
Advice on handling and disposal
of fire ceramics
The fuel effect and side panels of this
appliance are made from Refractory Ceramic
Fibre (RCF), a material which is commonly
used for this application.
Protective clothing is not required when
handling these articles, but we recommend you
follow normal hygiene rules of not smoking,
eating or drinking in the work area and always
wash your hands before eating or drinking.
To ensure that the release of RCF fibres
are kept to a minimum, during installation
and servicing a HEPA filtered vacuum
is recommended to remove any dust
accumulated in and around the appliance
before and after working on it. When servicing
the appliance it is recommended that the
replaced items are not broken up, but are
sealed within heavy duty polythene bags and
labelled as RCF waste.
RCF waste is classed as stable, non-reactive
hazardous waste and may be disposed of at a
licensed landfill site.
Excessive exposure to these materials may
cause temporary irritation to eyes, skin and
respiratory tract; wash hands thoroughly after
handling the material.
User Instructions
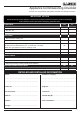
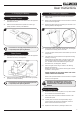
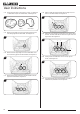
5A. White Stone Layout
ONLY USE THE CORRECT TYPE AND QUANTITY OF
WHITE STONES. ALWAYS FOLLOW THE FUEL BED
LAYOUT AS STATED IN THESE INSTRUCTIONS. NEVER
CHANGE THE LAYOUT FROM THAT SHOWN HERE.
5.1 Arrange the white stones in the areas highlighted in
Diagram 10. They should be evenly distributed.
10
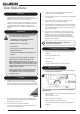
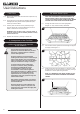
5.2 Lean the white stones against the burner ledges to disguise
the ledges, see Diagram 11.
11
5.3 Check that the port area, see Diagram 12, Arrow A is clear
of white stones. This can be easily done by gently running a
screwdriver or similar object along this area.
NOTE: IT IS IMPORTANT THE WHITE STONES DO NOT
COVER THE PORT AREA IN BETWEEN THE BURNER
LEDGES.
A
12