
Steel Frame Installation User Instructions

3
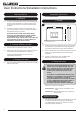
2
2.2 Separate the back and front sections of the frame. The
frame must first be opened to 90º (right angles) to the back
panel, Diagram 3.
3
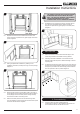
2.3 Having completed the installation by referring to the
Installation instructions, identify the 3 lugs on the top flange,
Diagram 4.
4
2.4 Place the back panel so that the tabs locate in the lugs on
the top flange and the bracket rests against the top edge of
the top flange. Ensure the back panel is resting centrally
and mark the location of the fixing holes.
2.5 Remove the back panel and drill the seven fixing holes,
push the rawlplugs into the holes and secure the back panel
to the wall with the screws supplied.
THE FIXINGS SUPPLIED SHOULD BE SUFFICIENT
WHEN MOUNTING ONTO A BRICK OR BLOCK
WALL. YOU SHOULD, HOWEVER, USE SUITABLE
FIXINGS WHEN MOUNTING ON A WALL
CONSTRUCTED OF AN ALTERNATIVE MATERIAL.
2.6 Re-attach the front panel to the back by dropping the two
pins into their appropriate barrels. Note this must be
dropped into place at 90º (right angles) to the back panel,
Diagram 5.
5
Wall Mounted
2.7 Secure the frame to the wall at the desired height in the
same fixing method as the hearth mounting method.
2.8 Following successful installation of the frame the lower
bracket of the frame requires an additional flange to ensure
a quality finish.
2.9 To attach the angled cover strip open the door and secure to
the base of the lower bracket by feeding the four fixed studs
through the pre-drilled holes and securing with the washers
and nuts provided in all four places Diagram 6.
6
3. Commissioning
3.1 Once the frame has been installed follow the
Commissioning section in the Installation Instructions and
ensure that the manuals are left with the user.
Installation Instructions