
Logic HE Balanced Flue Log Installation User Instructions


41
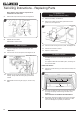
LINERS
Once the Front Top Baffle has been placed carefully to one
side the liners can then been taken out in the following order.
12.4 To remove the Right Hand liner first tilt inwards towards the
centre of the firebox before lifting up and pulling out through
the front of the firebox, see Diagram 38.
38
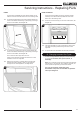
12.5 To remove the Left Hand liner first tilt inwards towards the
centre of the firebox before lifting up and pulling out through
the front of the firebox, see Diagram 38.
The 2 side liners also support the rear liner.
Taking out the side liners will allow the rear liner to move
forward so ensure it is supported.
12.6 Remove the rear liner by carefully leaning the top edge
forward and twisting slightly to allow it to be removed
through the front of the appliance, see Diagram 39.
39
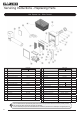
Servicing Instructions - Replacing Parts
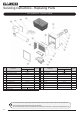
REAR TOP BAFFLE
Once the Front Top Baffle and Liners have been placed
carefully to one side the Rear Top Baffle can then been
taken out in the following order.
12.7 Undo the 4 screws securing it to the roof of the firebox, see
Diagram 40.
Screws
40
12.8 The Rear Top Baffle can now be removed by lowering the
front edge and pulling forward through the front of the
appliance.
12.9 To replace the liners and baffle reverse these procedures.
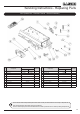
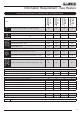
13. Changing between Gas Types
In order to change between gas types, it will be necessary
to change the Gas Valve, Pilot, Injector, Burner, &
Databadge.
Note: The Control Box will be set for the particular appliance
and gas type. In all instances, when ordering new parts, be
sure to quote the appliance type and serial number.
Use only genuine Gazco replacement parts.
Nonstandard components will invalidate the guarantee
and may be dangerous.