
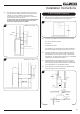
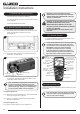
Logic HE Balanced Flue Log Installation User Instructions


27
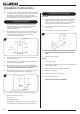
Setting the Time
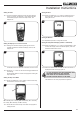
11b.1 Once the handset is paired the screen will show that the
time is not yet set, see Diagram 5. The handset will then
automatically progress to the next setup screen, see
Diagram 25.
25
Setting the display for 12 or 24 Hour Clock
11b.2 Holding the remote to keep the green light on and the
handset unlocked the handset will display an H:24, see
Diagram 26.
26
24 denotes a 24 hour clock and 12 denotes a 12 hour clock.
11b.3 Press the + or - button on the handset to toggle between the
two settings.
Press the SET button to confirm and progress to setting the
day of the week.
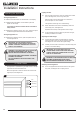
Setting the Day of the Week
11b.4 Press and release the + and - buttons until the correct day
of the week is shown on the display.
27
Mo = Monday, Tu = Tuesday, We = Wednesday, Th = Thursday,
Fr = Friday, Sa = Saturday and Su = Sunday.
11b.5 Press SET to confirm the day of the week and progress to
setting the time.
Setting the Hour
11b.6 Press and release the + or - button to change the hour to
the correct hour. Press SET to confirm and progress to
setting the minute.
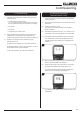
28
Setting the Minutes
11b.7 Repeat the process to change the minutes.
Setting the Temperature Display (Celsius or Fahrenheit)
11b.8 Press and release the + or - button to toggle between C and
F. When the display shows the desired symbol, press and
release the SET button to store.
29
11b.9 Place the handset down and wait until the home screen is
displayed and the unlock light goes off.
ALL THE NECESSARY SETTINGS REQUIRED HAVE
NOW BEEN COMPLETED. ANY FURTHER
FUNCTIONS ON THIS HANDSET ARE FOR
FACTORY SETTING AND NOT TO BE USED.
The Handset is now ready to operate the appliance.
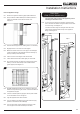
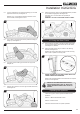
Installation Instructions