
Logic HE Balanced Flue Combined Controls Installation User Instructions


5
User Instructions
2.4 Hold in for a further 10 seconds.
When released the pilot should remain lit.
If the pilot does not remain lit, repeat until the operation is
successful.
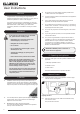
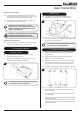
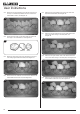
Locating the Pilot
Coal Effect
The pilot is located on the front right hand side of the
appliance. To view the pilot look down through the GAZCO
logo between the glass and the front coal, see Diagram 2.
Front Coal
Gap in logo
2
White Stone Effect
The pilot is located on the rear right hand side of the
appliance and is clearly visible when lit, see Diagram 3.
3
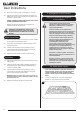
Adjusting the Flame height
2.5 From the pilot position push the valve knob in slightly and
rotate anti-clockwise until the first stop point is felt.
This denotes the lowest setting.
2.6 Push the valve knob in slightly and rotate further in an anti-
clockwise direction.
The final stop point is the highest setting.
Pilot
position
Low Setting
High Setting
Off position
4
IMPORTANT: YELLOW FLAMES TYPICALLY
APPEAR WHEN THE APPLIANCE HAS REACHED
NORMAL OPERATING TEMPERATURE. THIS CAN
TAKE UP TO 30 MINUTES.
WARNING: IF THE APPLIANCE FAILS TO LIGHT OR
BECOMES EXTINGUISHED IN USE, WAIT 3
MINUTES BEFORE ATTEMPTING TO RELIGHT.
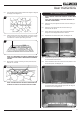
Switching OFF the Appliance
2.7 To switch the appliance off turn the control knob clockwise
until it is returned to the off position, see Diagram 5.
5
Rotate clockwise
The knob should be upright.
Remote Control
The pilot on Remote Control appliances must be lit
manually from the valve unit before operation.
The control valve is at the foot on the right-hand side of the
appliance. It has two controls, see Diagram 6:
1. The right-hand knob controls the pilot ignition.
2. The left-hand knob controls the main burner.
Lighting the Pilot
2.8 To start the left-hand and right-hand control knobs must
both point to off ( ):
6
2.9 Press in the right-hand control knob and rotate anti-
clockwise until a click is heard. Continue to press in. The
knob points to the pilot ( ).
The pilot is lit.
2.10 Keep the knob depressed for 10 seconds before releasing.
The pilot remains lit.
Repeat the above steps if the pilot does not stay lit.