
Logic HE Balanced Flue Log Installation User Instructions


36
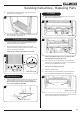
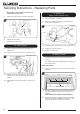
Servicing Instructions - Replacing Parts
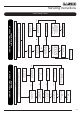
NOTE: The burner unit and pipe work have been
removed for clarity.
Burner
Tray
Retaining
Bracket
Detail A
Retaining
Bracket
11
Slide Control
model shown
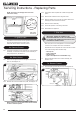
6. Ignition Lead
The different control versions of this appliance have different
servicing requirements for the Ignition Lead.
Follow the relevant section for each product.
6a. Remote Control
6a.1 The Ignition Lead used on this appliance can not be replaced
individually. If a new lead is required it will be necessary to
change the pilot unit, see Section 7.
6b. Slide Control
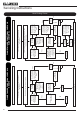
6b.1 Disconnect the ignition lead from the ignition unit and the
pilot unit, see Diagram 12.
12
Pilot Unit
Ignition
Unit
Ignition Lead & Vidaflex
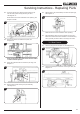
6b.2 Remove the screw and sealant from plate, see Diagram 13.
13
Plate
Screw
When replacing the cover plate ensure silicone sealant
is used to seal the aperture.
6b.3 Feed ignition lead complete with vidaflex through metal
plate.
6b.4 Remove the vidaflex from the old ignition lead.
6b.5 Refit the vidaflex cover over the new ignition lead and fit
following the same route as the old one.
6b.6 Refit the Control Assembly.
6b.7 Check the operation of the new ignition lead.
6b.8 Reassemble the appliance.
7. Pilot Unit
IMPORTANT: UNDER THE TERMS OF THE
EXTENDED WARRANTY IT WILL BE COMPULSORY
TO CHANGE THE COMPLETE PILOT UNIT ON THIS
APPLIANCE IN YEARS 2 AND 4.
Note: The pilot unit on the appliance is a non serviceable
unit due to the complex nature of its manufacture.
Replacement of the complete unit must be carried out when
one of the following items becomes faulty:
• Pilot injector
• Ignition electrode
• Thermocouple
• Ignition Lead (Remote Control Models only)
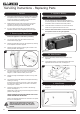
7.1 Remove the Main Burner and Control Assembly, see
Sections 4 & 5.
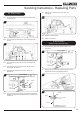
7a. Remote Control
7a.1 Undo the pilot pipe from the pilot unit, see Diagrams 14.
14
Pilot Pipe