
Designio Installation User Instructions


2
1. General
1.1 These instructions are supplementary to, and must be read
in conjunction with, the installation instructions supplied with
the appliance. Read both thoroughly before installation.
1.2 Fitting of this decorative front is to be carried out after the
appliance has been installed.
Logic Hotbox/ Logic Convector / VFC
Ensure that the commissioning tests are carried out AFTER
the fitting of the front.
Logic HE/ E-Box/ E-Studio
Ensure that the commissioning tests are carried out
BEFORE fitting the front.
1.3 Ensure that these supplementary instructions are attached
to the Installation Instructions and leave with the user.
2. Fitting
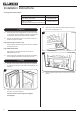
2.1 Note the location areas situated at the top of the appliance
as these secure the back of the frame to the appliance, see
Diagram 1.
1
2.2 Place the back of the frame over the locating areas and
push down to ensure rigid fixing.
Important: ensure all three lugs have engaged,
see Diagram 1.
2.3 Open the door and secure the frame at the base using the
two screws, see Diagram 2 or 3.
Electric
4
All other Models
2
2.4 Check the magnet holds the door shut when in the closed
position.
Installation Instructions
Covering frame model numbers:
Model
16" VFC
Logic Hotbox & Convector
8251GP/ 8251IR
E-Box™/ E-Studio™
Logic HE Convector (Manual & Remote only)
912-396/ 912-018