GRV43SKT USER MANUAL For more information on the Gator range go to our website gatordriverassist.
Introduction Thank you for purchasing the Gator GRV43SKT 4.3” wireless solar powered reverse camera kit. Please ensure that you have read the product manual and instructions in full, prior to installation and use. Failure to do so may result in product failure/damage or incorrect operation and therefore impact the product performance. Product features & specifications Monitor • 4.3” High-resolution LCD Screen • Resolution 480 x 272 Pixels • Parking guide lines • 12-30V Compatible • 3.
Table of contents Introduction..................................................................2 Product features & specifications..........................................2 Table of contents..................................................................3 Inclusions.............................................................................4 Charging the Camera's built-in battery.................................5 Monitor Installation...............................................................
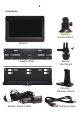
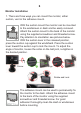
Inclusions Monitor Suction Mount Monitor Adapter Plate Monitor Vent Mount Camera Monitor Adhesive Mount Monitor Power Cable Charging Cable
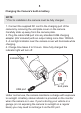
Charging the Camera's built-in battery NOTE: * Prior to installation the camera must be fully charged. 1. Connect the supplied DC cord to the charging port of the camera by removing the end plate cover on the camera. Carefully slide up away from the camera plate. 2. Plug the cable USB port into any standard USB charging adapter (Not included) with an output rating more than 1000mA 3. A red light indicator near the camera cover will illuminate while charging. 4. Charge time takes 4 to 5 hours.
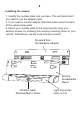
Monitor Installation 1. There are three ways you can mount the monitor, either suction, vent or the adhesive mount. With the suction mount the monitor can be mounted to the windscreen or dash and be easily removed. Attach the suction mount to the back of the monitor using the supplied screwdriver and threaded screw. Pay attention to orientation see pictures below. With the suction lever in the released position, press the suction cup against the windshield.
Monitor Installation For the vent mount, screw the socket adapter to the back of the monitor with the supplied screwdriver and small screw. Then secure the ball end of vent mount to the socket and tighten the retaining nut. Lift the clamp up and down to secure or release the vent clip on the vent. Vent Screw Align Ball Nut Rotate to tighten Vent Mount Connect Lock & release 2. Connect the monitor power cable to the monitor and plug the socket end into your 12-30V accessory input.
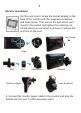
Installing the camera 1. Identify the number plate size you have. This will determine if you need to use the adapter plate. 2. If you need to use the adapter plate this slides inside the back of the camera base plate 3. Mount your number plate to the camera plate using your existing screws, by screwing into existing mounting holes on your vehicle. Alternatively use the extra screws provided.
Adjusting the camera angle 1. When you want to adjust the camera angle, firstly make sure the monitor is powered, by pressing the "Touch For Rearview" button to enter working status. 2. Please note when rotating the camera, hold the license base plate with one hand, hold the camera outer frame with the other hand, then move up or down to adjust the angle. Operating your device 1.
Menu options and settings ( ) ( ) 1. The middle button [MENU/OK]: Short Press to enter monitor menu settings. Long Press (press and hold for 3 seconds) to confirm the chosen item in the menu setting interface. 2. The Up button [ADD]: Short Press to change/add parameter value in the menu setting interface. 3. The Down button [DEC]: Short Press to change/decrease parameter value in the menu setting interface.
Menu options and settings While the monitor is showing the backup camera image, short press the [MENU/OK] button to enter and exit the main menu interface and settings. 5 options are available (Including Pairing, Image Parameters, Image Mirror, Guideline Style and Software Information). 1. PAIRING MODE: long press the [MENU/OK] button to pair the monitor with the camera. The Icon will turn purple when successfully paired 2.
Menu options and settings 3. IMAGE MIRROR: long press the [MENU/OK] button to enter settings. Press the ADD/DEC to either mirror the image or rotate it upside down. 4. GUIDELINE STYLE: long press the [MENU/OK] button to enter settings. Press the ADD/DEC to change the style of the guidelines. 5. SOFTWARE INFORMATION: long press the [MENU/OK] button to enter settings. Here you can see firmware and product information.
Troubleshooting guide Problem: The Monitor feels warm when it is operating Solution: • It is normal for the Mirror Monitor to feel warm to the touch during typical use. Problem: My screen image is blurry, dirty or discoloured Solution: • Check to see if there are any finger prints or dirt present on the camera lens. If needed, clean with a soft dry cloth before recording. • Also be sure to have removed the transparent lens/screen cover during installation.
Safety information & warnings Do not use the Monitor in damp working conditions; the Monitor is not waterproof. Do not try opening the shell or trying to repair the Monitor by yourself. If the accessories for the Monitor have any problems, please take it to an authorised repair agent for repair. Do not use a chemical substance, cleaning solvent or cleaner to clean the Monitor, please use a moist soft cloth if you would like to clean the Monitor.
Technical assistance If you need assistance setting up or using your Gator product now or in the future, call Gator Support. Australia TEL: 03 – 8587 8898 FAX: 03 – 8587 8866 Mon-Fri 9am – 5pm AEST Please retain this user guide for future reference. If you would like to download a digital copy of this manual, or other Gator manuals/software, please visit the gatordriverassist.