Wireless Cable Gateway CG3000D-1CXNAS User Manual 350 East Plumeria Drive San Jose, CA 95134 USA May 2010 202-10666-01 v1.
Wireless Cable Gateway CG3000D-1CXNAS © 2010 by NETGEAR, Inc. All rights reserved. No part of this publication may be reproduced, transmitted, transcribed, stored in a retrieval system, or translated into any language in any form or by any means without the written permission of NETGEAR, Inc. P/N: Part Number TBD v1.0 Technical Support When you register your product at http://www.netgear.
Table of Contents Chapter 1 Connecting to the Internet Gateway Front Panel . . . . . . . . . . . . . . . . . . . . . . . . . . . . . . . . . . . . . . . . . . Gateway Rear Panel . . . . . . . . . . . . . . . . . . . . . . . . . . . . . . . . . . . . . . . . . . Logging Into Your Gateway . . . . . . . . . . . . . . . . . . . . . . . . . . . . . . . . . . . . . Viewing the Basic Settings . . . . . . . . . . . . . . . . . . . . . . . . . . . . . . . . . . . . .
Wireless Cable Gateway CG3000D-1CXNAS Remote Management . . . . . . . . . . . . . . . . . . . . . . . . . . . . . . . . . . . . . . . . .34 Configuring Universal Plug and Play (UPnP) . . . . . . . . . . . . . . . . . . . . . . .36 Chapter 5 Troubleshooting Basic Functions . . . . . . . . . . . . . . . . . . . . . . . . . . . . . . . . . . . . . . . . . . . . .38 Using LEDs to Troubleshoot. . . . . . . . . . . . . . . . . . . . . . . . . . . . . . . . . .39 Connecting to the Gateway’s Main Menu . . . . . .
1. Connecting to the Internet 1 For help installing the gateway, see the Wireless Cable Gateway CG3000D-1CXNAS Quick Install Guide. This chapter describes how to configure your gateway’s Internet connection and includes these sections: • “Gateway Front Panel” on page 6. • “Gateway Rear Panel” on page 7. • “Logging Into Your Gateway” on page 7. • “Viewing the Basic Settings” on page 9. For information about product features and compatible NETGEAR products, see the NETGEAR website at http://www.
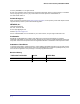
Wireless Cable Gateway CG3000D-1CXNAS Gateway Front Panel Figure 1 Gateway front view You can use the LEDs to verify status and connections. The following table lists and describes each LED and button on the front panel of the gateway. LED Power Downstream Upstream Internet Description • Green: Power is supplied to the cable modem. • Blinking: Power on self-test. • Off: No power. • Green: One or more downstream channels is locked. • Blinking: The unit is scanning for a downstream channel.
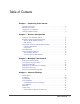
Wireless Cable Gateway CG3000D-1CXNAS Gateway Rear Panel Ethernet LAN ports USB port Coaxial cable connector Power adapter input Power On/Off button Figure 2 Gateway rear panel The rear panel includes the following connections, viewed from left to right: • Four Gigabit-Ethernet LAN ports: Use these ports to connect local computers. • USB port: The USB port is a USB host and can be used for connecting a USB hard drive, flash drive, or printer.
Wireless Cable Gateway CG3000D-1CXNAS When you have logged in, if you do not click Logout, the gateway waits for 5 minutes after no activity before it automatically logs you out. To log in to the gateway: 1. On the computer that is connected to the gateway with an Ethernet cable, type http://192.168.0.1 in the address field of your Internet browser. A login window opens. 2. Log in with the user name admin and its default password of password.
Wireless Cable Gateway CG3000D-1CXNAS Viewing the Basic Settings The Basic Settings screen shows the Internet settings for the gateway. To view or configure the basic settings: 1. Select Basic Settings from the main menu. 2. You can fill in the Domain Name and Device Name fields. • By default, the Dynamic IP radio button is selected. This allows the gateway to download network configuration from your ISP. • Select Static IP only if your ISP has assigned you a permanent, fixed (static) IP address. 3.
2. Wireless Configuration 2 Note: Before changing wireless settings, connect the gateway and set up its Internet connection as described in the Wireless Cable Gateway CG3000D-1CXNAS Quick Install Guide. This chapter includes: • Setting Up Your Wireless Network. • “Manually Configuring Wireless Settings” on page 11. • “Using Push 'N' Connect (WPS) Wireless Setup” on page 13. • “Wi-Fi Multimedia” on page 16. • “Advanced Wireless Settings” on page 17.
Wireless Cable Gateway CG3000D-1CXNAS Manually Configuring Wireless Settings You can manually configure the wireless settings and security for your gateway from the Wireless Settings screen. To view or configure the wireless settings: 1. If you are located near the gateway, use an Ethernet cable to connect your computer to the gateway while you are changing the wireless settings.
Wireless Cable Gateway CG3000D-1CXNAS To set up WPA or WPA2 wireless security: 1. In the Security Options section of the Wireless Settings screen, leave the default setting or select one of the WPA settings: • WPA-PSK. This setting provides the TKIP encryption type and a pre-shared key passphrase. • WPA2-PSK. This setting provides the AES encryption type and a pre-shared key passphrase. 2. Depending on the WPA settings that you select, enter the required information.
Wireless Cable Gateway CG3000D-1CXNAS To set up WEP wireless security: 1. In the Wireless Settings screen, select the WEP radio button in the Security Options section. 2. Select the Authentication from the drop-down list.The default is Automatic. 3. Depending on the encryption strength that you want, select one of these WEP Encryption options: • 64-bit encryption • 128-bit encryption 4.
Wireless Cable Gateway CG3000D-1CXNAS Note: All WPS-capable products should be compatible with the gateway. For more detailed information about the WPS standard, see http://www.wi-fi.org). There are two Push 'N' Connect methods, Push Button and PIN (personal identification number). • Push Button. This is the preferred method. See the following section, Using the WPS Button. • PIN. See “Using a PIN” on page 15.
Wireless Cable Gateway CG3000D-1CXNAS 4. Either click the WPS button, or press the button on the front of the gateway. • The WPS LED on the front of the gateway begins to blink. • The gateway tries to communicate with the wireless computer or device for 2 minutes. • If the Security Option in the Wireless Settings screen was set to Disabled, it is automatically changed to WPA-PSK [TKIP] + WPA2-PSK [AES] including a random wireless security password. 5.
Wireless Cable Gateway CG3000D-1CXNAS • The gateway tries to communicate with the wireless computer or device for 4 minutes. • If the Security Option in the Wireless Settings screen was set to Disabled, it is automatically changed to WPA-PSK (including a PSK security password). When the computer connects to the wireless network, the gateway sends its SSID and WPA-PSK or WPA2-PSK configuration to that computer. 6.
Wireless Cable Gateway CG3000D-1CXNAS Advanced Wireless Settings You can use the Advanced Wireless Settings screen to configure the wireless radio settings, and other advanced settings: The following table describes the fields in the Advanced Wireless Settings screen. Advanced Wireless Settings Description Wireless Access Point (Enhanced Feature) Enable Wireless Access Point By default this checkbox is selected so that the gateway works as a wireless access point.
Wireless Cable Gateway CG3000D-1CXNAS Start Configure Button This button can be used to start WPS configuration. Note: The first time you use WPS it will assign a random network name (SSID) and a random passphrase to your wireless network. If you want to keep the network name and passphrase you specified in the Wireless Settings screen, you must select the Keep Wireless Settings checkbox. 1. Click the Start Configure button. • The WPS LED on the front of the gateway begins to blink.
Wireless Cable Gateway CG3000D-1CXNAS 3. Click the Setup Access List button to display the Wireless Card Access List screen. Note: If you are configuring the gateway from a wireless computer, make sure to add your computer’s MAC address to the Access List. Otherwise you will lose your wireless connection when you click Apply. You must then access the gateway from a wired computer, or from a wireless computer that is on the access control list, to make any further changes. 4.
3. Managing Your Network 3 This chapter describes how to perform network management tasks with your gateway. When you log in to the gateway (see “Logging Into Your Gateway” on page 7), these tasks are grouped under Maintenance. This chapter includes: • Viewing the Gateway Status. • “Viewing the Connection Status” on page 22. • “Changing Passwords” on page 22. • “Backing Up and Restoring Your Settings” on page 23. • “Viewing the Event Log” on page 24.
Wireless Cable Gateway CG3000D-1CXNAS Viewing the Gateway Status Use the Modem Status screen to see hardware and firmware details about the gateway and basic status information. In the main menu, under Maintenance, select Gateway Status. The following table describes the fields displayed in this screen Modem Status Field Description Standard Specification Compliant DOCSIS 3.0 Hardware Version The hardware version of the gateway.
Wireless Cable Gateway CG3000D-1CXNAS Viewing the Connection Status To view this screen, from Gateway Status screen, click the Connection Status button. Use the Connection screen to track the gateway’s initialization procedure, and to get details about the downstream and upstream cable channel. The time is displayed after the gateway is initialized.
Wireless Cable Gateway CG3000D-1CXNAS To change the password: 1. In the main menu, under Maintenance, select Set Password. 2. To change the password, enter the new password twice. 3. Click Apply to save your changes. Note: After changing the password, you will be required to log in again to continue the configuration. If you have backed up the gateway settings previously, you should do a new backup so that the saved settings file includes the new password.
Wireless Cable Gateway CG3000D-1CXNAS • To restore the saved configuration settings from a backup file, click Browse, locate and select the previously saved backup file. Then click Restore. A message notifies you when the gateway has been restored to previous settings. Then, the gateway restarts, which takes about one minute. Note: When restoring configuration settings, do not interrupt the process by going online, turning off the gateway, or shutting down the computer.
Wireless Cable Gateway CG3000D-1CXNAS Running the Diagnostic Ping Utility From the Diagnostics screen you can use Ping. To use diagnostics: 1. Log in to the gateway as described in “Logging Into Your Gateway” on page 7. 2. In the main menu, under Maintenance, select Diagnostics. 3. To start a ping test, enter the IP address in the Diagnostics screen, and click the Ping button. The Ping Results are displayed: 4. To return to the Diagnostics screen and stop the test, click Back and then click Abort Test.
4. Advanced Settings 4 This chapter describes how to customize your network through the advanced settings on your gateway. When you log in to the gateway (see “Logging Into Your Gateway” on page 7), these tasks are grouped under Advanced. This chapter includes: • “MAC Filtering” on page 27. • “IP Filtering” on page 28. • “Port Blocking” on page 29. • “Port Forwarding” on page 30. • “Port Triggering” on page 31. • “DMZ Host” on page 32. • “LAN IP Setup” on page 33.
Wireless Cable Gateway CG3000D-1CXNAS MAC Filtering By default, the gateway allows any connected PC to access the Internet through. The MAC Filtering screen lets you block specific computers, based on their MAC address, from access to the Internet on selected days and times. To use MAC filtering to block Internet access for a specific computer: 1. In the main menu, under Advanced, select MAC Filtering. The Trusted Devices table shows computers that have access to the Internet through the gateway.
Wireless Cable Gateway CG3000D-1CXNAS IP Filtering By default, any computer will be allowed access to the internet through your gateway. You can use IP filtering to block specific computers based on their IP addresses from access to the Internet on selected days and times. To set up IP filtering: 1. In the main menu, under Advanced, select IP Filtering. • The Trusted Devices table shows computer that are allowed access to the Internet through your gateway.
Wireless Cable Gateway CG3000D-1CXNAS Port Blocking You can use port blocking to block outbound traffic on specific ports. Outbound traffic rules control access to outside resources from local users.The default rule is to allow all access from the LAN side to the outside. You can use port blocking to add predefined or custom rules to specify exceptions to the default rule. Note: Any outbound traffic that is not blocked by rules that you have created is allowed by the default rule.
Wireless Cable Gateway CG3000D-1CXNAS Port Forwarding A firewall has default rules for inbound traffic (WAN to LAN) and for outbound traffic. Port forwarding affects the inbound rules. These rules restrict access from outsiders. By default, the gateway blocks access from outside except responses to requests from the LAN side. You can use port forwarding to add rules to specify exceptions to the default rule.
Wireless Cable Gateway CG3000D-1CXNAS Considerations for Port Forwarding • If the IP address of the local server PC is assigned by DHCP, it might change when the PC is rebooted. To avoid this, you can assign a static IP address to your server outside the range that is assigned by DHCP, but in the same subnet as your LAN. By default, the IP addresses fromf 192.168.0.2 through 192.168.0.9 are reserved for this purpose. • Local PCs must access the local server using the PCs’ local LAN address (192.168.0.
Wireless Cable Gateway CG3000D-1CXNAS 2. For each port trigger, enter the settings in the Port Trigger List: • Trigger Range. To specify the range of outgoing ports that will be monitored to trigger the incoming port forwarding rule, enter the Start Port and End Port. • Target Range. To specify the range of incoming ports that will be opened when triggered, enter the Start Port and End Port. • Protocol. Select the protocol for the ports: 3. Select the Enable checkbox for the port trigger. 4.
Wireless Cable Gateway CG3000D-1CXNAS LAN IP Setup The LAN IP screen allows you to configure LAN services such as the IP address of the gateway and DHCP. The TCP/IP and DHCP default values work fine in most cases. Note: If you disable the DHCP server, you will need to assign to your computer a static IP address to reconnect to the gateway and enable the DHCP server again. To configure LAN IP settings: 1. In the main menu, under Advanced, select LAN IP. 2.
Wireless Cable Gateway CG3000D-1CXNAS Reserving an IP Address for DHCP Use To reserve an IP address for DHCP use, enter the DHCP server reservation settings for the private LAN under DHCP Reservation Lease Info in the LAN Setup screen. To reserve an IP address for DHCP: 1. Enter the MAC address of the computer for which you want to reserve an IP address. 2. Enter the permanent IP address for the computer. 3. Click Add to save your settings.
Wireless Cable Gateway CG3000D-1CXNAS To configure the gateway for remote management: 1. In the main menu, under Advanced, select Remote Management. 2. Select one of the Allow Remote Management checkboxes. 3. Fill in the Remote User Name and Remote Password fields. 4. Specify the port numbers to access the gateway remotely in your browser when you connect. To specify the port numbers: a. From a remote location, start a browser. b.
Wireless Cable Gateway CG3000D-1CXNAS Remote Management Settings (Continued) Description (Continued) Revert to factory default settings Allow Remote management after Factory Default Reset IP Address to connect this device Allow Management via Telnet You can select LAN interface (local managemetn), CM Interface (remote Allow Management via SSH management), or WAN Interface (remote management) in order to connect to the gateway from the Internet.
Wireless Cable Gateway CG3000D-1CXNAS gateway were opened by that device. The UPnP Portmap Table also displays the protocol for the port that was opened and if that port is still active for each IP address. 4. Perform one of the following actions: • Click Apply to save your settings. • Click Cancel to disregard any unsaved changes. • Click Refresh to update the UPnP Portmap Table and to show the active ports that are currently opened by UPnP devices.
5. Troubleshooting 5 This chapter gives information about troubleshooting your NETGEAR Wireless Cable Gateway. For the common problems listed, go to the section indicated. • Have I connected the gateway correctly? Go to “Basic Functions” on page 38. • I cannot access the gateway configuration with my browser. Go to “Connecting to the Gateway’s Main Menu” on page 39. • I have configured the gateway but I cannot access the Internet. Go to “Troubleshooting the ISP Connection” on page 40.
Wireless Cable Gateway CG3000D-1CXNAS Using LEDs to Troubleshoot The following table provides help when using the LEDs for troubleshooting. LED Behavior Action All LEDS are off when the gateway Make sure that the power cord is properly connected to your gateway is plugged in. and that the power supply adapter is properly connected to a functioning power outlet. Check that you are using the 12VDC power adapter supplied by NETGEAR for this product.
Wireless Cable Gateway CG3000D-1CXNAS auto-generated addresses are in the range of 169.254.x.x. If your IP address is in this range, check the connection from the PC to the gateway and reboot your PC. • If your gateway’s IP address has been changed and you don’t know the current IP address, clear the gateway’s configuration to factory defaults. This will set the gateway’s IP address to 192.168.0.1. This procedure is explained in “Factory Default Settings” in Appendix A.
Wireless Cable Gateway CG3000D-1CXNAS Testing the LAN Path to Your Gateway You can use ping to verify that the LAN path to your gateway is set up correctly. To ping the gateway from a PC running Windows 95 or later: 1. From the Windows toolbar, click on the Start button and select Run. 2. In the field provided, type Ping followed by the IP address of the gateway, as in this example: ping 192.168.0.1 3. Click OK.
Wireless Cable Gateway CG3000D-1CXNAS • Check that your PC has the IP address of your gateway listed as the default gateway. If the IP configuration of your PC is assigned by DHCP, this information will not be visible in your PC’s Network Control Panel. Verify that the IP address of the gateway is listed as the default gateway. See the link to the online document “Internet Networking and TCP/IP Addressing” in Appendix B.
Default Settings and Technical Specifications A. A This chapter includes: • Factory Default Settings • “Technical Specifications” on page 45 Factory Default Settings You can return the gateway to its factory settings. On the bottom of the gateway, press and hold the Restore Factory Settings button for over 7 seconds. The gateway resets, and returns to its factory settings. Your device will return to the factory configuration settings shown in the following table.
Wireless Cable Gateway CG3000D-1CXNAS Factory Default Settings (Continued) Internet connection WAN MAC address Use default hardware address WAN MTU size 1500 Wireless Wireless communication Enabled SSID name The last 3 octets of the Wi-Fi MAC address Security WPA/WPA2 Broadcast SSID Enabled Transmission speed Auto1 Country/region United States (varies by region) RF channel Auto Operating mode n, g, and b Data rate Best Output power Full Access point Enabled Authentication type
Wireless Cable Gateway CG3000D-1CXNAS Technical Specifications The following table describes the technical specifications for the gateway. Technical Specifications Network protocol and standards compatibility Data and Routing Protocols: TCP/IP, DHCP server and client, DNS relay, NAT (many-to-one), TFTP client, VPN pass through (IPSec, PPTP) Power adapter • North America (input): 120V, 60 Hz, input • All regions (output): 12 V DC @ 1.5A output 15W maximum Physical specifications • Dimensions: 8.5 by 5.
B. Related Documents B This appendix provides links to reference documents you can use to gain a more complete understanding of the technologies used in your NETGEAR product. Document Link Windows XP and Vista Wireless Configuration Utilities http://documentation.netgear.com/reference/enu/winzerocfg/index.htm Internet Networking and TCP/IP Addressing http://documentation.netgear.com/reference/enu/tcpip/index.htm Wireless Communications http://documentation.netgear.com/reference/enu/wireless/index.
C. Notification of Compliance C Certificate of the Manufacturer/Importer It is hereby certified that the TBD has been suppressed in accordance with the conditions set out in the BMPT-AmtsblVfg 243/1991 and Vfg 46/1992. The operation of some equipment (for example, test transmitters) in accordance with the regulations may, however, be subject to certain restrictions. Please refer to the notes in the operating instructions.
Wireless Cable Gateway CG3000D-1CXNAS Europe – EU Declaration of Conformity Marking by the above symbol indicates compliance with the Essential Requirements of the R&TTE Directive of the European Union (1999/5/EC). This equipment meets the following conformance standards: EN300 328, EN301 489-17, EN60950 For complete DoC please visit the NETGEAR EU Declarations of Conformity website at: http://kb.netgear.
Wireless Cable Gateway CG3000D-1CXNAS EDOC in Languages of the European Community Nederlands [Dutch] Hierbij verklaart NETGEAR Inc. dat het toestel Radiolan in overeenstemming is met de essentiële eisen en de andere relevante bepalingen van richtlijn 1999/5/EG. Malti [Maltese] Hawnhekk, NETGEAR Inc., jiddikjara li dan Radiolan jikkonforma mal-htigijiet essenzjali u ma provvedimenti ohrajn relevanti li hemm fid-Dirrettiva 1999/5/EC. Magyar [Hungarian] Alulírott, NETGEAR Inc.
Wireless Cable Gateway CG3000D-1CXNAS • • This device may not cause harmful interference, and This device must accept any interference received, including interference that may cause undesired operation. FCC Radio Frequency Interference Warnings & Instructions This equipment has been tested and found to comply with the limits for a Class B digital device, pursuant to Part 15 of the FCC Rules.
Index Numerics 192.168.0.
Wireless Cable Gateway CG3000D-1CXNAS TCP/IP network, troubleshooting 5-40 technical specifications A-45 troubleshooting 5-38 ISP connection 5-40 LEDs 5-39 ping utility 5-40 TCP/IP network 5-40 U Universal Plug and Play (UPnP) 4-36 W WEP 2-13 keys 2-13 passphrase 2-13 Wi-Fi Protected Setup (WPS) Push ’N’ Connect 2-17 wireless access point 2-17 card access list 2-17 manually configuring settings 2-11 wireless network planning 2-10 wireless security 2-16 Wireless Security Options 2-10 WPA 2-12 WPA2 2-12 WP