GATEWAY COMPUTER USERGUIDE ORDINATEUR GATEWAY MANUEL DE L’UTILISATEUR ®
Contents Chapter 1: Getting Help. . . . . . . . . . . . . . . . . . . . . . . . . . . . . . . . . . . . . . . . . . . 1 Thank you for purchasing our computer! . . . . . . . . . . . . . . . . . . . . . . . . . . . . . . . . Using the Gateway Web site . . . . . . . . . . . . . . . . . . . . . . . . . . . . . . . . . . . . . . . . . . Using Help and Support . . . . . . . . . . . . . . . . . . . . . . . . . . . . . . . . . . . . . . . . . . . . . . Searching for a topic . . . . . . . . . . . . . . . . . . . . .
Contents Creating audio files and music libraries . . . . . . . . . . . . . . . . . . . . . . . . . . . . . . . . . Creating music files . . . . . . . . . . . . . . . . . . . . . . . . . . . . . . . . . . . . . . . . . . . Building a music library . . . . . . . . . . . . . . . . . . . . . . . . . . . . . . . . . . . . . . . Editing track information . . . . . . . . . . . . . . . . . . . . . . . . . . . . . . . . . . . . . . Creating music CDs and video DVDs . . . . . . . . . . . . . . . . . . . . . . . . .
www.gateway.com Changing mouse settings . . . . . . . . . . . . . . . . . . . . . . . . . . . . . . . . . . . . . . . . . . . . Adding and modifying user accounts . . . . . . . . . . . . . . . . . . . . . . . . . . . . . . . . . . Changing power-saving settings . . . . . . . . . . . . . . . . . . . . . . . . . . . . . . . . . . . . . . Changing the power plan . . . . . . . . . . . . . . . . . . . . . . . . . . . . . . . . . . . . . . Changing accessibility settings . . . . . . . . . . . . . . . . . . . . .
Contents iv
CHAPTER1 Getting Help • Using the Gateway Web site • Using Help and Support • Using online help 1
CHAPTER 1: Getting Help Thank you for purchasing our computer! You have made an excellent decision choosing Gateway. We are sure that you will be pleased with the outstanding quality, reliability, and performance of your new computer. Each and every Gateway computer uses the latest technology and passes through the most stringent quality control tests to ensure that you are provided with the best product possible.
www.gateway.com To start Help and Support: (Start), then click Help and Support. Help and Support opens. • Click You can find help information by clicking a general topic under Find an answer, selecting an option under Ask someone, or picking a category from Information from Microsoft. You can also search for a topic. Searching for a topic To search for a topic in Help and Support, type a word or phrase (keyword) in the Search Help box located at the top of any Help and Support screen, then press ENTER.
CHAPTER 1: Getting Help Using online help If you are connected to the Internet, many programs provide information online so you can research a topic or learn how to perform a task while you are using the program. You can access most online help information by selecting a topic from a Help menu or by clicking the Help button on the menu bar and selecting Online Support from the list. Available information depends on the particular Help site to which you are taken.
CHAPTER2 Using Windows • • • • • Using the Windows desktop Working with files and folders Searching for files Working with documents Shortcuts 5
CHAPTER 2: Using Windows Using the Windows desktop After your computer starts, the first screen you see is the Windows desktop. The desktop is like the top of a real desk. Think of the desktop as your personalized work space where you open programs and perform other tasks. . Help For more information about the Windows desktop, click Start, then click Help and Support. Type the phrase Windows desktop in the Search Help box, then press ENTER.
www.gateway.com Using the Start menu Help For more information about the Windows Start menu, click Start, then click Help and Support. Type Windows Start menu in the Search Help box, then press ENTER. You can start programs, open files, customize your system, get help, search for files and folders, and more using the Start menu. To use the Start menu: Shortcut Start Ö All Programs Ö 1 Click (Start) on the lower left of the Windows desktop.
CHAPTER 2: Using Windows Adding icons to the desktop Help For more information about the desktop icons, click Start, then click Help and Support. Type desktop icons in the Search Help box, then press ENTER. You may want to add an icon (shortcut) to the desktop for a program that you use frequently. To add icons to the desktop: Shortcut Start Ö All Programs Ö right-click programÖ Send To Ö Desktop (create shortcut) 1 Click (Start), then click All Programs.
www.gateway.com Window item Description Clicking the minimize button reduces the active window to a button on the taskbar. Clicking the program button in the taskbar opens the window again. Clicking the maximize button expands the active window to fit the entire computer display. Clicking the maximize button again restores the window to its former size. Clicking the close button closes the active window or program. Clicking an item on the menu bar starts an action such as Print or Save.
CHAPTER 2: Using Windows Creating folders Folders are much like the folders in a file cabinet. They can contain files and other folders. Files are much like paper documents—letters, spreadsheets, and pictures—that you keep on your computer. In fact, all information on a computer is stored in files. Folders Files To create a folder: Shortcut Click File ÖNew ÖFolder Ötype name 1 Click (Start), then click Computer on the Start menu. 2 Double-click the drive where you want to put the new folder.
www.gateway.com 5 With the pointer inside the destination folder, right-click. 6 Click Paste. A copy of the file or folder appears in the new location. Help For more information about copying files and folders or moving files or folders, click Start, then click Help and Support. Type copying files and folders or moving files and folders in the Search Help box, then press ENTER. To move a file or folder to another folder: 1 Locate the file or folder you want to move.
CHAPTER 2: Using Windows To empty the Recycle Bin: Caution Emptying the Recycle Bin permanently erases any files or folders in the bin. These files cannot be restored. 1 Double-click the Recycle Bin icon on the desktop. The Recycle Bin window opens. 2 Click Empty the Recycle Bin. Windows asks you if you are sure that you want to empty the bin. 3 Click Yes. Windows permanently deletes all files in the Recycle Bin.
www.gateway.com Using advanced search options Search can find files meeting more criteria than file name. You can narrow your search by selecting the search options that you want. You can search by the: • Name or part of a name • Creation date • Modification date • File type • Tag • Author • Text contained in the file • Time period in which it was created or modified You can also combine search criteria to refine searches.
CHAPTER 2: Using Windows Creating a new document To create a new document: (Start), All Programs, Accessories, then click WordPad. Microsoft WordPad starts and a blank document opens. 1 Click 2 Begin composing your document. Use the menus and toolbar buttons at the top of the window to format the document. Saving a document After you create a document, you need to save it if you want to use it later. To save a document: 1 Click File, then click Save. The Save As dialog box opens.
www.gateway.com 3 Click Folders to open the Folders list, then click the folder you want to open. 4 Double-click the document file name. The document opens. Help For more information about opening documents, click Start, then click Help and Support. Type opening files in the Search Help box, then press ENTER. Printing a document To print a document, you must have a printer connected to your computer or have access to a network printer.
CHAPTER 2: Using Windows Shortcuts Help For more information about Windows keyboard shortcuts, click Start, then click Help and Support. Type Windows keyboard shortcuts in the Search Help box, then press ENTER. The following table shows a few shortcuts that you can use in Windows and almost all programs that run in Windows. For more information about shortcuts, see your Windows or program documentation. 16 To... Do this... Copy a file, folder, text, or graphic Click the item, then press CTRL + C.
CHAPTER3 Using the Internet and Faxing • • • • • Learning about the Internet Setting up an Internet account Using the World Wide Web Using e-mail Using Windows Fax and Scan 17
CHAPTER 3: Using the Internet and Faxing Learning about the Internet The Internet is a worldwide network of computers linked together to provide information to people everywhere. The two most popular services on the Internet are e-mail and the World Wide Web. You can access this network by connecting your computer to a telephone, DSL (Digital Subscriber Line), or cable television line and signing up with an Internet service provider (ISP).
www.gateway.com Setting up an Internet account Before you can view the information on the World Wide Web, you need to set up an Internet account with an Internet service provider (ISP). To set up an ISP service or to transfer an existing account to this computer, contact the ISP directly. Dial-up Internet connections are those using a telephone system to connect to the Internet. This may include ordinary analog telephone lines, ISDN connections, and in some cases ADSL over PPP, or other technologies.
CHAPTER 3: Using the Internet and Faxing To learn more about using the Web browser features, click Help in the menu bar. Link Web page Linked Web page Connecting to a Web site After you set up an account with an Internet service provider (ISP), you can access the many information sources on the World Wide Web. To connect to a Web site: 1 Connect to your Internet account. 2 Depending on the method you use to connect to your Internet account, you may need to start your Web browser.
www.gateway.com Downloading files Caution To protect your computer against viruses, make sure that you scan the files you download. For more information, see “Protecting your computer from viruses” on page 59. Downloading is the process of transferring files from a computer on the Internet to your computer. To download files or programs from a Web site: 1 Connect to your Internet account.
CHAPTER 3: Using the Internet and Faxing 4 Type the e-mail address of the recipient you want to send e-mail to in the To box. 5 Type the subject of your e-mail in the Subject box. 6 Type the e-mail message. Tip Most e-mail programs let you attach files, such as photographs, to your e-mail. For more information, see the help for your e-mail program. 7 When finished, click Send. Your e-mail is sent over the Internet to the e-mail address you specified.
www.gateway.com Sending a fax Windows Fax and Scan lets you send and receive faxes using your dial-up modem. To send a fax: (Start), All Programs, then click Windows Fax and Scan. Windows Fax and Scan opens. 1 Click 2 If Windows Fax and Scan is in Scan view, click Fax in the lower left corner of the window. 3 If you have never sent a fax on this computer before, click New Fax on the toolbar. The Fax Setup window opens. 4 Click the type of connection you will be using (fax modem or fax server).
CHAPTER 3: Using the Internet and Faxing 6 Click how you want to receive faxes, then click Unblock when the The Security Alert window opens. The New Fax window opens. 7 Create your fax, then open the Cover Page menu by clicking the arrow and selecting a cover page from the list. The Sender Information dialog box opens. 8 Type your information in the spaces provided, then click OK. The New Fax dialog box opens.
www.gateway.com 10 Type your location information, then click OK. The Dialing Rules dialog box opens. 11 Highlight your location, then click Edit. The Edit Location dialog box opens. 12 Complete the location information, then click OK. You are returned to the Dialing Rules dialog box. 13 Click OK. The New Fax dialog box opens. 14 Enter, scan, or attach the fax information you want to send, then click Send.
CHAPTER 3: Using the Internet and Faxing 3 Click Tools, Cover Pages, then click New. The Fax Cover Page Editor opens. • If you want to include fields that are imported from the Send Fax Wizard or the Fax 4 Configuration Wizard (such as To or From), add them to the page by using the Insert menu, then move them to the appropriate place on your template. You can also use the Insert menu to include information that is automatically calculated (such as number of pages or date and time sent).
www.gateway.com Receiving and viewing a fax To receive and view a fax: (Start), All Programs, then click Windows Fax and Scan. Windows Fax and Scan opens. 1 Click 2 If Windows Fax and Scan is in Scan view, click Fax in the lower left corner of the window. 3 To view a fax, click Inbox, then double-click the fax you want to view. The fax viewer opens, where you can view and print the fax.
CHAPTER 3: Using the Internet and Faxing 28
CHAPTER4 Playing and Creating Media Files • • • • • Playing music and movies Creating audio files and music libraries Creating music CDs and video DVDs Creating and copying data discs Using Windows Media Center 29
CHAPTER 4: Playing and Creating Media Files Playing music and movies Playing audio and video files Windows Media Player can play several types of audio and video files, including WAV, MIDI, MP3, AU, AVI, and MPEG formats. For more information about using Windows Media Player, click Help. To play a file using Windows Media Player: Shortcut Start Ö Computer Ö find the file Ö double-click the file 1 Click (Start), All Programs, then click Windows Media Player. Windows Media Player opens.
www.gateway.com 3 Click one of the following to control playback: Repeat Shuffle • • • • • • • Rewind Stop Fast forward Pause/Play Volume Mute Shuffle randomizes the playback order of the files in the playlist. Repeat starts playing the list over again after it reaches the end. Stop stops playback and rewinds the current file to the beginning. Rewind quickly rewinds the current file (when you click and hold it) or skips to the previous file in the playlist (when you click it).
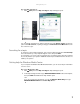
CHAPTER 4: Playing and Creating Media Files 3 If a dialog box opens and asks you what you want the computer to do with the disc, click Play. Windows Media Player opens and begins playing the disc. If Windows Media Player does not open automatically, click (Start), All Programs, then click Windows Media Player. Windows Media Player opens. Playlist Video screen Playback controls 4 If the disc is not already playing, click (play).
www.gateway.com 5 Click one of the following to control playback: Repeat Shuffle • • • • • • • Rewind Stop Fast forward Pause/Play Volume Mute Shuffle randomizes the playback order of the files in the playlist. Repeat starts playing the list over again after it reaches the end. Stop stops playback and rewinds the current file to the beginning. Rewind quickly rewinds the current file (when you click and hold it) or skips to the previous file in the playlist (when you click it).
CHAPTER 4: Playing and Creating Media Files 4 When you finish recording, click Stop Recording. The Save As dialog box opens. 5 Type a name for the recording, specify the file type and location where you want to save the recording, then click Save. The recording is saved. Creating WMA and MP3 music files Important Some music CDs have copy protection software. You cannot copy tracks from copy-protected CDs.
www.gateway.com Building a music library Use Windows Media Player to build a music library. You can organize your music tracks (individual MP3 or WMA audio files) by categories, find a track quickly by sorting, and add information to a music file. You can add music tracks to your music library by: • Creating MP3 or WMA files—When you create MP3 or WMA files from the tracks on your music CD, Windows Media Player automatically adds these files to your music library.
CHAPTER 4: Playing and Creating Media Files Creating music CDs and video DVDs Creating a music CD Important We recommend that you do not use your computer for other tasks while creating CDs or DVDs. If you record copyrighted material on a CD or DVD, you need permission from the copyright owner. Otherwise, you may be violating copyright law and be subject to payment of damages and other remedies.
www.gateway.com Creating a video DVD Creating a video DVD using Windows DVD Maker If your computer has Windows Vista Home Premium or Windows Vista Ultimate Edition, you can create video DVDs using Windows DVD Maker. To create a video DVD using Windows DVD Maker: Important We recommend that you do not use your computer for other tasks while creating CDs or DVDs. If you record copyrighted material on a CD or DVD, you need permission from the copyright owner.
CHAPTER 4: Playing and Creating Media Files 4 Click Add items. The Add Items to DVD dialog box opens. 5 Find and select the videos you want to add to the video DVD, then click Add. The videos are added to the video list, and a graphic in the lower left corner of the window shows you how much disc capacity will be used. 6 Click Next. The Ready to burn disc dialog box opens.
www.gateway.com 7 Click any of the following options to customize your video disc: • Preview shows how your DVD’s opening menu will look using the current settings. • Menu text changes the disc title, font, and button names. • Customize menu changes the menu fonts, background and foreground videos, audio track, and button styles. • Slide show creates a slide show from photo files. 8 Click Burn. Your DVD is recorded.
CHAPTER 4: Playing and Creating Media Files Using Windows Media Center If your computer has Windows Vista Home Premium or Windows Vista Ultimate Edition, you can use Windows Media Center to watch TV, videos, and movies, listen to music, and view photos. Media Center is a simplified, streamlined interface that is ideally suited for playing and managing media files.
www.gateway.com 3 Use the remote control navigation buttons to select a Media Center menu option, then press OK. • TV + Movies lets you play TV programs you have recorded, play a DVD or Blu-ray movie, or set up your TV tuner card (if installed). • Online Media lets you play online games. • Tasks lets you set up your display and media types, shut down or restart your • • computer, burn an optical disc (CD or DVD), and synchronize with another digital media device (such as an MP3 player).
CHAPTER 4: Playing and Creating Media Files Using the Media Center remote control With Media Center mode active, you can use the optional remote control to play all of your media files from across the room. (The remote control, if included with your computer, may look different from that shown below.
CHAPTER5 Networking Your Computer • Introduction to Networking • Ethernet networking • Bluetooth networking 43
CHAPTER 5: Networking Your Computer Introduction to Networking Networking terms you should know DHCP—Dynamic Host Configuration Protocol (DHCP) lets a router temporarily assign an IP address to a computer on the network. IP address—Internet Protocol (IP) address is a number that uniquely identifies a computer on the network. LAN—A local area network (LAN) is a computer network covering a local area, like a home or office. Wired and wireless Ethernet are common methods of creating a LAN.
www.gateway.com Attached to the router are all of your computers or Ethernet-ready devices. Also connected to the router is a cable or DSL modem that provides access to the Internet. Cable/DSL modem Router Equipment you need for a router-based Ethernet network Important For best results, all Ethernet components should be either standard Ethernet (10 Mbps), Fast Ethernet (100 Mbps or 10/100), or Gigabit Ethernet (1000 Mbps or 10/100/1000).
CHAPTER 5: Networking Your Computer Setting up wired Ethernet network hardware Making sure your broadband connection works Important If you do not have a broadband connection already installed, make the necessary arrangements with your ISP. Be sure to find out how soon after the installation the line will be activated. Broadband Internet settings differ from ISP to ISP. Before you begin setting up your network, you should contact your ISP for any specific instructions they have for setting up a network.
www.gateway.com In addition to a router, you need a straight-through cable for each computer you want to connect to the network. Cable/DSL modem Router WAN port To set up a network using a router: 1 Plug one end of the power adapter into the AC connector on the router and the other end into a grounded, 110V electrical outlet. 2 Turn on your computers. 3 Plug one end of a straight-through network cable into any numbered port on the router (except the WAN port).
CHAPTER 5: Networking Your Computer Speed is not the only issue if you decide to use equipment with different standards. Compatibility can also be an issue. Take the following into consideration when you purchase wireless equipment: Access point Wireless cards supported 802.11a 802.11a only 802.11b 802.11b only 802.11g 802.11b and 802.11g 802.11n 802.11b, 802.11g, and 802.
www.gateway.com Setting up wireless Ethernet network hardware Making sure your broadband connection works Important If you do not have a broadband connection already installed, make the necessary arrangements with your ISP. Be sure to find out how soon after the installation the line will be activated. Broadband Internet settings differ from ISP to ISP. Before you begin setting up your network, you should contact your ISP for any specific instructions they have for setting up a network.
CHAPTER 5: Networking Your Computer Configuring the TCP/IP protocol A networking protocol is a language computers use to talk to each other. One of several available protocols must be set up on each computer you plan to use on your network. We recommend you use the Transmission Control Protocol/Internet Protocol (TCP/IP), which is widely accepted and compatible for local area networks (LANs), as well as for Internet communications.
www.gateway.com 2 Click Network and Sharing Center. The Network and Sharing Center window opens. 3 Click Connect to a network on the left of the window. The Connect to a network dialog box opens. 4 Click a network, then click Connect. If you can see the network name, but you cannot connect to it, your network is using security. Right-click on the network, then click Properties. Modify the security settings to match the settings you set on your access point.
CHAPTER 5: Networking Your Computer Testing your network Now that your home network is set up, log onto one of your computers and access a favorite Internet Web site. If you are unable to connect to the Internet: • Click Start, Control Panel, Network and Internet, then the Network and Sharing Center. Choose Diagnose and Repair on the left of the window. Take any actions suggested.
www.gateway.com 3 Click the Sharing tab. If Share is grayed out, click Advanced Sharing to set sharing for this drive or folder. 4 Click OK, then click Close. Un-sharing drives and folders To un-share drives or folders: 1 Click Start, then click Computer. 2 Right-click the drive or folder that you want to un-share, then click Share. 3 Click Advanced Sharing, then click Share this folder (or drive) to uncheck the box. 4 Click Apply, then click OK.
CHAPTER 5: Networking Your Computer Viewing shared drives and folders Help For more information about workgroups, click Start, then click Help and Support. Type the keyword workgroups in the Search Help box, then press ENTER. To view shared drives and folders: 1 Click Start, then click Network. The Network window opens. 2 If no drives or folders are displayed, click the option bar under the menu bar, then click Turn on network discover and file sharing.
www.gateway.com Printing files across the network Important Before you can print a file across the network, you must install the driver for the printer on the computer you are sending the file from. You can obtain the printer driver and installation instructions from the CD that shipped with your printer or from the manufacturer’s Web site. To print files across the network: 1 Open the file you want to print, then click Print.
CHAPTER 5: Networking Your Computer 56
CHAPTER6 Protecting your computer • Hardware security • Data security • Security updates 57
CHAPTER 6: Protecting your computer Hardware security Although you may be able to replace your computer with a call to your insurance agent, you cannot replace the information stored on your computer. Take steps to prevent theft of your computer. Kensington lock slot The first step in computer security is preventing your computer from being stolen. Attach a cable lock to the Kensington lock slot on your computer, then wrap the cable lock to a solid object like a desk or table.
www.gateway.com Windows user accounts Windows lets you set up a user account for each person who uses your computer. When you set up user accounts, Windows sets up a My Documents folder for each account. You can assign a password to each account so only the account owner can access files in the My Documents folder. When you set up a user account, you can also limit the programs that a user can install or run. Help For more information about Windows user accounts, click Start, then click Help and Support.
CHAPTER 6: Protecting your computer • McAfee Privacy Service protects against online identity theft by blocking the transmission • of personally identifiable information. This service also filters offensive online content (including pop-ups, ads, and web-bugs) and monitors, controls, and logs where children surf. McAfee Spamkiller prevents identified spam from reaching your e-mail inbox and protects you against known Phishing scams.
www.gateway.com To update your virus definitions: 1 Make sure that you are connected to the Internet. 2 Click (Start), All Programs, McAfee, then click McAfee SecurityCenter. McAfee SecurityCenter opens. 3 Click Update. The McAfee SecurityCenter checks for updates. Important To update McAfee SecurityCenter after the subscription period expires, you must extend your subscription.
CHAPTER 6: Protecting your computer 2 Click Computer & Files. A list of services appears to the right of Computer & Files category. 3 Click Configure in the services area. The Computer & Files Configuration screen opens. 4 Click the grey Virus protection is enabled bar to expand that area, then click Advanced. 5 Click the type of scan you want to configure, then set the options for that scan type. 6 Click OK.
www.gateway.com Using McAfee Parental Controls You can use McAfee Parental Controls to restrict your children from accessing specific Web sites or spending too much time on the Internet. To use McAfee Parental Controls: (Start), All Programs, McAfee, then click McAfee SecurityCenter. McAfee SecurityCenter opens. 1 Click 2 Click Parental Controls, then click Configure in the services area. The Parental Controls Configuration screen opens.
CHAPTER 6: Protecting your computer 4 Click the control you want to configure, then follow the instructions for modifying that control. 5 Click OK. Using Windows Security Center Windows Security Center helps protect your computer through: • A firewall • Automatic Windows updates • Third party virus protection software • Security options in Internet Explorer Modifying security settings To modify security settings: 1 Click (Start), Control Panel, then Click Security. 2 Click Security Center.
www.gateway.com Security updates To keep your computer secure, you need to keep Windows and your computer’s system software up to date. Windows Update If a hacker finds a way to bypass the security features built into Windows, Microsoft creates a high-priority Windows update to fix the problem. You should update Windows regularly to keep your computer secure. To update Windows: 1 Click (Start), Control Panel, then click Security. 2 Click Security Center. The Windows Security Center dialog box opens.
CHAPTER 6: Protecting your computer 4 Click Change Settings. The Change Settings dialog box opens. 5 Make your changes to the schedule settings, then click OK. BigFix Your computer may include BigFix. BigFix monitors your computer for problems and conflicts. It automatically gathers information about the latest bugs, security alerts, and updates from BigFix sites on the Internet. Whenever BigFix detects a problem, it alerts you by flashing the blue taskbar icon.
CHAPTER7 Customizing Windows • • • • • • • Changing screen settings Changing system sounds Changing mouse settings Adding and modifying user accounts Changing power-saving settings Changing accessibility settings Setting up parental controls 67
CHAPTER 7: Customizing Windows Changing screen settings Adjusting the color depth and screen area are two of the most basic display settings you may need to change. You can also adjust settings such as the screen background and screen saver. Changing color depth and screen resolution Color depth and screen resolution are two of the most basic monitor settings you may need to change to suit your needs. Color depth is the number of colors your computer uses to display images on your monitor.
www.gateway.com Changing the appearance of windows and backgrounds You can change the appearance of Windows desktop items, such as the colors of windows and dialog boxes and the color and design of the desktop background. To change window colors and effects: 1 Click (Start), Control Panel, then under Appearance and Personalization, click Customize colors. The Window Color and Appearance dialog box opens. 2 Click one of the color choices and adjust the Color intensity slider, then click OK.
CHAPTER 7: Customizing Windows 2 Click the Picture Location list, then click the location where you want to look for background images. If the location you want is not in the list, click Browse and locate the drive and folder. 3 Click the picture or color you want to use for the background, then click OK.
www.gateway.com Changing gadgets Gadgets are constantly running mini-programs that are visible on your Windows desktop. They can be moved, removed, resized, and configured according to your preference. Although you can position them anywhere on your desktop, gadgets are usually visible on the right edge of your screen in the Sidebar.
CHAPTER 7: Customizing Windows Using a gadget’s control panel Some gadgets have built-in control panels that you can use to control their behavior. To use a gadget’s control panel: 1 In the Sidebar, hold the mouse pointer over the gadget. The gadget’s built-in control panel appears on the gadget. (Slideshow gadget shown) 2 Click the control you want to operate. Configuring the gadget Sidebar You can change the appearance and behavior of the Sidebar.
www.gateway.com Setting up multiple monitors Important The dialog boxes shown in this section are for demonstrative purposes only and may not represent the screens on your computer. If your computer’s video card supports additional monitors (it must have two video ports), you can connect an additional monitor or projector to your computer. You can use the second monitor or projector as a duplicate of the primary display, or as an extension to roughly double the size of your Windows desktop.
CHAPTER 7: Customizing Windows 9 To use the second monitor or projector as an extension of your desktop (increasing the size of your Windows desktop), click to select the check box for Extend my Windows desktop onto this monitor. You can click and drag the “2” monitor icon to position it the same way the physical monitor is arranged on your desk. 10 Click OK.
www.gateway.com Changing mouse settings Help For more information about mouse settings, click Start, then click Help and Support. Type mouse settings in the Search Help box, then press ENTER. You can adjust the double-click speed, pointer speed, left-hand or right-hand configuration, and other mouse settings. To change your mouse settings: Shortcut Start Ö Control Panel Ö Hardware and Sound Ö Mouse 1 Click (Start), Control Panel, then under Hardware and Sound, click Mouse.
CHAPTER 7: Customizing Windows Adding and modifying user accounts You can create and customize a user account for each person who uses your computer. You can also change between user accounts without turning off your computer. User account tips • If you want to create an account for someone, but you do not want that user to have full • access to your computer, be sure to make that account limited. Remember that limited accounts may not be able to install some older programs.
www.gateway.com To switch between user accounts: 1 Save any open documents that are being worked on in your current account. 2 Click (Start), click the arrow next to the lock icon, then click Switch User or Log Off. • Switch User opens the account selection screen but does not log off the current user, • and any programs that were running for the previous user continue to run. Log Off logs off the current user, then opens the account selection screen.
CHAPTER 7: Customizing Windows 2 Click a power plan (default plans shown): • Balanced uses several energy-saving features while maintaining reasonable • • performance and convenience. Power saver maximizes energy savings but reduces performance and convenience. High performance maximizes performance but reduces energy savings. 3 To change a power plan, click Change plan settings, change the settings you want, then click Save changes.
www.gateway.com Changing accessibility settings Your computer can be a powerful tool, but it may be less useful to you if items on the screen are difficult to see, or if the mouse is difficult to control. Windows has several tools that help you use it more easily. Using the Ease of Access Center Use the Ease of Access Center to change several system display settings. To use the Ease of Access Center: 1 Click (Start), Control Panel, Ease of Access, then click Ease of Access Center.
CHAPTER 7: Customizing Windows Using voice recognition You can attach a microphone to your computer and configure Windows to create typed text from your voice. To set up voice recognition: 1 Click (Start), Control Panel, Ease of Access, then click Speech Recognition Options. The Speech Recognition Options window opens. 2 Click one of the following settings to start setting up speech recognition: • Start Speech Recognition turns on speech recognition.
www.gateway.com Filtering Internet access You can specify the type of Internet content that can be accessed by a user. To set up Internet filtering: (Start), Control Panel, then under User Accounts and Family Safety, click Set up parental controls for any user. The Parental Controls dialog box opens. 1 Click 2 Click the user account to set up restrictions for. The User Controls dialog box opens. 3 Click On, enforce current settings, then click Windows Vista Web Filter.
CHAPTER 7: Customizing Windows Scheduling computer and Internet use To schedule the times a user can access the Internet: (Start), Control Panel, then under User Accounts and Family Safety, click Set up parental controls for any user. The Parental Controls dialog box opens. 1 Click 2 Click the user account to schedule for, then click Time limits. The Time Restrictions dialog box opens. 3 Click inside the grid to set when the user can access the computer.
www.gateway.com 3 Click Set game ratings. The Game Restrictions dialog box opens. 4 Click the level of games you want allowed, then click OK. The settings are saved. To restrict specific games: 1 Click (Start), Control Panel, then under User Accounts and Family Safety, click Set up parental controls for any user. The Parental Controls dialog box opens. 2 Click the user account to set up restrictions for, then click Games. The Game Controls dialog box opens. 3 Click Block or Allow specific games.
CHAPTER 7: Customizing Windows 4 Click the level of access you want for each game listed, then click OK. If the game you want to restrict access to is not shown on the list, see “Restricting specific programs” on page 84. Restricting specific programs To restrict specific programs: 1 Click (Start), Control Panel, then under User Accounts and Family Safety, click Set up parental controls for any user. The Parental Controls dialog box opens.
Index A CD access point setting up 49 using 48 accessibility high contrast color scheme 79 Magnifier 79 Narrator 79 on-screen keyboard 79 settings 79 accessing shared drives 54 shared files 54 shared folders 54 accounts Internet 19 ISP 19 user 76 Windows user 59 adding user accounts 76 address e-mail 21 Web 20 AU file playing 30 audio playing 30 recording file 33 audio CD adding tracks to library 35 editing track information 35 playing 31 AVI file playing 30 B adding tracks to library 35 creating audio
Index files copying 10, 16 cutting 10 deleting 6, 11, 16 downloading 21 finding 12, 13 moving 10 opening 7 opening shared 54 pasting 10, 16 recovering 11 renaming 16 searching for 12, 13 sharing 52 un-sharing 53 viewing list 9 finding files and folders 12, 13 Help and Support topics 3 folders copying 10, 16 creating 10 cutting 10 deleting 6, 11, 16 finding 12, 13 moving 10 opening 9 pasting 10, 16 recovering 11 renaming 16 searching for 12, 13 sharing 52 un-sharing 53 viewing list 9 G gadgets adding 71 ch
www.gateway.
Index Scan 23 receiving and viewing faxes maximize button 9 menu bar 9 26 minimize button 9 sending fax 26 title bar 8 sending fax from program 26 Windows sending scanned image fax changing background 69 26 clipboard 10 setting up fax cover page Product Key Code 4 template 26 Search utility 12 testing network 52 user accounts 59 text to speech 80 Windows DVD Maker 37 title bar 8 Windows Fax and Scan 22 transferring Windows Media Center 40 help 3 files from Internet 21 starting 40 U Windows Media Player bu
Sommaire Chapitre 1 : Obtenir de l’aide . . . . . . . . . . . . . . . . . . . . . . . . . . . . . . . . . . . . . . 1 Nous vous remercions d’avoir acheté notre ordinateur! . . . . . . . . . . . . . . . . . . . . Utilisation du site Web Gateway . . . . . . . . . . . . . . . . . . . . . . . . . . . . . . . . . . . . . . . Obtenir de l’aide et un support technique . . . . . . . . . . . . . . . . . . . . . . . . . . . . . . . Recherche d’une rubrique . . . . . . . . . . . . . . . . . . . . . . . . . . . . . . .
Sommaire Création de fichiers audio et de bibliothèques musicales . . . . . . . . . . . . . . . . . . Création de fichiers musicaux . . . . . . . . . . . . . . . . . . . . . . . . . . . . . . . . . . Création d’une bibliothèque musicale . . . . . . . . . . . . . . . . . . . . . . . . . . . . Modifier les informations des pistes . . . . . . . . . . . . . . . . . . . . . . . . . . . . . Création de CD musicaux et de DVD vidéo . . . . . . . . . . . . . . . . . . . . . . . . . . . . . .
www.gateway.com Changement des sons système . . . . . . . . . . . . . . . . . . . . . . . . . . . . . . . . . . . . . . . Modification des paramètres de la souris . . . . . . . . . . . . . . . . . . . . . . . . . . . . . . . Ajout ou modification de comptes d’utilisateur . . . . . . . . . . . . . . . . . . . . . . . . . . Changement des paramètres d’économie d’énergie . . . . . . . . . . . . . . . . . . . . . . Modification du mode de gestion de l’alimentation . . . . . . . . . . . . . . . . .
Sommaire iv
CHAPITRE 1 Obtenir de l’aide • Utilisation du site Web Gateway • Obtenir de l’aide et un support technique • Utilisation de l’aide en ligne 1
CHAPITRE 1 : Obtenir de l’aide Nous vous remercions d’avoir acheté notre ordinateur! Vous avez fait un choix judicieux en choisissant Gateway. Nous sommes certains que vous serez satisfait de la qualité exceptionnelle, de la fiabilité et des performances de votre ordinateur. Chaque ordinateur Gateway se sert de la plus récente technologie et doit subir des essais de contrôle de qualité très rigoureux pour vous assurer de bénéficier du meilleur produit possible.
www.gateway.com Pour accéder au Centre d’aide et de support, procédez comme suit : (Démarrer), puis sur Aide et support. Le Centre d’aide et de support s’ouvre. • Cliquez sur Vous trouverez des informations supplémentaires en cliquant sur une rubrique d’ordre général sous Trouver une réponse, en sélectionnant une option sous Demander à quelqu’un ou en choisissant une catégorie dans Information Microsoft.
CHAPITRE 1 : Obtenir de l’aide Utilisation de l’aide en ligne Si vous êtes connecté à Internet, de nombreux programmes fournissent des informations en ligne pour vous permettre de faire des recherches par rubrique ou d’apprendre à exécuter une tâche en utilisant le programme. Vous pouvez accéder à la plupart des rubriques d’aide en ligne en sélectionnant une rubrique dans un menu Aide ou en cliquant sur un bouton Aide situé sur une barre de menus puis en choisissant Assistance en ligne dans la liste.
CHAPITRE 2 Utilisation de Windows • • • • • Utilisation du bureau Windows Gestion des fichiers et des dossiers Recherche de fichiers Gestion des documents Raccourcis 5
CHAPITRE 2 : Utilisation de Windows Utilisation du bureau Windows Après le démarrage de votre ordinateur, le premier écran que vous voyez est le bureau Windows. Le bureau fonctionne comme la surface de travail d’un bureau ordinaire. Considérez le bureau comme votre espace de travail personnalisé où vous pouvez ouvrir des programmes et effectuer d’autres tâches. . Aide Pour de plus amples informations sur le bureau Windows, cliquez sur Démarrer, puis sur Aide et support.
www.gateway.com Utilisation du menu Démarrer Aide Pour de plus amples informations sur le menu Démarrer de Windows, cliquez sur Démarrer, puis sur Aide et support. Tapez menu Démarrer Windows dans le champ Rechercher et appuyez ensuite sur ENTRÉE. Vous pouvez démarrer des programmes, ouvrir des fichiers, personnaliser votre système, obtenir de l’aide, rechercher des fichiers et des dossiers et bien plus encore en utilisant le menu Démarrer.
CHAPITRE 2 : Utilisation de Windows Ajout d’icônes sur le bureau Aide Pour de plus amples informations sur les icônes du bureau, cliquez sur Démarrer, puis sur Aide et support. Tapez icônes de bureau dans le champ Rechercher et appuyez ensuite sur ENTRÉE. Vous pouvez ajouter l’icône (raccourci) d’un programme que vous utilisez souvent sur le bureau.
www.gateway.com Élément de fenêtre Description Cliquer sur le bouton Réduire réduit la fenêtre active en un bouton sur la barre des tâches. Cliquer sur le bouton du programme dans la barre des tâches ouvre de nouveau la fenêtre. Cliquer sur le bouton Agrandir agrandit la fenêtre active pour qu’elle remplisse l’affichage tout entier de l’ordinateur. Cliquer de nouveau sur le bouton Agrandir restaure la taille précédente de la fenêtre. Cliquer sur le bouton Fermer ferme la fenêtre active ou le programme.
CHAPITRE 2 : Utilisation de Windows 2 Double-cliquez sur l’icône du lecteur. Création de dossiers Les dossiers sont fort similaires aux dossiers d’un classeur. Ils peuvent contenir des fichiers ou d’autres dossiers. Les fichiers sont fort similaires à des documents imprimés—lettres, feuilles de calcul et photos—que vous stockez sur votre ordinateur. En fait, toutes les informations d’un ordinateur sont stockées dans des fichiers.
www.gateway.com Lorsque vous coupez et collez un fichier ou un dossier, vous le supprimez de son emplacement original et vous le placez dans le Presse-papiers Windows. Ensuite, vous sélectionnez le dossier dans lequel vous voulez placer le fichier ou le dossier et vous le collez dans ce dossier. Pour copier un fichier ou un dossier vers un autre dossier : 1 Localisez le fichier ou le dossier que vous voulez copier.
CHAPITRE 2 : Utilisation de Windows 3 Cliquez sur Restaurer. Windows restaure les fichiers ou les dossiers supprimés vers leur emplacement original. Pour vider la Corbeille : Mise en garde Vider la Corbeille supprime définitivement les fichiers ou les dossiers qui s’y trouvent. Ces fichiers ou dossiers sont alors irrécupérables. 1 Double-cliquez sur l’icône Corbeille du bureau. La fenêtre Corbeille s’ouvre. 2 Cliquez sur Vider la Corbeille.
www.gateway.com 3 Ouvrez un fichier, un dossier ou un programme en double-cliquant sur son nom dans la liste. Aide Pour de plus amples informations sur la recherche de fichiers et dossiers, cliquez sur Démarrer puis sur Aide et support. Tapez le mot clé rechercher dans le champ Rechercher, puis cliquez sur la loupe. Utilisation des options de recherche avancées La recherche peut trouver des fichiers répondant à d’autres critères que le nom de fichier.
CHAPITRE 2 : Utilisation de Windows Gestion des documents Les documents informatiques comprennent des fichiers de traitement de texte, des fichiers de feuille de calcul ou d’autres fichiers similaires. Les méthodes de base pour créer, enregistrer, ouvrir et imprimer un document s’appliquent à la plupart de ces types de fichiers. Les exemples suivants expliquent comment créer, enregistrer, ouvrir et imprimer un document en utilisant Microsoft® WordPad.
www.gateway.com Ouverture d’un document Pour afficher, modifier ou imprimer un document existant, vous devez tout d’abord l’ouvrir. Ouvrez le document dans le programme dans lequel il a été créé. Pour ouvrir un document : 1 Démarrez le programme. 2 Cliquez sur Fichier, puis cliquez sur Ouvrir. 3 Cliquez sur Dossiers pour ouvrir la liste Dossiers, puis cliquez sur le dossier que vous voulez ouvrir. 4 Double-cliquez sur le nom du document. Le document s’ouvre.
CHAPITRE 2 : Utilisation de Windows Raccourcis Aide Pour de plus amples informations sur les raccourcis clavier Windows, cliquez sur Démarrer puis sur Aide et support. Tapez raccourcis clavier Windows dans le champ Rechercher et appuyez ensuite sur ENTRÉE. Le tableau suivant présente quelques raccourcis que vous pouvez utiliser sous Windows et dans la plupart des programmes exécutables sous Windows. Pour plus d’informations sur les raccourcis, consultez la documentation de Windows ou du programme.
CHAPITRE 3 Utilisation d’Internet et envoi de télécopies • • • • • Découvrir Internet Configuration d’un compte Internet Utilisation du Web Utilisation de la messagerie Utilisation de Télécopie et numérisation Windows 17
CHAPITRE 3 : Utilisation d’Internet et envoi de télécopies Découvrir Internet Internet est un réseau mondial d’ordinateurs liés entre eux pour offrir des informations à des utilisateurs dans le monde entier. Les deux services les plus populaires sur Internet sont le courriel et le Web (World Wide Web).
www.gateway.com Configuration d’un compte Internet Avant de pouvoir parcourir les informations disponibles sur le Web, vous devez ouvrir un compte Internet auprès d’un fournisseur de services Internet (FSI). Pour configurer un service FSI ou pour transférer un compte existant sur cet ordinateur, contactez le fournisseur directement. Les connexions Internet commutées utilisent un système téléphonique pour se connecter à Internet.
CHAPITRE 3 : Utilisation d’Internet et envoi de télécopies Pour en savoir plus sur l’utilisation des fonctionnalités de votre navigateur Web, cliquez sur Aide dans la barre de menus. Lien Page Web Page Web liée Connexion à un site Web Lorsque vous ouvrez un compte auprès d’un fournisseur de services Internet (FSI), vous pouvez accéder à de nombreuses sources d’informations sur le Web. Pour vous connecter à un site Web : 1 Connectez-vous à votre compte Internet.
www.gateway.com Téléchargement de fichiers Mise en garde Pour protéger votre ordinateur contre les virus, veillez à analyser les fichiers que vous téléchargez. Pour obtenir plus d’informations, consultez « Protection antivirus de votre ordinateur » à la page 59. Le téléchargement est le processus de transfert des fichiers d’un ordinateur sur Internet vers votre ordinateur. Pour télécharger des fichiers ou programmes à partir d’un site Web : 1 Connectez-vous à votre compte Internet.
CHAPITRE 3 : Utilisation d’Internet et envoi de télécopies Envoi d’un courriel Pour envoyer un courriel avec Windows Mail : 1 Connectez-vous à votre fournisseur de services Internet. 2 Cliquez sur (Démarrer), puis sur Courriel. Votre programme de courriel par défaut s’ouvre. 3 Cliquez sur Créer un message. 4 Tapez l’adresse électronique de la personne à qui vous voulez envoyer un courriel dans la zone À. 5 Saisissez l’objet de votre message dans la zone Objet. 6 Tapez le texte du courriel.
www.gateway.com Ces instructions ne décrivent pas comment envoyer ou recevoir une télécopie à l’aide d’un modem câble ou DSL. De nombreux services Internet permettent d’envoyer ou de recevoir des télécopies en utilisant une connexion haut débit. Le câble du modem commuté doit être installé avant que vous puissiez envoyer et recevoir des télécopies. Vous ne pouvez pas utiliser votre modem téléphonique normal pour vous connecter à Internet alors que vous envoyez ou recevez des télécopies.
CHAPITRE 3 : Utilisation d’Internet et envoi de télécopies 6 Cliquez sur la manière dont vous souhaitez recevoir des télécopies, puis cliquez sur Déverrouiller lorsque la fenêtre Alerte de sécurité s’ouvre. La fenêtre Nouvelle télécopie s’ouvre. 7 Créez votre télécopie, puis ouvrez le menu Page de garde en cliquant sur la flèche et en sélectionnant une page de garde dans la liste. La boîte de dialogue Informations sur l’expéditeur s’ouvre.
www.gateway.com 9 Pour saisir des informations facultatives sur les règles de numérotation, cliquez sur Règle de numérotation et sélectionnez une règle dans le menu. Si vous n’avez pas encore défini de règle de numérotation, sélectionnez Nouvelle règle à partir du menu. La boîte de dialogue Informations sur l’emplacement s’ouvre. 10 Saisissez les informations sur l’emplacement et cliquez ensuite sur OK. La boîte de dialogue Règles de numérotation s’ouvre.
CHAPITRE 3 : Utilisation d’Internet et envoi de télécopies 13 Cliquez sur OK. La boîte de dialogue Nouvelle télécopie s’ouvre. 14 Saisissez, scannez ou numérisez les informations de télécopie, puis cliquez sur Envoyer. Configuration du modèle de page de garde Vous pouvez créer votre propre modèle de page de garde, que vous pouvez utiliser à la place des modèles de page de garde fournis par Télécopie et numérisation Windows. Pour créer un modèle de page de garde, utilisez l’Éditeur de page de garde.
www.gateway.com Télécopie d’un document numérisé ou à partir d’autres programmes Pour télécopier un document numérisé ou directement à partir de la plupart des programmes, procédez comme suit : 1 Numérisez le document à l’aide du programme de votre scanner, ou ouvrez le document dans le programme dans lequel il a été créé. 2 Cliquez sur Fichier, puis sur Imprimer. La boîte de dialogue Imprimer s’ouvre. 3 Cliquez sur le bouton fléché pour ouvrir la liste Nom, puis cliquez sur l’imprimante Télécopie.
CHAPITRE 3 : Utilisation d’Internet et envoi de télécopies 28
CHAPITRE 4 Lecture et création de fichiers multimédia • Écouter de la musique et regarder des films • Création de fichiers audio et de bibliothèques musicales • Création de CD musicaux et de DVD vidéo • Création et copie de disques de données • Utilisation de Windows Media Center 29
CHAPITRE 4 : Lecture et création de fichiers multimédia Écouter de la musique et regarder des films Lecture de fichiers audio et vidéo Le Lecteur Windows Media peut lire différents types de fichiers audio et vidéo, notamment les formats WAV, MIDI, MP3, AU, AVI et MPEG. Pour plus d’informations sur l’utilisation du Lecteur Windows Media, cliquez sur Aide.
www.gateway.com 3 Cliquez sur l’une des commandes ci-dessous pour contrôler la lecture : Répéter Mix Retour rapide Arrêter Avance rapide Pause/Lecture Volume Sourdine • Mix permet de répartir au hasard l’ordre de lecture des fichiers. • Répéter permet de relancer la liste de lecture une fois celle-ci terminée. • Arrêter permet d’arrêter la lecture et de faire un retour rapide jusqu’au début du fichier en cours.
CHAPITRE 4 : Lecture et création de fichiers multimédia 3 Si une boîte de dialogue s’ouvre et vous demande ce que vous voulez faire avec le disque, cliquez sur Lecture. Le Lecteur Windows Media s’ouvre et commence la lecture du disque. Si le Lecteur Windows Media ne s’ouvre pas automatiquement, cliquez sur (Démarrer), Tous les programmes, puis sur Lecteur Windows Media. Le Lecteur Windows Media s’ouvre.
www.gateway.com 5 Cliquez sur l’une des commandes ci-dessous pour contrôler la lecture : Répéter Mix Retour rapide Arrêter Avance rapide Pause/Lecture Volume Sourdine • Mix permet de répartir au hasard l’ordre de lecture des fichiers. • Répéter permet de relancer la liste de lecture une fois celle-ci terminée. • Arrêter permet d’arrêter la lecture et de faire un retour rapide jusqu’au début du fichier en cours.
CHAPITRE 4 : Lecture et création de fichiers multimédia 3 Cliquez sur Démarrer l’enregistrement, et parlez ensuite ou produisez d’autres sons dans le microphone. 4 Lorsque vous avez fini d’enregistrer, cliquez sur Arrêter l’enregistrement. La boîte de dialogue Enregistrer sous s’ouvre. 5 Saisissez un nom pour l’enregistrement, spécifiez le type de fichier et l’emplacement où vous voulez le sauvegarder, et cliquez ensuite sur Enregistrer. L’enregistrement sera sauvegardé.
www.gateway.com Création d’une bibliothèque musicale Utilisez le Lecteur Windows Media pour créer une bibliothèque musicale. Vous pouvez organiser vos pistes musicales par catégories (fichiers audio MP3 ou WMA individuels), trouver rapidement des pistes en utilisant les options de tri et ajouter des informations dans un fichier musical.
CHAPITRE 4 : Lecture et création de fichiers multimédia Création de CD musicaux et de DVD vidéo Création d’un CD musical Important Nous vous recommandons de ne pas utiliser votre ordinateur pendant la création de CD ou de DVD. Si vous enregistrez un CD ou un DVD dont le contenu est protégé, vous devez obtenir une autorisation du propriétaire des droits d’auteur. Vous pourriez sinon commettre une infraction de la loi sur les droits d’auteur et risquer de devoir payer des dommages-intérêts ou autres.
www.gateway.com Création d’un DVD vidéo Création d’un DVD vidéo à l’aide du programme Création de DVD Windows Si votre ordinateur est livré avec le système d’exploitation Windows Vista Home Premium ou Windows Vista Ultimate Edition, vous pouvez créer des DVD vidéo à l’aide du programme Création de DVD Windows. Pour créer un DVD vidéo à l’aide du programme Création de DVD Windows : Important Nous vous recommandons de ne pas utiliser votre ordinateur pendant la création de CD ou de DVD.
CHAPITRE 4 : Lecture et création de fichiers multimédia 4 Cliquez sur Ajouter des éléments. La boîte de dialogue Ajouter des éléments au DVD s’ouvre. 5 Recherchez et sélectionnez les vidéos que vous voulez ajouter au DVD vidéo, puis cliquez sur Ajouter. Les vidéos sont ajoutées à la liste vidéo et un graphique dans le coin inférieur gauche de la fenêtre indique combien d’espace disque sera utilisé. 6 Cliquez sur Suivant. La boîte de dialogue Prêt à graver s’ouvre.
www.gateway.com 7 Cliquez sur l’une des options suivantes pour personnaliser votre disque vidéo : • Aperçu montre à quoi le menu d’ouverture du DVD ressemblera avec les paramètres • • • actuels. Texte du menu permet de modifier le titre, la police de caractères et le nom des boutons. Personnaliser le menu permet de modifier les polices du menu, les vidéos en arrière-plan et en avant-plan, la piste audio et les styles des boutons. Diaporama permet de créer un diaporama à partir de fichiers de photos.
CHAPITRE 4 : Lecture et création de fichiers multimédia 4 Cliquez sur Mastered, puis sur Suivant. Un dossier vide s’ouvre. 5 Ouvrez le dossier contenant les fichiers que vous souhaitez graver sur le disque, puis cliquez et faites glisser les fichiers dans le dossier du disque vide. 6 Cliquez sur Graver sur le disque. La gravure des fichiers sur le disque commence.
www.gateway.com 3 Utilisez les boutons de navigation de la télécommande pour sélectionner une option de menu Media Center, puis appuyez sur OK. • TV + Movies (Télévision + Films) permet de regarder des programmes de télé, de • • • • regarder des films sur disques DVD ou Blu-ray, ou de configurer votre carte de tuner TV (si votre ordinateur en a une). Online Media (Multimédia en ligne) permet de jouer à des jeux sur Internet.
CHAPITRE 4 : Lecture et création de fichiers multimédia Utilisation de la télécommande Windows Media Center Lorsque le mode Media Center est actif, vous pouvez utiliser la télécommande optionnelle pour lire vos fichiers multimédia à une certaine distance. (La télécommande fournie avec votre ordinateur peut avoir un aspect différent de celui illustré ci-dessous.
CHAPITRE 5 Mise en réseau de votre ordinateur • Introduction aux réseaux • Réseau Ethernet • Réseau Bluetooth 43
CHAPITRE 5 : Mise en réseau de votre ordinateur Introduction aux réseaux Termes que vous devez connaître en matière de réseau DHCP — le protocole DHCP (Dynamic Host Configuration Protocol) permet à un routeur d’attribuer temporairement une adresse IP à un ordinateur du réseau. Adresse IP — Une adresse IP (Internet Protocol) est un nombre qui identifie de façon unique un ordinateur du réseau.
www.gateway.com Exemple de réseau Ethernet utilisant un routeur Vous trouverez ci-dessous un exemple de réseau Ethernet câblé. Le réseau est composé d’un routeur, d’un modem câble ou DSL, de vos ordinateurs et de câbles reliant chacun de ces composants. Le routeur constitue le point de contrôle central du réseau. Astuce Pour que votre réseau Ethernet câblé puisse accéder à un réseau Ethernet sans fil, connectez un point d’accès au routeur ou utilisez un routeur doté d’un point d’accès intégré.
CHAPITRE 5 : Mise en réseau de votre ordinateur Comment déterminer si une carte Ethernet est déjà installée sur l’ordinateur Pour déterminer si une carte Ethernet est déjà installée sur l’ordinateur : 1 Cliquez sur Démarrer puis sur Panneau de configuration. La fenêtre Panneau de configuration s’ouvre. 2 Cliquez sur Système et maintenance, puis sur Système. 3 Cliquez sur Gestionnaire de périphériques dans la liste des tâches sur le côté gauche. La fenêtre Gestionnaire de périphériques s’ouvre.
www.gateway.com Configuration d’un réseau utilisant un routeur Si vous configurez un réseau pour plus de deux ordinateurs et si vous prévoyez de connecter le réseau à une connexion Internet haut débit (modem câble ou DSL), nous vous recommandons d’utiliser un routeur. Un routeur vous permet d’accéder à la connexion Internet depuis n’importe quel ordinateur du réseau. Le routeur peut attribuer des adresses IP aux ordinateurs du réseau et fournir également au réseau une protection par pare-feu.
CHAPITRE 5 : Mise en réseau de votre ordinateur Normes Ethernet sans fil Les normes Ethernet sans fil actuelles comprennent : • 802.11a — 54 Mbit/s • 802.11b — 11 Mbit/s • 802.11g — 54 Mbit/s • 802.11n — 540 Mbit/s La vitesse n’est pas le seul problème si vous décidez d’utiliser un équipement ayant des normes différentes. Il peut y avoir des problèmes de compatibilité.
www.gateway.com Comment déterminer si un périphérique Ethernet sans fil est déjà installé sur l’ordinateur Pour déterminer si une carte Ethernet est déjà installée sur l’ordinateur : 1 Cliquez sur Démarrer puis sur Panneau de configuration. La fenêtre Panneau de configuration s’ouvre. 2 Cliquez sur Système et maintenance, puis sur Système. 3 Cliquez sur Gestionnaire de périphériques dans la liste des tâches sur le côté gauche. La fenêtre Gestionnaire de périphériques s’ouvre.
CHAPITRE 5 : Mise en réseau de votre ordinateur 2 Cliquez sur Système et maintenance. La fenêtre Système et maintenance s’ouvre. 3 Cliquez sur Système, puis sur Modifier les paramètres dans la zone Nom d’ordinateur, Domaine et Groupe de travail. La boîte de dialogue Propriétés système s’ouvre. 4 Cliquez sur Modifier. 5 Si vous n’avez pas encore donné un nom à votre ordinateur, saisissez un nom unique dans le champ Nom de l’ordinateur.
www.gateway.com Pour vous connecter au réseau Ethernet sans fil : 1 Cliquez sur Démarrer puis sur Réseau. La fenêtre Réseau s’ouvre. 2 Cliquez sur Centre réseau. La fenêtre Centre réseau s’ouvre. 3 Cliquez sur Connexion à un réseau en bas à gauche de la fenêtre. La boîte de dialogue Connexion à un réseau s’ouvre.
CHAPITRE 5 : Mise en réseau de votre ordinateur 4 Cliquez sur un réseau, puis sur Connecter. Si le nom du réseau est affiché mais que vous ne parvenez pas à établir la connexion, votre réseau est sécurisé. Cliquez avec le bouton droit sur le réseau, puis sur Propriétés. Modifiez les paramètres réseau pour qu’ils correspondent à ceux que vous avez configurés sur votre point d’accès.
www.gateway.com Partage des ressources Avec un réseau, vous pouvez partager votre connexion Internet, vos lecteurs et vos imprimantes. Partage de lecteurs et d’imprimantes Avec un réseau, vous pouvez partager des lecteurs (par exemple, des disques durs et des lecteurs de DVD) et des imprimantes entre les ordinateurs connectés au réseau. Important Pour partager une imprimante entre les ordinateurs du réseau, les pilotes de l’imprimante partagée doivent être installés sur chaque ordinateur.
CHAPITRE 5 : Mise en réseau de votre ordinateur Désactivation du partage des lecteurs et des dossiers Pour désactiver le partage de lecteurs ou de dossiers, procédez comme suit : 1 Cliquez sur Démarrer puis sur Poste de travail. 2 Cliquez avec le bouton droit sur l’imprimante que vous ne souhaitez pas partager, puis cliquez sur Partager. 3 Cliquez sur Partage avancé, puis sur Partager ce dossier (ou lecteur) pour désactiver l’option. 4 Cliquez sur Appliquer, puis sur OK.
www.gateway.com 2 Cliquez avec le bouton droit sur le lecteur ou dossier, puis cliquez sur Créer un raccourci. Un raccourci est créé vers le lecteur ou dossier, et l’icône du raccourci est placée sur votre bureau. 3 Cliquez sur X pour fermer la fenêtre. Ouverture de fichiers sur le réseau Pour ouvrir des fichiers sur le réseau, procédez comme suit : 1 Démarrez le programme correspondant au fichier que vous souhaitez ouvrir. 2 Cliquez sur Fichier, puis cliquez sur Ouvrir.
CHAPITRE 5 : Mise en réseau de votre ordinateur 2 Cliquez sur (Démarrer), Panneau de configuration, puis sur Matériel et son. 3 Cliquez sur Périphériques Bluetooth. 4 Cliquez sur Ajouter, puis suivez les instructions affichées à l’écran. Pour installer une imprimante Bluetooth, procédez comme suit : Allumez la radio Bluetooth et l’imprimante Bluetooth. 1 2 3 4 Cliquez sur (Démarrer), Panneau de configuration, puis sur Matériel et son. Cliquez sur Ajouter une imprimante.
CHAPITRE 6 Protection de votre ordinateur • Sécurité du matériel • Sécurité des données • Mises à jour de sécurité 57
CHAPITRE 6 : Protection de votre ordinateur Sécurité du matériel Vous pouvez peut-être remplacer votre ordinateur en appelant votre assureur, mais les informations stockées sur votre ordinateur, elles, sont irremplaçables. Prenez toutes les mesures nécessaires pour protéger votre ordinateur contre le vol. Sécurité Kensington La première étape pour garantir la sécurité de l’ordinateur est de le protéger contre le vol.
www.gateway.com Comptes d’utilisateur Windows Windows vous permet de configurer un compte d’utilisateur pour chaque personne qui utilise l’ordinateur. Lorsque vous configurez des comptes d’utilisateur, Windows installe un dossier Mes documents pour chaque compte. Vous pouvez définir un mot de passe pour chaque compte de sorte que seul le propriétaire du compte puisse accéder aux fichiers du dossier Mes documents.
CHAPITRE 6 : Protection de votre ordinateur • McAfee VirusScan, un service d’abonnement antivirus. Vous pouvez utiliser VirusScan pour • protéger votre ordinateur contre les virus, les vers, les chevaux de Troie et les attaques hybrides. McAfee Personal Firewall bloque le trafic Internet entrant et sortant indésirable pour éviter les attaques de pirates informatiques.
www.gateway.com Pour mettre à jour les définitions de virus : 1 Assurez-vous que vous êtes connecté à Internet. 2 Cliquez sur (Démarrer), Tous les programmes, McAfee, puis cliquez sur McAfee SecurityCenter. McAfee SecurityCenter s’ouvre. 3 Cliquez sur Mettre à jour. McAfee SecurityCenter vérifie si des mises à jour sont disponibles. Important Pour mettre à jour McAfee SecurityCenter après la période d’évaluation gratuite, vous devez prolonger votre abonnement.
CHAPITRE 6 : Protection de votre ordinateur 2 Cliquez sur Ordinateur et fichiers. Une liste des services apparaît à droite de la catégorie « Ordinateur et fichiers ». 3 Cliquez sur Configurer dans la zone des services. L’écran Configuration de l’ordinateur et des fichiers s’ouvre. 4 Cliquez sur la barre grise Protection antivirus activée pour agrandir cette zone, puis cliquez sur Avancé. 5 Cliquez sur le type d’analyse que vous voulez configurer et définissez les options pour ce type d’analyse.
www.gateway.com Utilisation des contrôles parentaux McAfee Vous pouvez utiliser les contrôles parentaux McAfee pour empêcher vos enfants d’accéder à des sites Web spécifiques ou de passer trop de temps sur Internet. Pour utiliser les contrôles parentaux McAfee : (Démarrer), Tous les programmes, McAfee, puis cliquez sur McAfee SecurityCenter. McAfee SecurityCenter s’ouvre. 1 Cliquez sur 2 Cliquez sur Contrôles parentaux, puis cliquez sur Configurer dans la zone des services.
CHAPITRE 6 : Protection de votre ordinateur 4 Cliquez sur le contrôle que vous souhaitez configurer, puis suivez les instructions pour modifier le contrôle. 5 Cliquez sur OK. Utilisation de Windows Security Center Windows Security Center protège votre ordinateur grâce à : • un pare-feu, • des mises à jour automatiques de Windows, • un logiciel de protection antivirus tiers, • des options de sécurité dans Internet Explorer.
www.gateway.com Mises à jour de sécurité Pour assurer la sécurité de votre ordinateur, vous devez maintenir Windows et les logiciels système de l’ordinateur à jour. Windows Update Lorsqu’un pirate informatique parvient à contourner les dispositifs de sécurité intégrés à Windows, Microsoft crée une mise à jour de haute priorité pour résoudre le problème. Vous devriez mettre Windows à jour régulièrement pour protéger votre ordinateur.
CHAPITRE 6 : Protection de votre ordinateur 4 Cliquez sur Modifier les paramètres. La boîte de dialogue Modifier les paramètres s’ouvre. 5 Modifiez les paramètres de programmation et cliquez ensuite sur OK. BigFix Votre ordinateur peut inclure BigFix. BigFix surveille votre ordinateur pour y déceler d’éventuels problèmes et incompatibilités. Il rassemble automatiquement les informations au sujet des plus récents bogues, des alertes de sécurité et des mises à jour depuis les sites BigFix sur Internet.
CHAPITRE 7 Personnalisation de Windows • • • • • • • Modification des paramètres d’écran Changement des sons système Modification des paramètres de la souris Ajout ou modification de comptes d’utilisateur Changement des paramètres d’économie d’énergie Modification des paramètres d’accès Configuration des contrôles parentaux 67
CHAPITRE 7 : Personnalisation de Windows Modification des paramètres d’écran Le réglage de profondeur de couleur et celui de la zone d’écran sont deux des paramètres d’affichage de base que vous pouvez avoir à modifier. Vous pouvez également régler des paramètres tels que l’arrière-plan de l’écran et l’écran de veille.
www.gateway.com Modifier l’apparence des fenêtres et des arrière-plans Vous pouvez modifier l’apparence des éléments du bureau de Windows, tels que les couleurs des fenêtres et des boîtes de dialogue, ainsi que la couleur et le style de l’arrière-plan du bureau. Pour modifier les couleurs et effets de fenêtres, procédez comme suit : 1 Cliquez sur (Démarrer), Panneau de configuration, puis sous Apparence et personnalisation, cliquez sur Personnaliser les couleurs.
CHAPITRE 7 : Personnalisation de Windows 2 Cliquez sur la liste Emplacement des images, puis sélectionnez l’emplacement où vous souhaitez voir les images d’arrière-plan. Si l’emplacement souhaité n’apparaît pas dans la liste, cliquez sur Parcourir pour choisir le lecteur et le dossier. 3 Cliquez sur l’image ou la couleur souhaitée pour l’arrière-plan, puis sur OK.
www.gateway.com Changement de gadgets Les gadgets sont des petits programmes constamment en cours d’exécution qui sont visibles sur le bureau Windows. Vous pouvez les déplacer, les supprimer, les redimensionner et les configurer selon vos préférences. Bien que vous puissiez les positionner n’importe où sur le bureau, les gadgets sont en principe visibles sur le côté droit de votre écran dans le Volet Windows.
CHAPITRE 7 : Personnalisation de Windows Utilisation du panneau de commande d’un gadget Certains gadgets ont un panneau de commande intégré que vous pouvez utiliser pour contrôler leur comportement. Pour utiliser le panneau de commande d’un gadget : 1 Dans le Volet Windows, maintenez le pointeur de la souris sur le gadget. Le panneau de commande du gadget apparaît sur le gadget lui-même. (gadget de diaporama illustré) 2 Cliquez sur la commande souhaitée.
www.gateway.com Configuration de plusieurs moniteurs Important Les boîtes de dialogue illustrées dans cette section sont des exemples uniquement et leur apparence peut être différente des boîtes de dialogue de votre ordinateur. Si la carte vidéo de votre ordinateur prend en charge des moniteurs additionnels (deux ports vidéo sont requis), vous pouvez connecter un moniteur additionnel ou un projecteur à votre ordinateur.
CHAPITRE 7 : Personnalisation de Windows 9 Pour utiliser le deuxième moniteur ou projecteur en tant que complément du bureau (augmenter la taille de votre bureau Windows), cliquez pour activer la case à cocher Étendre mon bureau Windows à ce moniteur. Vous pouvez faire glisser l’icône du moniteur « 2 » pour le positionner de la même manière que le moniteur réel est arrangé sur votre bureau. 10 Cliquez sur OK.
www.gateway.com Modification des paramètres de la souris Aide Pour de plus amples informations sur les paramètres de la souris, cliquez sur Démarrer, puis sur Aide et support. Tapez paramètres de la souris dans le champ Rechercher et appuyez ensuite sur ENTRÉE. Vous pouvez régler la vitesse du double clic, la vitesse du pointeur, la configuration main gauche ou main droite, ainsi que d’autres paramètres liés à la souris.
CHAPITRE 7 : Personnalisation de Windows Ajout ou modification de comptes d’utilisateur Vous pouvez créer et personnaliser un compte d’utilisateur pour chaque personne qui utilise l’ordinateur. Vous pouvez également basculer d’un compte d’utilisateur à l’autre sans éteindre l’ordinateur. Conseils relatifs aux comptes d’utilisateur • Si vous voulez créer un compte pour quelqu’un mais souhaitez restreindre l’accès de cet • utilisateur à votre ordinateur, veillez à ce que ce compte soit limité.
www.gateway.com Pour basculer entre les comptes d’utilisateur : 1 Enregistrez et fermez les documents ouverts dans la session en cours de votre compte. 2 Cliquez sur (Démarrer), cliquez sur la flèche à côté de l’icône de verrouillage, puis sur Changer d’utilisateur ou Fermer la session. • L’option Changer d’utilisateur ouvre l’écran de sélection du compte mais ne ferme • pas la session de l’utilisateur en cours ; les programmes en cours d’exécution pour l’utilisateur précédent continuent de s’exécuter.
CHAPITRE 7 : Personnalisation de Windows 1 Cliquez sur (Démarrer), Panneau de configuration, Matériel et audio, puis sous Options d’alimentation, cliquez sur Changer les options d’économie d’énergie. La boîte de dialogue Sélectionner un mode de gestion de l’alimentation s’ouvre. 2 Cliquez sur un mode de gestion de l’alimentation (modes par défaut illustrés) : • Équilibré utilise plusieurs caractéristiques d’économie d’énergie tout en maintenant • • des performances et une commodité raisonnables.
www.gateway.com 7 Pour créer un nouveau mode de gestion de l’alimentation, sur le côté gauche de la fenêtre, cliquez sur Créer un mode de gestion de l’alimentation, puis suivez les instructions affichées à l’écran. Modification des paramètres d’accès Votre ordinateur est un outil puissant, mais son efficacité sera réduite si des éléments sur l’écran sont difficiles à voir ou si la souris est difficile à contrôler.
CHAPITRE 7 : Personnalisation de Windows Vous pouvez aussi utiliser les Options d’ergonomie pour : • • • • Se servir de l’ordinateur sans écran, souris ni clavier Rendre plus facile l’usage de l’ordinateur Rendre plus facile l’usage de la souris et du clavier Substituer des options textuelles ou visuelles aux sons Utilisation de la reconnaissance vocale Il est possible de fixer un microphone à votre ordinateur et de configurer Windows pour saisir du texte à partir de votre voix.
www.gateway.com Configuration des contrôles parentaux Vous pouvez utiliser les contrôles parentaux pour : • contrôler et surveiller l’activité de vos enfants sur Internet ; • bloquer les jeux et les programmes inappropriés ; • programmer les heures auxquelles vos enfants ont accès à l’ordinateur ; • imprimer des rapports d’activité contenant un historique détaillé sur l’utilisation de l’ordinateur.
CHAPITRE 7 : Personnalisation de Windows 3 Cliquez sur Activé - mise en œuvre des paramètres actuels, puis cliquez sur Filtre Web Windows Vista. La boîte de dialogue Restrictions d’accès au Web s’ouvre. 4 Spécifiez les paramètres que vous voulez utiliser pour cet utilisateur, puis cliquez sur OK. Les paramètres sont enregistrés.
www.gateway.com Limiter l’accès aux jeux Vous pouvez limiter l’accès aux jeux en fonction de leur classement, ou vous pouvez spécifier les jeux qui ne sont pas autorisés. Pour limiter l’accès aux jeux en fonction de leur classement, procédez comme suit : 1 Cliquez sur (Démarrer), Panneau de configuration, puis sous Comptes d’utilisateur et Protection des utilisateurs, cliquez sur Configurer les contrôles parentaux pour un utilisateur. La boîte de dialogue Contrôles parentaux s’ouvre.
CHAPITRE 7 : Personnalisation de Windows Pour limiter l’accès à des jeux spécifiques : 1 Cliquez sur (Démarrer), Panneau de configuration, puis sous Comptes d’utilisateur et Protection des utilisateurs, cliquez sur Configurer les contrôles parentaux pour un utilisateur. La boîte de dialogue Contrôles parentaux s’ouvre. 2 Cliquez sur le compte d’utilisateur auquel vous voulez ajouter des restrictions, puis cliquez sur Jeux. La boîte de dialogue Contrôles des jeux s’ouvre.
www.gateway.com Limiter l’accès à des programmes spécifiques Pour limiter l’accès à des programmes spécifiques : (Démarrer), Panneau de configuration, puis sous Comptes d’utilisateur et Protection des utilisateurs, cliquez sur Configurer les contrôles parentaux pour un utilisateur. La boîte de dialogue Contrôles parentaux s’ouvre. 1 Cliquez sur 2 Cliquez sur le compte d’utilisateur auquel vous voulez ajouter des restrictions, puis cliquez sur Autoriser ou bloquer des programmes spécifiques.
CHAPITRE 7 : Personnalisation de Windows 86
Index A accès dossiers partagés 54 fichiers partagés 55 lecteurs partagés 54 accès aux jeux limiter 83 accessibilité clavier à l'écran 79 jeu de couleurs à haut contraste 79 Loupe 79 Narrateur 79 paramètres 79 adresse courriel 21 Web 20 adresse IP 44 entrer 50 affichage dossiers partagés 54 lecteurs partagés 54 utilisation d'un écran de veille 70 aide en ligne 4 Media Center 3 utilisation 2 aide en ligne 2, 4 ajout comptes d'utilisateur 76 alimentation changement de modes de gestion 77 modes de gestion 77 a
Index D déconnexion d'Internet 19 déplacement dossiers 10 fichiers 10 désactivation du partage dossiers 54 lecteurs 54 DHCP 44, 50 disque Blu-ray lecture 31 disque optique création de données 39 lecture 31 documentation aide 2 aide en ligne 4 Centre d'aide et de support 2 site Web de Gateway 2 documents création 14 enregistrement 14 impression 15 ouverture 15 dossier Documents partagés 76 dossiers coller 10, 16 copie 10, 16 couper 10 création 10 déplacement 10 désactivation du partage 54 liste d'affichage
www.gateway.com L démarrer 60 mise à jour 60 La fenêtre Options d'ergonomie Personal Firewall Plus 60 s'ouvre.
Index fermeture de fenêtres 16 fermeture de programmes 16 renommer des fichiers et des dossiers 16 sélection d'éléments adjacents dans une liste 16 sélection d'éléments dans une liste 16 suppression de fichiers et de dossiers 16 recherche dans Centre d'aide et de support 3 de fichiers et dossiers 12, 13 reconnaissance vocale 80 récupération de fichiers et de dossiers 11 renommer des fichiers et des dossiers 16 réseau Bluetooth 55 Ethernet câblé 44 Ethernet sans fil 47 test 53 utilisation 54 réseau Bluetoo
8512164 - MAN GW CA DT USR GDE V R1 02/07