
Installation Instructions

Rotate
2
1
5
AAA
2
2
3
AAA
AAA
AAA
AAA
B
B
4
1
3
AAA
B
B
C
C
WARNING
• Disconnect power at the source prior to beginning installation or servicing product.
cord or wires to contact any surface having a sharp edge. To do so may damage or cut the wire insulation,
which could cause serious injury or death from electric shock.
• String light sockets must be suspended so that lamps are facing downwards. DO NOT mount the light string
with sockets facing upward. Lamps should hang freely with at least 3 inches of space from nearest object.
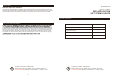
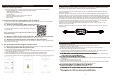
INSTALLATION INSTRUCTIONS
1. Carefully remove all the parts
from the packaging, and gently
lay them out on a smooth
workspace. Remove the packing
material and uncoil the string light
(A). Be careful not to cut or nick
the string nor damage the pre-
attached lamps.
2. Ensure all 12 of the pre-attached
of the string light’s (A) sockets
by gently turning each lamp (C)
clockwise. Do not over-turn.
3. Connect the 12V plug-in power
supply with adaptor (B) to the light
string (A) by pushing the male and
female end connections together
,
then tightening the screw-on
connection cover
.
4.
Securely attach string light (A)
to a support structure using
the eyelet holes at the top
of each suspended socket
and appropriate supporting
hardware (eyebolts, brackets,
etc. not included).
5. Plug-in power supply
with adapter (B) to an
appropriate power outlet.
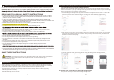
1. Ensure that all string lights (A)
are unplugged before adding
additional string light (A)
segments to the series.
2. Remove the end cap from the
last string light (A) in the series
by unscrewing the plastic end
cap.
3. Connect two string lights
together by pushing the male
and female end connections
together, then tightening the
screw-on connection cover.
Ensure the new last string in
the series still has its end cap
attached.
EXTENDING THE SERIES
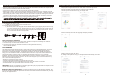
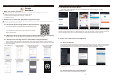
13. This step is the voice control tutorial, click “FINISH SET UP”. Then the speaker that have been
connected successfully will display in the “Home” page.
9
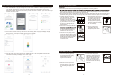
11. Click “VIEW MORE” to pop up a dialog box, and then click “I AGREE” to allow Google Home to get
your calendar, flight itinerary, and more to provide personalized customization. Then set your
geographic location, select the music service you need, and click on “NEXT”. If you don’t need it, you
can click “Not Now” to skip.
12. Then comes a review of what you have done. After clicking “Next” the page will display “Google
Home is ready”. At this point, Google Home’s setup is com
plete.
Quick Guide of Using Google Home to Control Smart Devices