
User's Manual

GKS RECEIVER INSTALLATION FOR CARTMANAGER
Remove the main leads to battery positive, negative and negative
from the first battery before you start working for this installation.
Reconnect the wiring harness connector install the covers and then main battery
leads.
Tools Required
Phillip screwdriver
¾” Drill bit and a Drill
Small flat screwdriver
7/8” socket wrench with extension
A small adjustable wrench to tighten antenna
Parts:
Receiver
Remote
Pushbutton Switch and wires
Antenna and grommet
Antenna cable
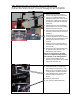
• Install the receiver in the neck. Open
the receive box cover
• Insert the antenna cables (E7003)
and the wires to the old receiver box
along with the 2 wires for the switch
thru cord grips.
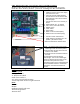
• Connect the wires to the receiver pc
board
1) GND IN: Black for (- in old box)
2) VCC : Red (+ from old receiver)
3) Rabbit: Green
4) turtle: Yellow
5) Horn: Brown
6) Blank : from new switch (Blue)
7) GND IN: from new switch (Gray)
• Connect remote antenna here
• All dip switches should be set to off
position (all switches down)
• Connect announce antenna here
1)Drill Ø.75 (19mm) hole for the remote
switch right under the remote pocket.
2) Connect Blue and gray wires from the
receiver to the switch.
3) Install the remote association switch in
the hole.
To associate the Remote with the
cartmanager. Turn on the cartmanager.
Press red and then green button on the
remote and then press the remote
association switch on the cartmanager the
remote led blinks 3 times to confirm the
association. Test with horn button on
remote.