
Installation Guide


5
Product Overview:
NOTE: For plain at rails use an internal post
top. For decorative rails use a rail plug.
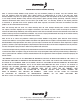
1.) Assemble the center portion by insetting
the vertical boards into the bottom of the
horizontal rail. For decorative top rail gates,
there are two 4-1/2 in. boards (One missing
a tongue and one missing a groove) which
should be placed on the outer edges of the
gate. Add left and right U-channels on either
side. Snap the top rail horizontal rail on the
vertical uprights.
2.) Install the center portion into the gate uprights.
Snip off excess material on the upright for
decorative rail installation
(Figure 1).
For at
rails the space should be at the top of the
upright.
3.) Next, adhere the internal post top or
decorative rail plug with glue.
(Figure 2)
4.) Make sure the gate is square
(Figure 3)
and
mark screw position in each of four corners.
Make sure the screw placement allows for
connection of the rail to the upright.
(Figure 4)
5.) Secure the rails to the uprights using #2
square drive bit with supplied screws (20) for
the at rails or #10 x 3/4 in. screws (40) for
the decorative rail. Repeat in each of the four
corners on the front side of the gate and for
the decorative rail on the opposite side of the
gate (eight corners).
6.) Mount the gate according to the instructions
on the hinge.
NOTE: Not All fences, gates, or gate hardware
are pool code approved.
Figure 3
Figure 4a
Figure 4b
Figure 1
90º
Square
Internal
Post Top
Route
Hole
Rail Plug
Rail
Glue
Space
Figure 2a
Figure 2b
For gates with
decorative top rails
For gates with
decorative top rails
For gates with
plain at top rails
For gates with
plain at top rails
For gates with
decorative top rails