Operating Instructions Multi - Cook Art.-No.
Carefully read all provided instructions before you start running the appliance and pay regard to the warnings mentioned in these instructions. Table of Contents Knowing Your Multi - Cook.............................................................39 Important Safeguards......................................................................41 Important Safeguards for Electrical Appliances................................42 High Temperatures – Risk of Burns.................................................
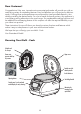
Dear Customer! Congratulations! Your new, innovative micro-computerized cooker will provide you with an astonishing variety of outstanding features. Easy and effortless you will conjure up delicious meals. Cooking times and temperatures are monitored by timer-controlled electronic, thus reliably providing the desired results. For a lot of meals and small portions, this appliance is a real energy-saving alternative to the usual range.
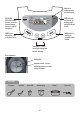
Indicators for cooking operation and warm-keeping KEEP WARM/ OFF button with two functions - to activate the warm-keeping function or switch off the appliance KEEP WARM OFF Rice Bake (preset) Baby Food START Yoghurt (preset) Steam cook Soup (preset) (preset) PRESET button with indicator - calls up the timer function START button with two functions - for switching on and starting the selected function MENU button - for selecting the requested cooking function Timer buttons „+“ and „–“ for se
Important Safeguards Carefully read all instructions before operating this appliance and save for further reference. Do not attempt to use this appliance for any other than the intended use described in these instructions. Any other use, especially misuse, can cause severe injuries or damage by electric shock, heat or fire. Any operation, repair and technical maintenance of the appliance or any part of it other than described in these instructions may only be performed at an authorised service centre.
• Do not leave any cooking utensils or other foreign objects in the pot of the appliance during operation. Do not use any hard, sharp or edged objects (e.g. knives, forks) with the appliance. Only use wooden or heat-resistant plastic cooking utensils to stir and serve the food (e.g. supplied soup ladle and rice spoon). Do not use the inner pot for mixing ingredients to avoid excessive wear of the non-stick coating. Do not handle the appliance or any part of it with violence.
• Do not to use any extension cords or multi socket outlets. • Always handle the power cord with care. Always completely unwind the power cord before use. Do not place the appliance on a power cord. Power cords may never be knotted, twisted, pulled, strained or squeezed. Do not let the plug or power cord hang over the edge of the table or counter. The power cord may not touch hot surfaces. Ensure that no one will pull the appliance by the power cord. Take care not to entangle in the power cord.
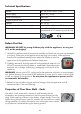
Technical Specifications Model: Art. No. 42525 Multi - Cook Power supply: 230 V AC, 50 Hz Power consumption: 640 Watt Length of power cord: ca. 125 cm Weight: ca. 3.2 kg Dimensions: (width x depth x height) ca. 24.4 cm x 32.4 cm x 20.3 cm Capacity, inner pot: max. 1.8 Litre (corresponds to 5.5 measuring cups of rice) Certification: Before First Use WARNING: DO NOT let young children play with the appliance, or any part of it, or the packaging! 1.
Because of the energy-saving heating system, it takes approx. 20 minutes to bring about 1 litre of water to the boil. The programmed cooking times will not start until the required temperature is reached. WARNING: DO NOT leave the appliance unattended during operation when cooking lathery food, because foam could come out KEEP WARM of the steam vent and overflow the upper cover.
“+” and “–” Use these buttons to adjust the cooking time. Each time you press a button the cooking time will be increased (“+”) or decreased (“–”) in predefined steps, depending on the currently selected function. With the functions “Rice” and “Bake” you cannot adjust the cooking time. With functions marked with “PRESET”, additionally you can adjust the timer via these buttons (See: Adjusting the Timer).
If liquid accumulates under the appliance or overflows the upper cover during operation, immediately switch OFF (KEEP WARM/OFF button), unplug the appliance, and let it cool down. Check, whether you have assembled the appliance correctly, or overfilled the pot. If necessary, take some food out of the pot, and avoid cooking foodstuffs that will violently froth. Dry the appliance and the table thoroughly. If the problem persists, send the complete appliance to an authorized service centre for repair.
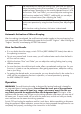
5. Select a suitable function for cooking your food according to the following table.
Cooking Rice WARNING: During operation, steam will come out of the steam vent. Do not hold your hands, arms and face over the appliance during operation. Do not place any objects (e.g. clothes) on the upper cover of the appliance during operation. Beware of hot condensate, steam, and hot food, when opening the upper cover, or when serving hot dishes.
WARNING: When opening the upper cover shortly after operation, condensate and a large amount of steam could come out from under the brim of the upper cover. Thus, keep a sufficient distance to the appliance to avoid scalding. Do not place the hot pot on any heat- or moisture-sensitive surfaces. Do not use any hard or edged objects (e.g. metal spoons) with the appliance to avoid damage to the surfaces, especially the non-stick coating. Always use cooking utensils from heat-resistant plastic or wood (e.g.
10. Press the opening button to open the upper cover of the appliance, and stir, using a plastic or wooden spoon. WARNING: Just cooked food is too hot for feeding a baby. 11. Always let the mush cool down to body temperature before feeding. 12. Clean the appliance after each use. See: Care and Cleaning. Steaming To steam food over water, use the function “Steam cook”. Add an appropriate amount of water to the inner pot.
9. Press the START button to start the selected function. The operation indicator will illuminate continuously. The count-down of the cooking time will not start until the water in the inner pot comes to the boil. At this moment, a beep sounds several times. When the water is boiled down or the cooking time expires, the appliance toggles to warm-keeping mode automatically. The display shows the already elapsed time of warm-keeping.
4. Connect the appliance to the power supply and press the START button to switch on the appliance. 5. Press the MENU button several times until the arrow on the display is pointing to the “Bake” function. Two dashes are shown on the display. 6. Press the START button to enter the reheating process. The operation indicator lights up with two dashes on the display. As soon as the function finished, a beep sounds. 7. Press the KEEP WARM/OFF button to switch OFF the appliance.
3. Ensure that the lid of the pot is inserted properly in the upper cover of the Multi - Cook, (see: Re-assembling the Appliance) and then close the upper cover. A click sounds if the upper cover is closed correctly. 4. Connect the appliance to the power supply and press the START button to switch on the appliance. 5. Press the MENU button several times until the arrow on the display is pointing to the “Bake” function. Two dashes are shown on the display. 6.
2. Ensure that there are no foreign objects in the oven compartment of the cooker and the interior of the oven compartment is clean. Then insert the pot. The pot may not protrude the upper brim of the oven compartment. WARNING: It is essential to ensure that the upper brim of the pot is clean. Otherwise the lid will not seal sufficiently and condensate could run into the oven compartment. 3.
4. Connect the appliance to the power supply and press the START button to switch on the appliance. 5. Press the MENU button several times until the arrow on the display is pointing to the “Soup” function. On the display, the minimum cooking time (30 minutes) is flashing. The flashing of the time display indicates that you can adjust the cooking time via the Timer buttons “+” and “–”. 6.
Adjusting the Timer For operating the functions “Rice”, “Baby Food”, “Steam cook” or “Soup” the timer function (preset) can be used to pre-select the start time of operation. The period of timing lies within 1 to 15 hours. 1. Prepare the appliance for use and connect the appliance to the power supply (See: Preparing the Cooker for Operation). 2. Press the START button to switch on the appliance. 3. Press the MENU button to select the desired function. 4.
Ingredients are crude or over-cooked. Cooked food is burnt or cannot be kept warm automatically. Overflow happens when cooking porridge. It will not boil in the pot within a very long time. The upper cover cannot be closed. Insufficiently adjusted cooking time. Adjust the proper cooking time. Leave the meal in the appliance for some time after cooking or cancel the used function at the right time. Too large amounts of food/ water. Decrease the used quantities. The heating plate is deformed.
You cannot adjust the Timer (PRESET). The lid is not inserted properly. Insert the lid with the seal facing towards the oven compartment. The functions “Bake” and “Yoghurt” cannot be operated via the PRESET timer. Select an appropriate function. Liquid is accumulating below The pot is overfilled. the appliance Take out an appropriate amount of food. Froth or liquid is coming out of the steam vent. The pot is overfilled. Take out an appropriate amount of food. The steam vent is blocked.
4. Press the white button at the underside of the steam vent and fold the two halves of the steam vent apart. 5. Remove the lid of the inner pot from the upper cover of the appliance. To do so, press the two white buttons above the hinge to release the lid of the inner pot from the upper cover of the appliance. Then pull out the lid. CAUTION: At the lid of the pot and at both parts of the steam vent seals are mounted. Ensure not to damage the seals.
2. Moisten a clean cloth or soft sponge with a little warm dishwater and carefully wipe the exterior of the appliance, the upper cover, the oven compartment, and the power cord. Stubborn residues on the other surfaces can be removed better by moistening with some warm dish-water. Baked-on residues on the heating plate in the oven compartment can be removed using a scouring pad or, if necessary, some fine sandpaper. 3. Thereafter wipe all surfaces with a clean moistened cloth.
3. Place the power cord and the measuring cup in the steamer. 4. Then place the pot in the oven compartment and carefully close the upper cover. 5. To move the appliance, grasp the handle. Place the appliance on a suitable surface where it can not fall, and is out of reach of young children. Notes for disposal Dispose of the appliance and packaging must be effected in accordance with the corresponding local regulations and requirements for electrical appliances and packaging.
Thick Pancake Ingredients 3 eggs 100 g caster sugar 100 g cake flour 50 g butter 20 ml milk The proportion of ingredients can be adjusted according to individual tastes. If too much ingredients are used, the cake effect may the affected and even the cake may be half cooked. However, you can add flavours to taste (e.g. vanilla, rum or almond oil). Preparation 1. Combine sugar and eggs in a mixing bowl and beat the mixture until it is frothy and the sugar is dissolved completely. 2.
Cheese Pasta Gratin Ingredients 100 g dried pasta 1 teaspoon salt 150 g carrots 200 g broccoli 200 g courgette (zucchini) 1 small parsnip 2 slices of Gauda (50 to 80 g) 2 teaspoons of instant broth 50 ml sweet cream 50 ml milk 1/2 teaspoon of pepper 1 pinch grounded nutmeg 1 teaspoon chopped parsley Preparation 1. Cook the pasta. Thereafter let the pasta cool down. 2. Cut carrots and courgette to slices, and the parsnip in small cubes. Cut broccoli to florets. 3.
Preparation 1. Separate the eggs and beat the egg white. Combine yolks and sugar and beat it until it is frothy. 2. Combine flour and baking powder and add it to the mixture of yolk and sugar. Melt marge in warm water bath and then add it to the cake mixture. Add vanilla flavour and a small pinch of salt. Mix thoroughly until there are no more lumps. Fold in the egg white. 3. Grease the pot of the multi-functional cooker and spread some samolina in to evenly cover the interior of the pot. 4.
6. Cover with the remaining rice pudding and bake in the multi-functional cooker using the function “Bake”. 7. Serve hot with vanilla sauce. Comments: This sweet dish is delicious with a lot of other fruits (without raisin mixture) as well. For instance, try cherries, bananas, peaches, strawberries, raspberries, and blackberries. Index |A| abroad operation..................................42 accessories...............................40, 41, 60 assemble..............................................
GASTROBACK GmbH Gewerbestraße 20 . D-21279 Hollenstedt / Germany Telefon +49 (0)41 65/22 25-0 . Telefax +49 (0)41 65/22 25-29 info@gastroback.de . www.gastroback.